VERA Benchmark
Benchmarking VERA
This document presents a benchmarking analysis, comparing the performance of the Ververica Cloud: Managed Service platform against Apache Flink deployed on an Amazon EMR cluster. Additionally, it provides detailed guidelines on configuring the testing environment and executing performance evaluations.
Ververica has selected the Nexmark suite as the benchmarking tool of choice. This well-regarded benchmark, derived from the Google Cloud Dataflow benchmark suite, is specifically tailored for assessing the capabilities of streaming platforms. It encompasses a series of queries that simulate the demands of genuine streaming workloads, offering a robust framework for our comparative study.
Prerequisites
Before you begin, ensure you have the following prerequisites ready and available:
-
Essential Tools:
tar: A utility for archiving files, necessary for unpacking and installing software components.
-
Unix/Linux Proficiency:
- A basic understanding of Unix/Linux shell commands is crucial. This will enable you to navigate the system, manage files, and execute scripts within the Unix/Linux environment.
Nexmark setup
Before you can run benchmarks, you'll need to prepare the Nexmark JAR file for use as a custom connector on both Ververica Cloud: Managed Service and Amazon EMR clusters.
Download the Nexmark JAR
The first step involves obtaining the latest version of Nexmark. As of the last update of this guide, version 0.2.0 was the most recent. You can download it using the curl command:
curl -L https://github.com/nexmark/nexmark/releases/download/v0.2.0/nexmark-flink.tgz --output ~/Downloads/nexmark-flink.tgz
You can also download the latest release version of Nexmark from the Nexmark releases page.
Extract the JAR file
After downloading the tarball, proceed to extract its contents with the following commands:
cd ~/Downloads/
tar -xvzf nexmark-flink.tgz
Verify the JAR file
Ensure that the JAR file has been correctly extracted and is present in the directory:
ls -alh nexmark-flink/lib/nexmark-flink-0.2.0.jar
With the nexmark-flink-0.2.0.jar file prepared, you will use it to create a custom connector that will facilitate the source of streaming queries in your benchmarking activities.
Ververica Cloud: Managed Service setup
Log in or register
- Access the Ververica Cloud: Managed Service portal.
- If you already have an account, proceed to log in.
- If you do not have an account, please register for a new account and then log in.
Create a workspace
- Once logged in, click on the New Workspace button to create a new workspace.
During the free-trial period, you are allowed to create only one workspace which comes with 10 Compute Unit (CU) credits. This allocation is sufficient for running the benchmarks as each Flink job will utilize 9 CUs.
Set Up a Nexmark custom connector
- After your workspace is ready, follow these steps to set up the Nexmark custom connector:
- Click on your workspace.
- In the left-side navigation pane, click on Connectors.
- On the Connectors page, click on Create Connector.
- In the dialog box, click on Click to select and navigate to the Nexmark JAR file at
~/Downloads/nexmark-flink/lib/nexmark-flink-0.2-SNAPSHOT.jarand select it.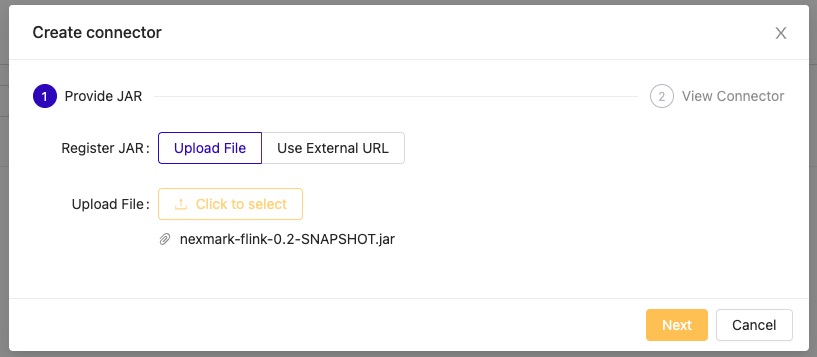
- Click Next.
- Name the connector
nexmark. - Click Finish.
You don't need to configure the Properties here; they will be provided when the connector is called from the Flink SQL job.
For more detailed instructions, refer to the Ververica Cloud custom connectors documentation.
Execute a SQL query
To create and run a Flink SQL query using the Nexmark source:
- Navigate to the SQL Editor page via the left-side navigation pane.
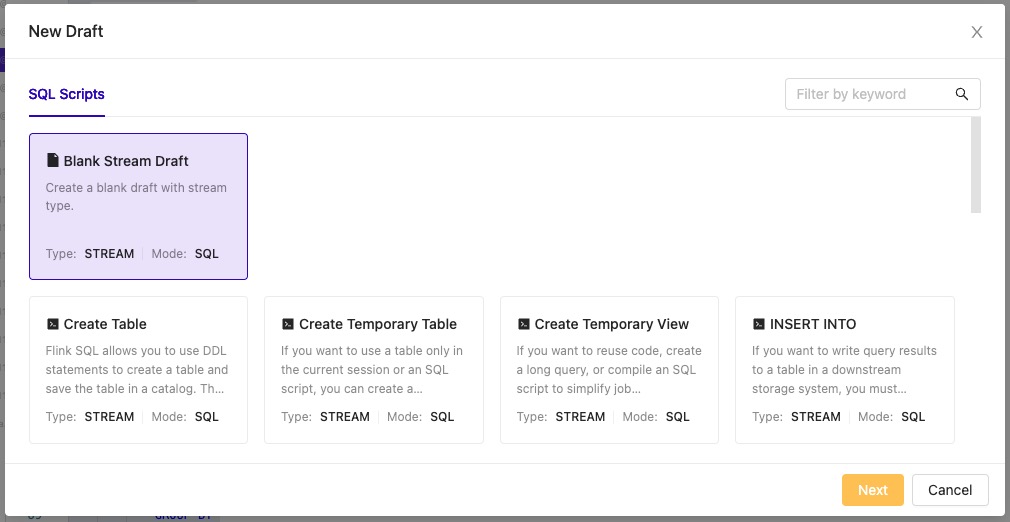
- Click on the New button.
- Select Blank Stream Draft, then click Next.
- Name your draft and click Create.
Initial SQL job
- Begin with the following query. Copy and paste it into the editor:
-- nexmark-q0, Pass Through
-- Measures the monitoring overhead including the source generator.

DROP TEMPORARY TABLE IF EXISTS nexmark_table;

CREATE TEMPORARY TABLE nexmark_table (
    event_type INT,
    person ROW<
        id BIGINT,
        name VARCHAR,
        emailAddress VARCHAR,
        creditCard VARCHAR,
        city VARCHAR,
        state VARCHAR,
        dateTime TIMESTAMP(3),
        extra VARCHAR>,
    auction ROW<
        id BIGINT,
        itemName VARCHAR,
        description VARCHAR,
        initialBid BIGINT,
        reserve BIGINT,
        dateTime TIMESTAMP(3),
        expires TIMESTAMP(3),
        seller BIGINT,
        category BIGINT,
        extra VARCHAR>,
    bid ROW<
        auction BIGINT,
        bidder BIGINT,
        price BIGINT,
        channel VARCHAR,
        url VARCHAR,
        dateTime TIMESTAMP(3),
        extra VARCHAR>,
    dateTime AS CASE
        WHEN event_type = 0 THEN person.dateTime
        WHEN event_type = 1 THEN auction.dateTime
        ELSE bid.dateTime
    END,
    WATERMARK FOR dateTime AS dateTime - INTERVAL '4' SECOND
)
WITH (
    'connector' = 'nexmark',
    'first-event.rate' = '10000000',
    'next-event.rate' = '10000000',
    'events.num' = '100000000',
    'person.proportion' = '2',
    'auction.proportion' = '6',
    'bid.proportion' = '92'
);

DROP TEMPORARY VIEW IF EXISTS bid;

CREATE TEMPORARY VIEW bid AS
    SELECT
        bid.auction,
        bid.bidder,
        bid.price,
        bid.channel,
        bid.url,
        dateTime,
        bid.extra
    FROM
        `default`.nexmark_table
    WHERE
        event_type = 2;

DROP TEMPORARY TABLE IF EXISTS q0_sink;

CREATE TEMPORARY TABLE q0_sink (
    auction  BIGINT,
    bidder   BIGINT,
    price    BIGINT,
    channel  VARCHAR,
    url      VARCHAR,
    dateTime TIMESTAMP(3),
    extra    VARCHAR
)
WITH ('connector' = 'blackhole');

INSERT INTO q0_sink
    SELECT
        auction, bidder, price, channel, url, dateTime, extra
    FROM
        bid;
This initial query is the first in the Nexmark benchmark suite, designed to measure the monitoring overhead of the source generator.
For more queries and their descriptions, explore the Nexmark GitHub repository.
Deployment on Ververica Cloud: Managed Service
To deploy the SQL query:
- Save the query.
- Click on the Deploy button at the top-right corner of the page.
- Confirm deployment in the dialog box.
Set resources��
- Go to the Deployments page via the left-side navigation pane.
- Select the deployed SQL query.
- On the Configuration page, locate the Resources section and click the Edit button.
Update the following properties:
| Property | Value |
|---|---|
| Parallelism | 8 |
| Job Manager CPU | 1 |
| Job Manager Memory | 1Gi |
| Task Manager CPU | 1 |
| Task Manager Memory | 4GiB |
| TaskManager Slots | 1 |
Start the job
- To start the Flink SQL job, click on the Start button at the top of the page.
- Select Initial Mode in the dialog box and click Start.
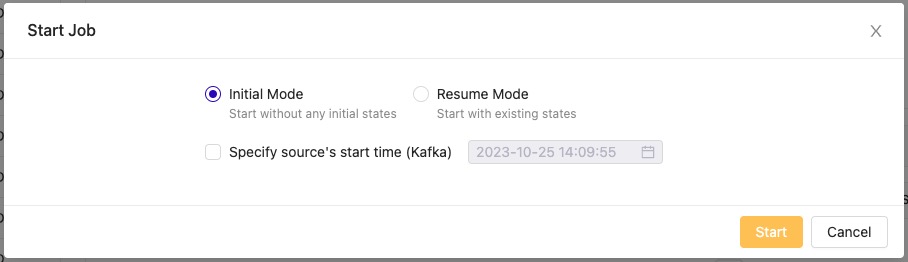
When the job completes, the total duration is visible on the Status page.
Setup on Flink EMR cluster
For benchmarking, replicate the setup with Apache Flink on an AWS EMR cluster:
- Follow the instructions in the AWS Flink on EMR documentation.
- To automate the setup, use the Terraform script available in the flink-emr-terraform repository.
Instance configuration
- Use 8
TaskManagernodes with 1 CPU and 4GB of memory each. - On AWS EMR, opt for 2
m5.xlargeinstances. If you encounter out-of-memory issues, switch to a largerm5.2xlargeinstance type.
Upload Nexmark JAR
-
Securely copy the Nexmark JAR to the EMR main node:
scp -i <USER_PEM_FILE> ~/Downloads/nexmark-flink/lib/nexmark-flink-0.2-SNAPSHOT.jar hadoop@<EMR_MAIN_NODE_ADDRESS>: -
SSH into the EMR main node and move the JAR into the Flink library directory:
sudo cp nexmark-flink-0.2-SNAPSHOT.jar /usr/lib/flink/lib/
sudo chmod 755 /usr/lib/flink/lib/nexmark-flink-0.2-SNAPSHOT.jar
Run queries
There are multiple methods to execute queries on the cluster:
Zeppelin Notebook
- Refer to the Apache Zeppelin documentation for details on using the Flink interpreter.
Flink SQL client
-
Start a Flink YARN session:
flink-yarn-session -d -jm 1024 -tm 4096 -s 2 \
     -D state.backend=rocksdb \
     -D state.checkpoint-storage=filesystem \
     -D state.checkpoints.dir=s3://<FLINK_CHECKPOINTS_BUCKET>/<CHECKPOINTS_FOLDER>/ \
     -D execution.checkpointing.interval=180s \
-D execution.checkpointing.mode=EXACTLY_ONCE -
Submit SQL queries:
/usr/lib/flink/bin/sql-client.sh embedded -f /home/hadoop/q0.sql -j /usr/lib/flink/lib/nexmark-flink-0.2-SNAPSHOT.jar
For more details, visit the Flink YARN documentation and the Flink SQL Client documentation.
Nexmark queries overview
Nexmark features a suite of 23 sophisticated queries that simulate the workload of a dynamic online auction system. These queries are designed to stress-test SQL capabilities, focusing on critical operations such as selection, projection, joins, and complex aggregations.
Excluded queries and future considerations
Currently, queries q10, q13, and q14 are excluded from our benchmark suite. These particular queries are specialized for evaluating the performance of filesystem connectors and the behavior of user-defined functions (UDFs). Additionally, query q6 is not supported by our current system setup due to limitations in processing retractions for the OVER WINDOW operator. For those interested in tracking the progress of this feature, the Apache Flink issue FLINK-19059 provides updates on the support for this operator. Ververica aims to incorporate these queries into future benchmarks as the capabilities of our systems evolve.
Nexmark benchmarking results
Below, you'll find a comparative analysis of the Nexmark query execution times. Our benchmarking was conducted using Ververica Cloud: Managed Service with the vera-0.5.0-flink-1.15 environment and Apache Flink version 1.15.2. The results are presented in seconds, providing a clear picture of the performance landscape across different query types and execution environments.
| Use case | vera-0.5.0-flink-1.15 | Apache Flink 1.15.2 | % Improvement |
|---|---|---|---|
| q4 | 398 seconds | 647 seconds | 38.48% |
| q5 | 408 seconds | 623 seconds | 34.51% |
| q7 | 973 seconds | 1198 seconds | 18.78% |
| q9 | 395 seconds | 1290 seconds | 69.38% |
| q11 | 192 seconds | 332 seconds | 42.17% |
| q15 | 488 seconds | 713 seconds | 31.55% |
| q20 | 317 seconds | 838 seconds | 62.17% |
Conclusion
Comparative results indicate that Ververica Cloud: Managed Service demonstrates superior performance in executing queries, particularly those involving intricate aggregations and joins.
The Ververica Cloud: Managed Service platform provides an intuitive and simplified user experience for running Apache Flink jobs, reducing the complexity associated with setup and ongoing maintenance. This seamless integration and managed service approach make Ververica Cloud: Managed Service an appealing option for organizations seeking to optimize their real-time data processing workflows.