Amazon ElastiCache (Redis)
Amazon ElastiCache is a fully managed in-memory data store and cache service by Amazon Web Services (AWS). It facilitates the process of deploying, operating, and scaling an in-memory cache in the cloud, which optimizes applications by allowing real-time data access with high throughput and low latency. ElastiCache supports two open-source in-memory caching engines: Redis and Memcached. With ElastiCache, developers can focus on application development without worrying about managing the underlying infrastructure. It is designed to maintain high performance, ease of management, and a seamless experience in caching layers, making it a reliable solution for use cases like real-time analytics, gaming, geospatial services, and caching.
Below is an example of configuring the AWS ElastiCache (with Redis) to connect to Ververica Cloud via a private connection.
Prerequisites
You must have an IAM user with the necessary permissions for creating the IAM role and the ElastiCache cluster.
Step 1: Create an ElastiCache cluster
-
Open the AWS Management Console and go the the ElastiCache Dashboard at https://console.aws.amazon.com/elasticache/home
-
In the side bar, click Redis clusters.
-
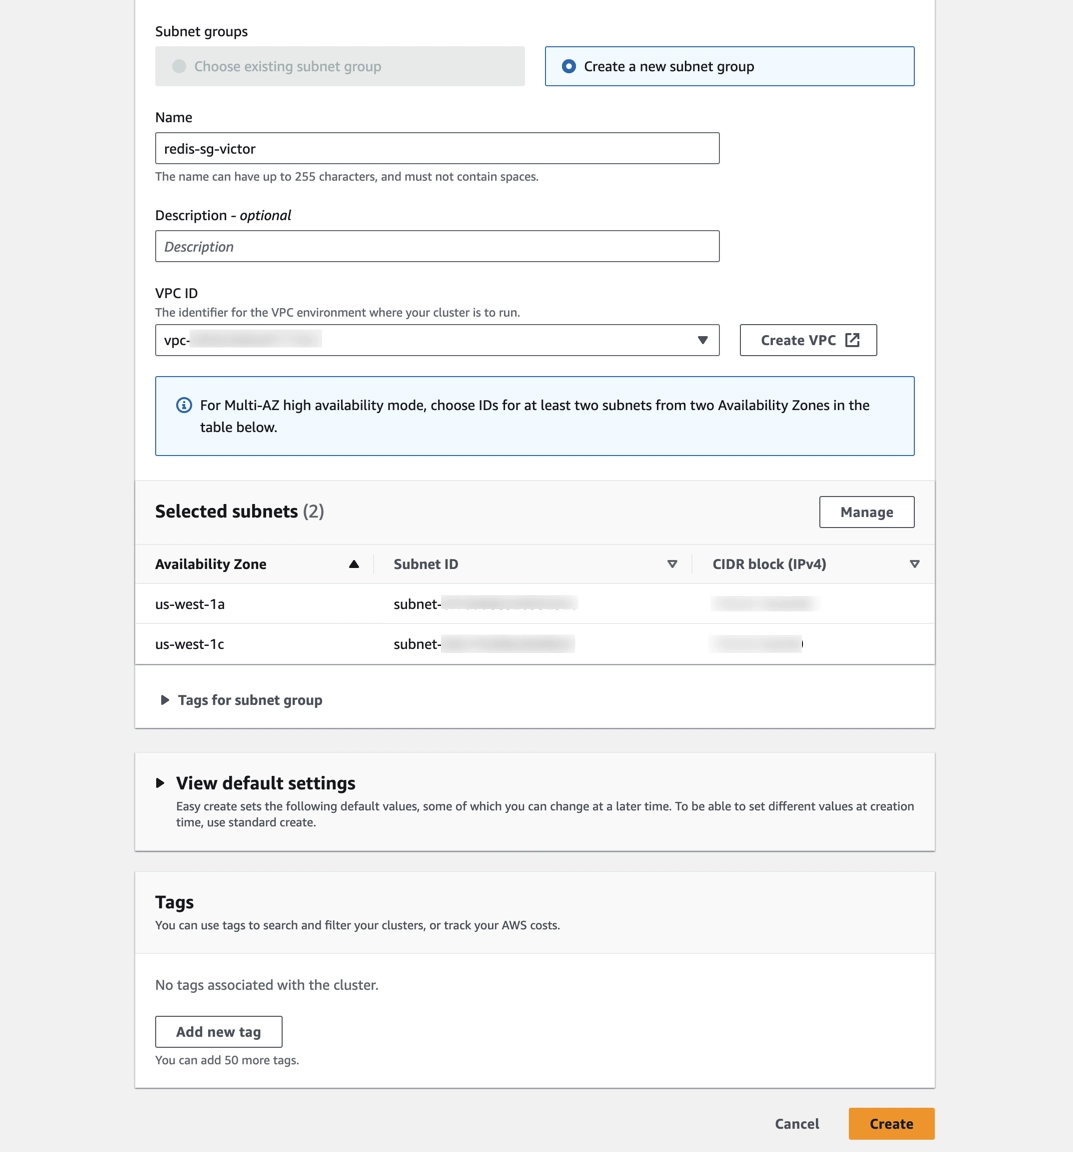
Click Create Redis cluster to create an ElastiCache cluster quickly with Demo configuration and a new subnet.
infoThe ElastiCache cluster creation takes around 15 minutes.

Step 2: Configure network setting for ElastiCache cluster
The inbound rules of ElastiCache-related security groups need to be configured to allow the ElastiCache to be accessed through a private connection.
- Open the AWS Management Console and go to the ElastiCache Dashboard at https://console.aws.amazon.com/elasticache/home
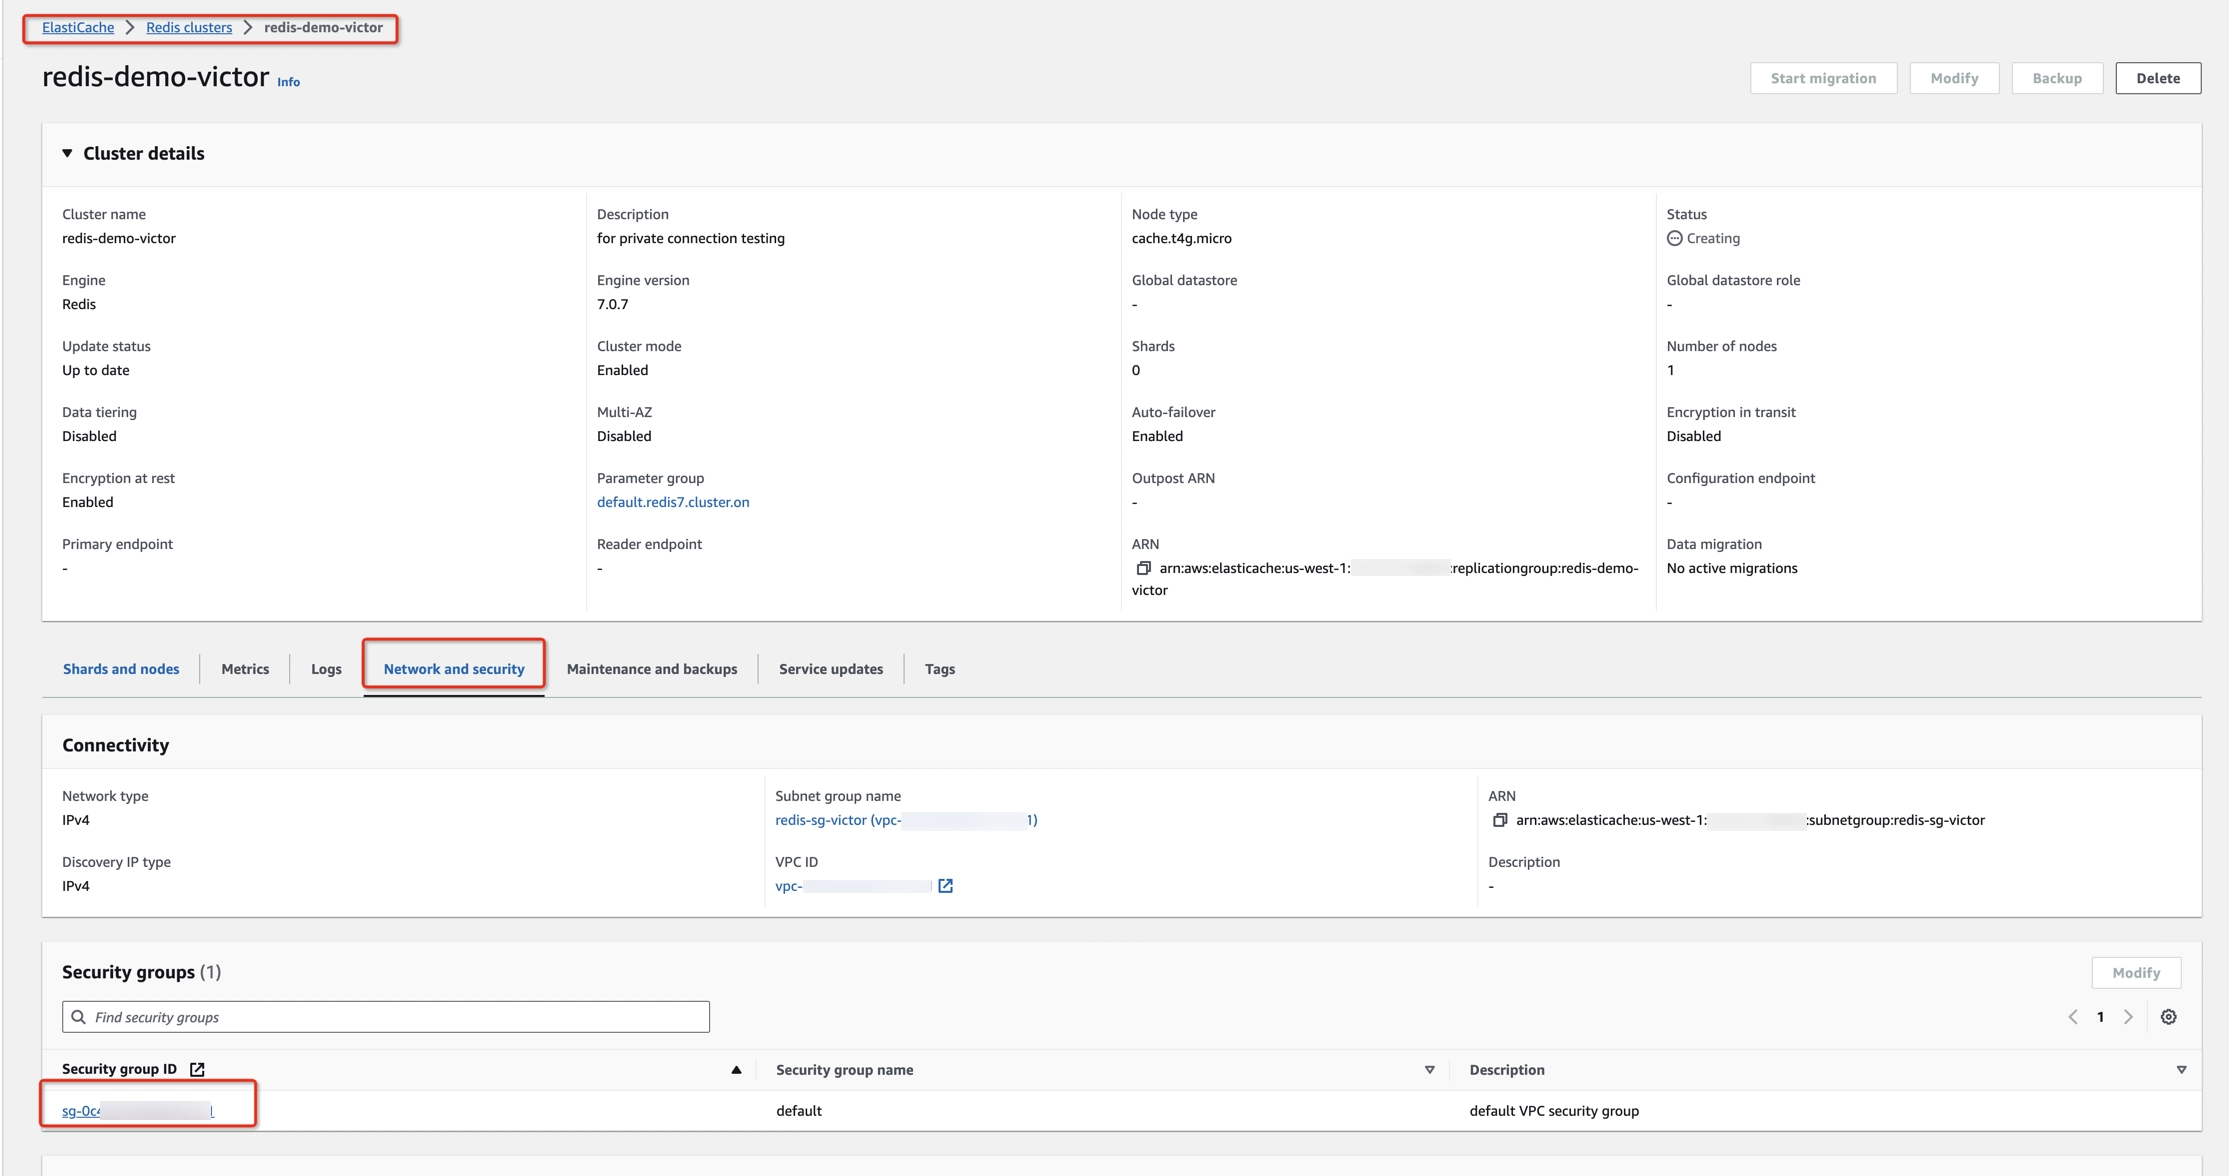
- Navigate to Redis clusters > [Your Redis cluster] > Network and security > Security groups.
- Click on the security group ID.
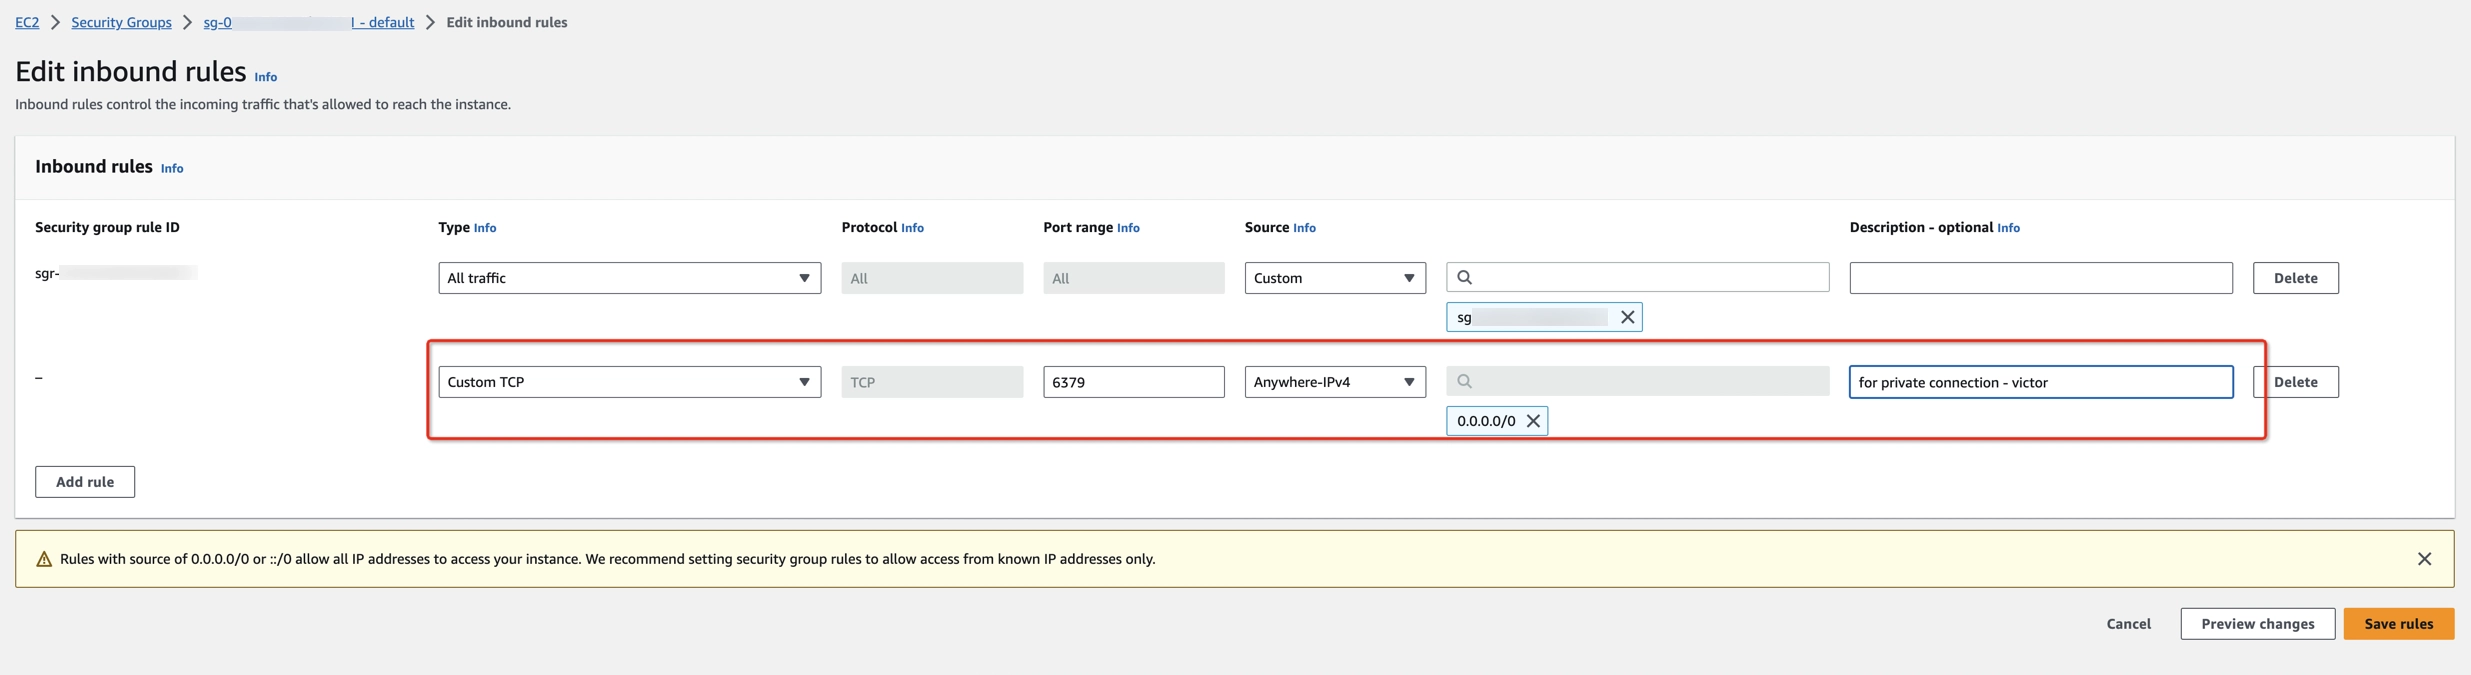
- In the Inbound rules tab, click Edit inbound rules.
- Add a rule with the below protocol, broker’s port, and source:
- Protocol: TCP
- Port range: 6379
- Source: 0.0.0.0/0, which allows all the connections from VVC VPC CIDR
Step 3: Get endpoint and AZ
- Open the AWS Management Console and go to the ElastiCache Dashboard at https://console.aws.amazon.com/elasticache/home
- Navigate to Redis clusters > [Your Redis cluster] -> Shards and nodes.
- Get the endpoint, port, and Availability Zone of each node.
- Get the IP address of the endpoint via ‘ping’ or ‘nslookup’.
ElastiCache ensures that both the DNS name and the IP address of the cache node remain the same when cache nodes are recovered in case of failure.
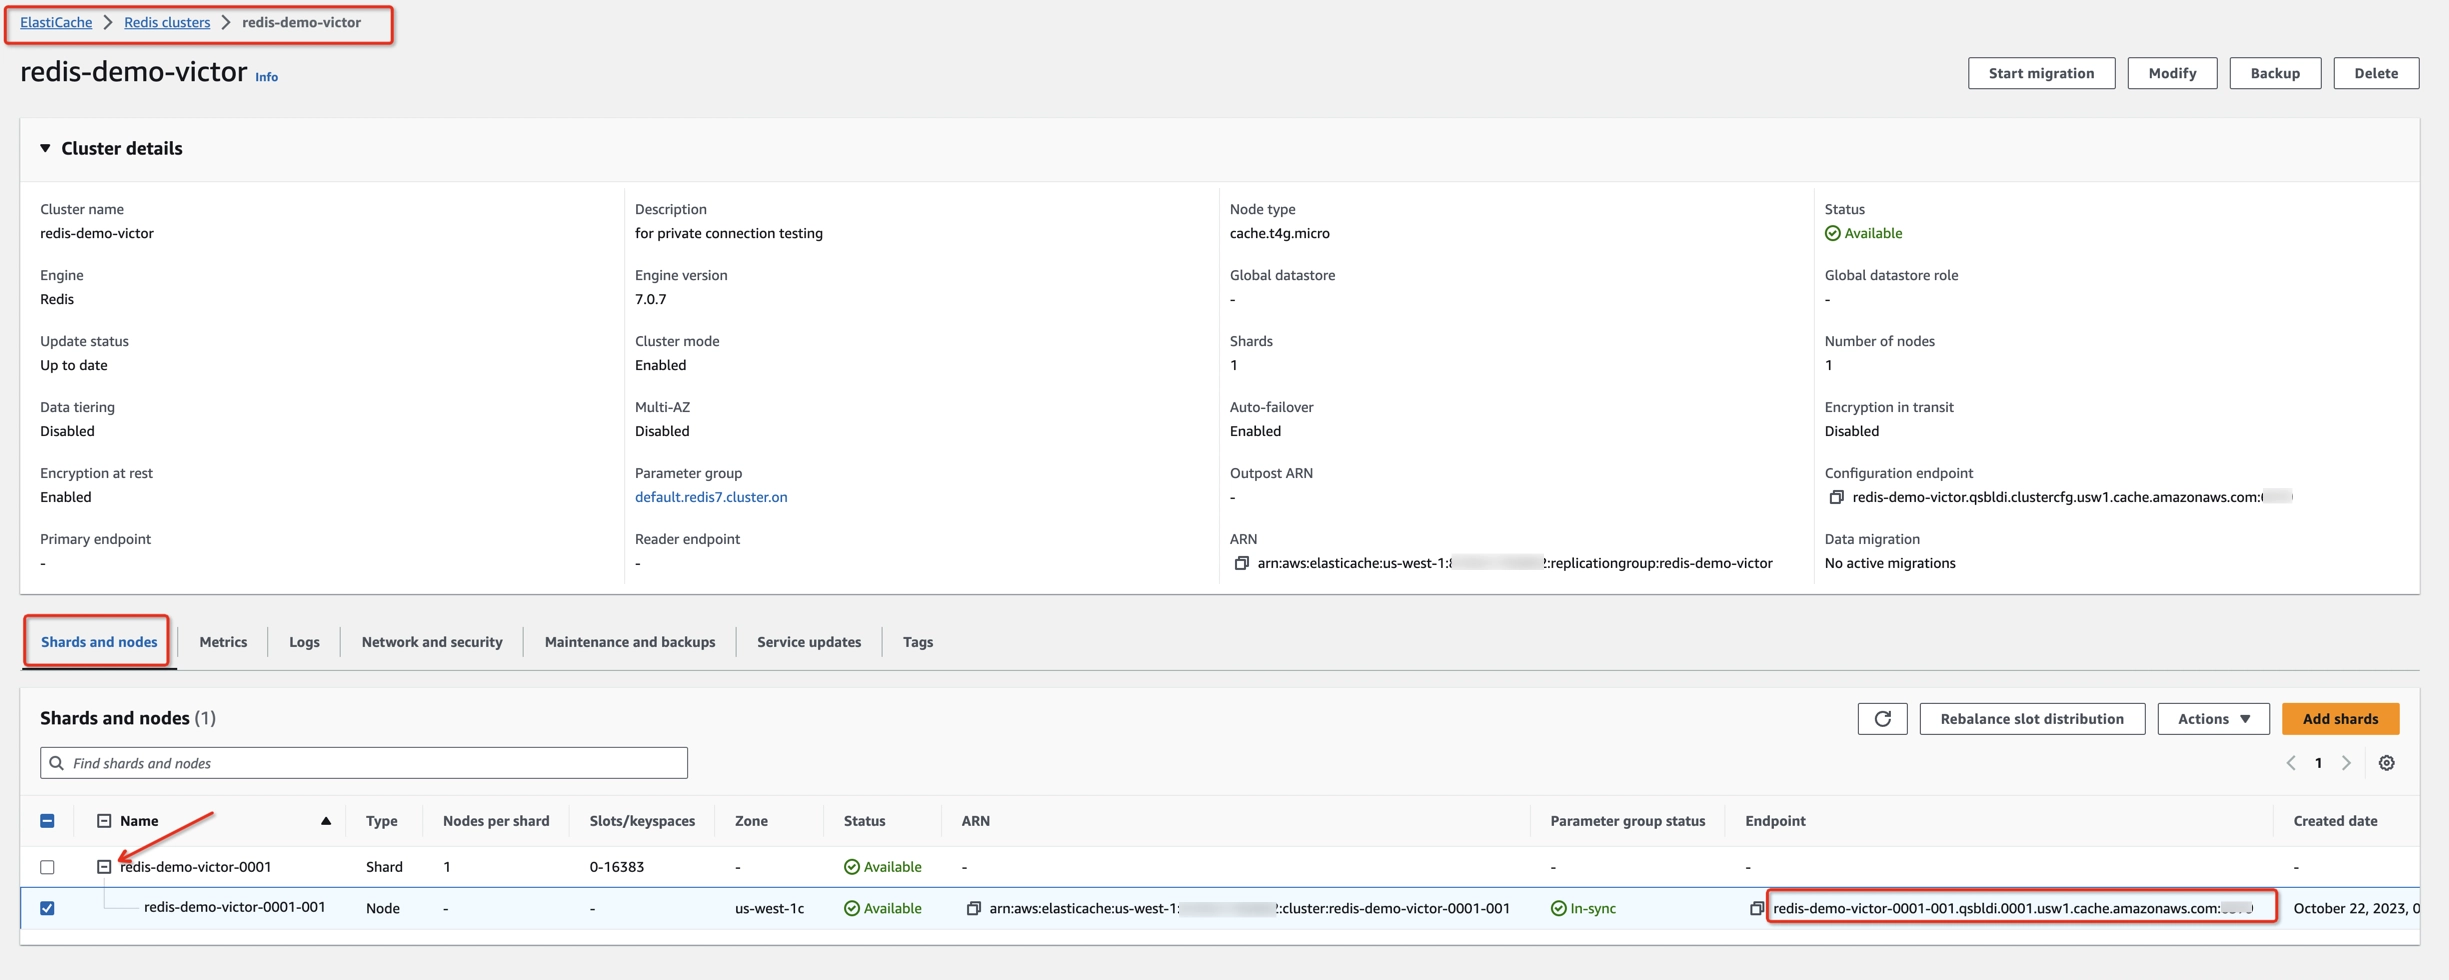
| Node Endpoint | Port | Availability Zone | IP Address |
|---|---|---|---|
| http://redis-demo-victor-0001-001.qsbldi.0001.usw1.cache.amazonaws.com | 6379 | us-west-1c | 172.31.15.132 |
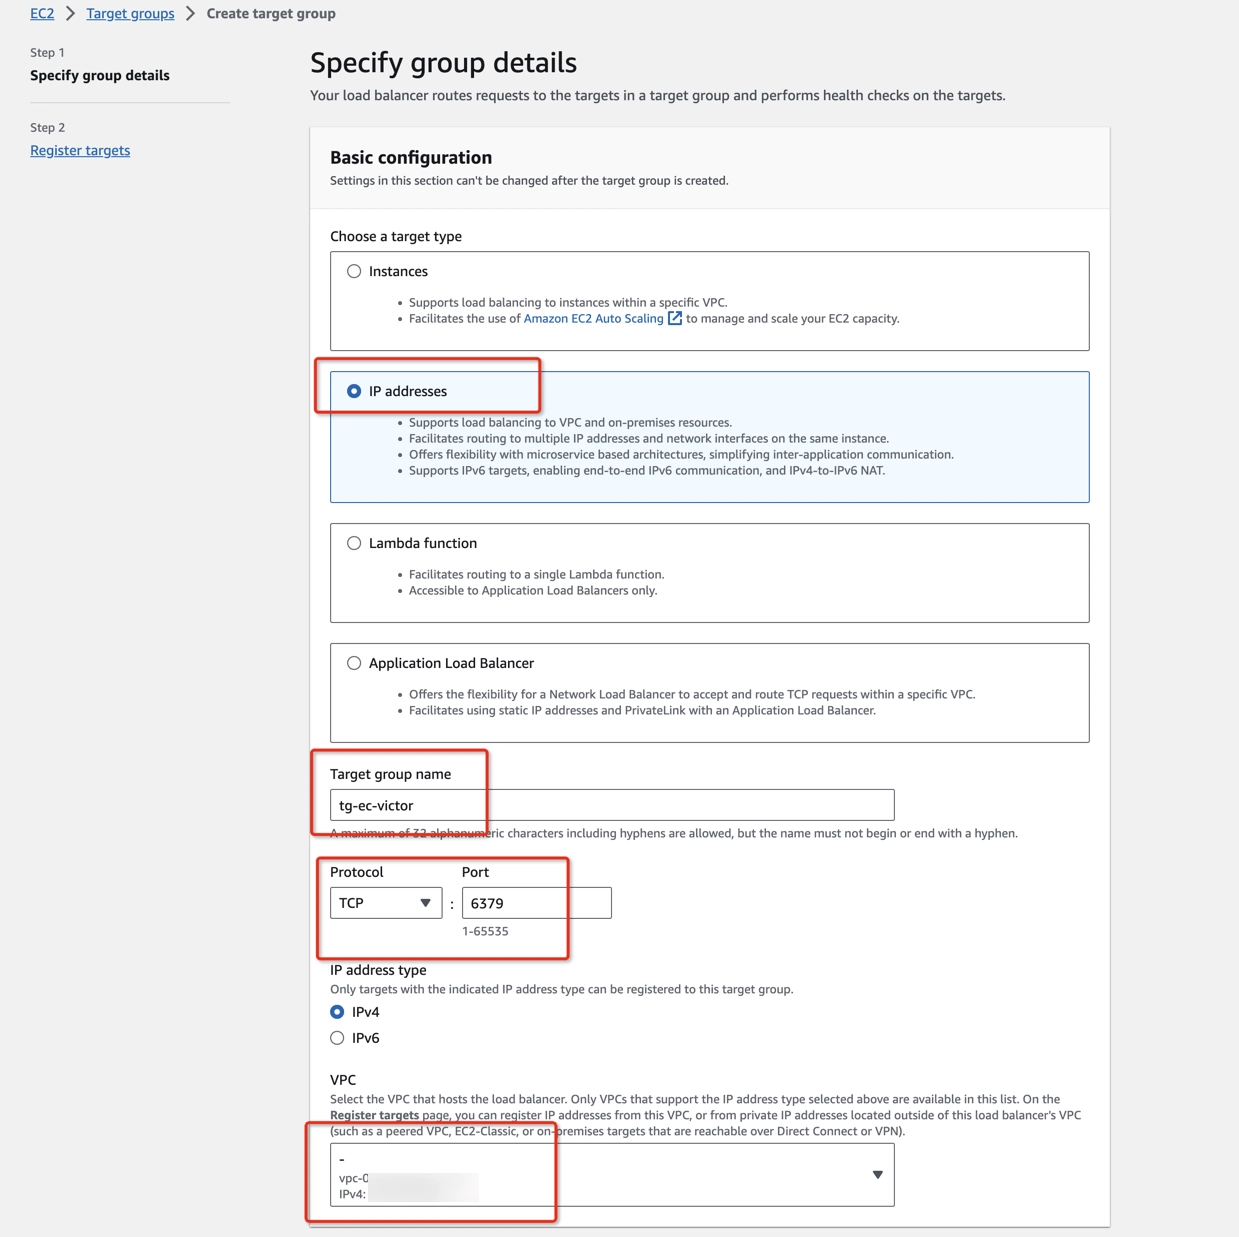
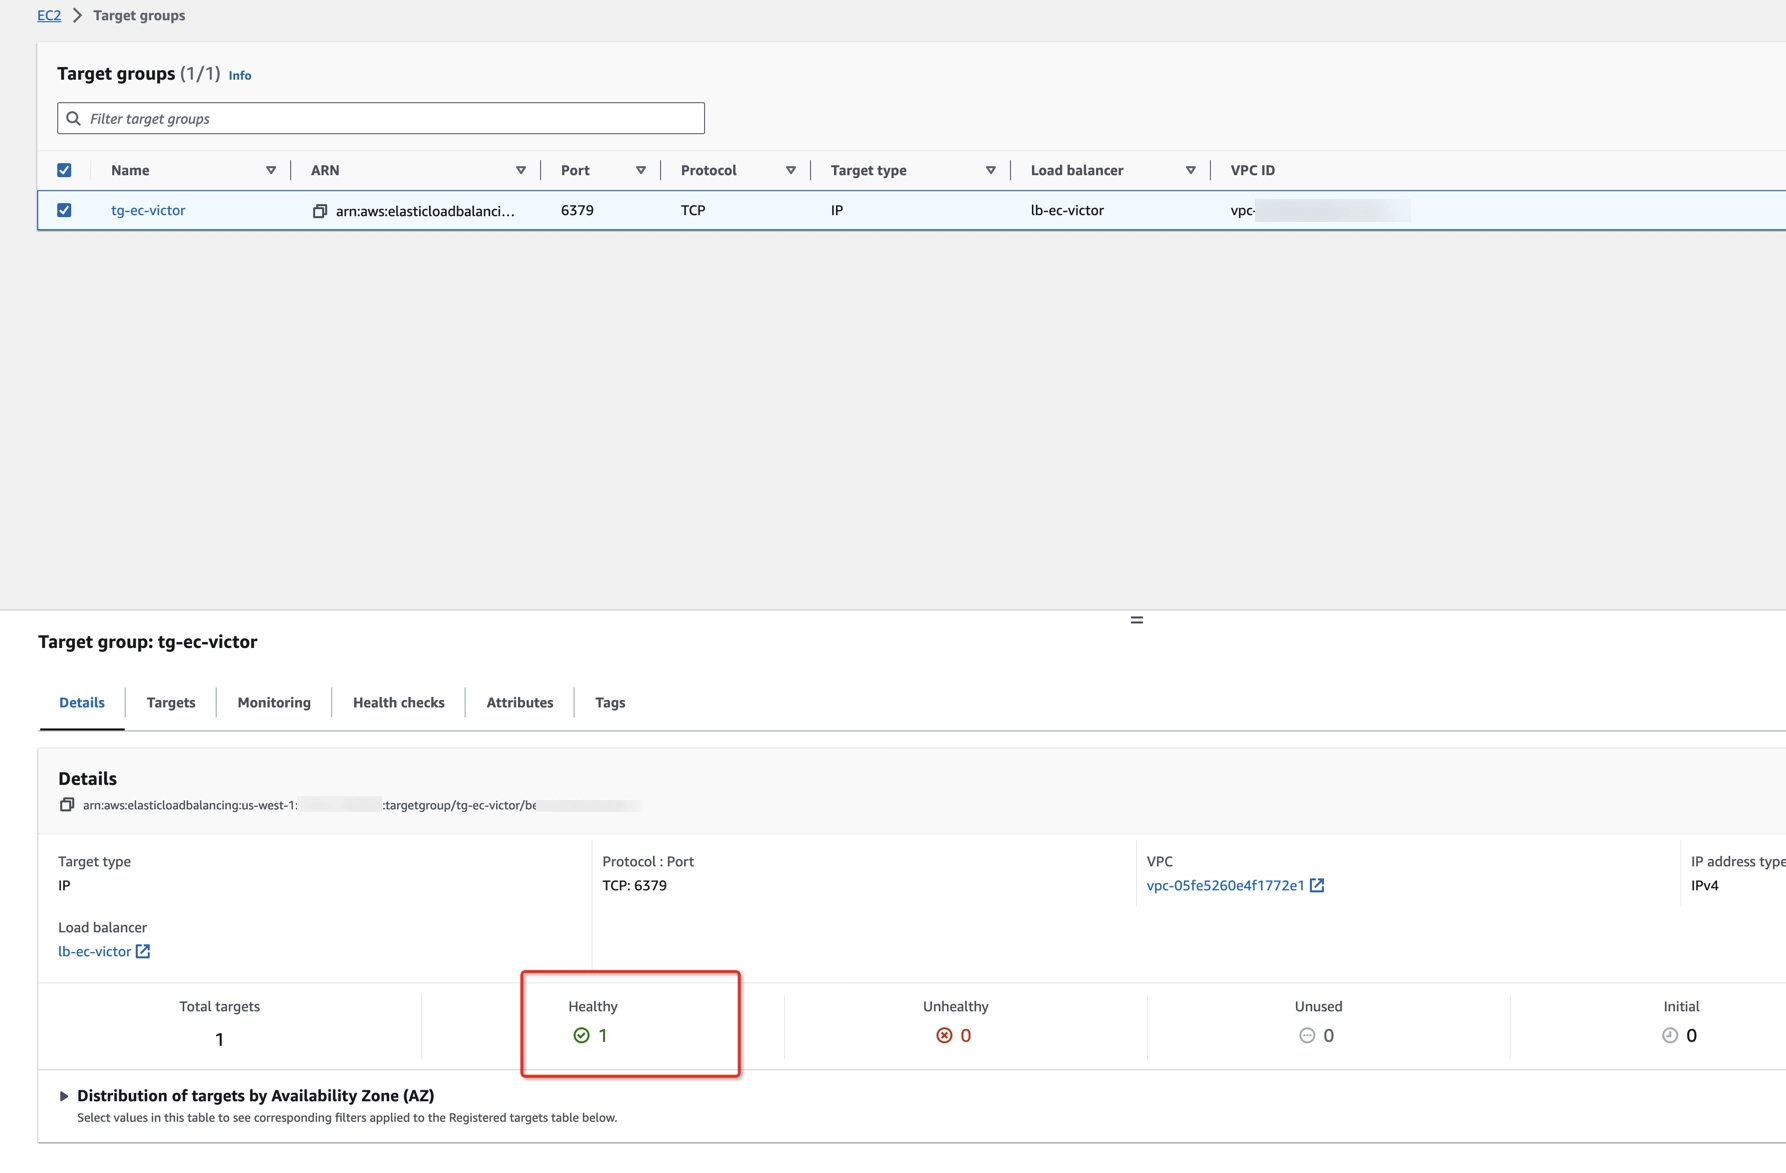
Step 4: Create target group
Create a target group for each Redis node, which will be used for NLB forwarding.
- Open Amazon EC2 Console > Load Balancing > Target Groups (https://console.aws.amazon.com/ec2/home#TargetGroups).
- Click Create target group with the information below:
- Target type: IP addresses
- Protocol: TCP
- Node’s port: 6379
- Same VPC as ElastiCache cluster.
- Add the node’s endpoint IP address to the target list when registering targets via the Include as pending below button.

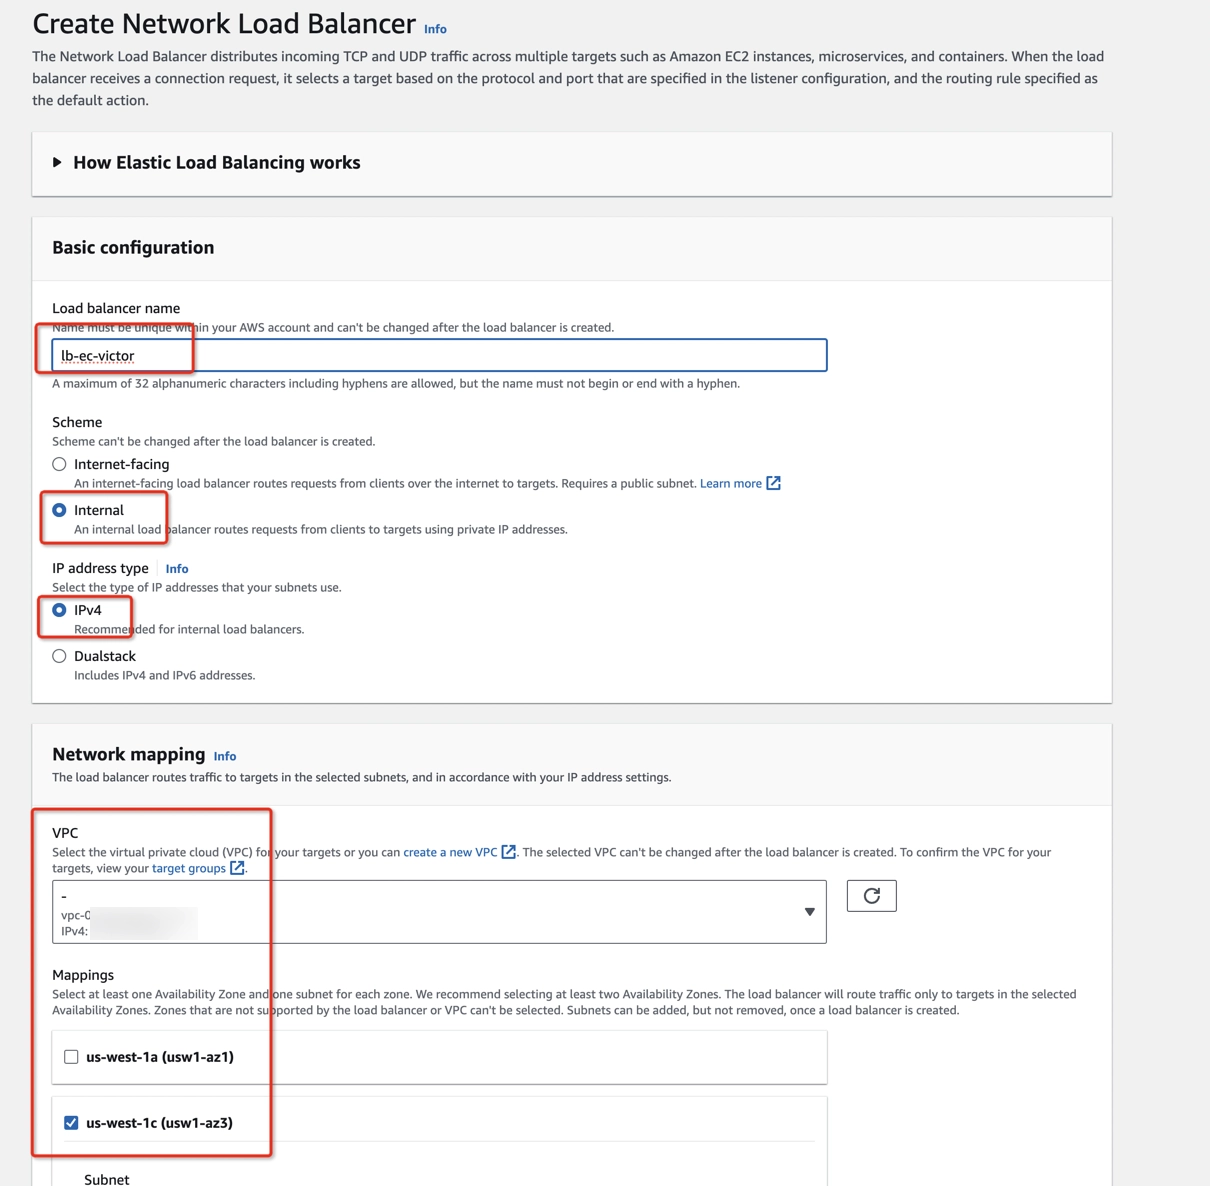
Step 5: Create NLBs
Create a Network Load Balancer (NLB) for each ElastiCache node, which will be targeting the previous target group.
- Open Amazon EC2 console > Load Balancing > Load Balancers (https://console.aws.amazon.com/ec2/home#LoadBalancers).
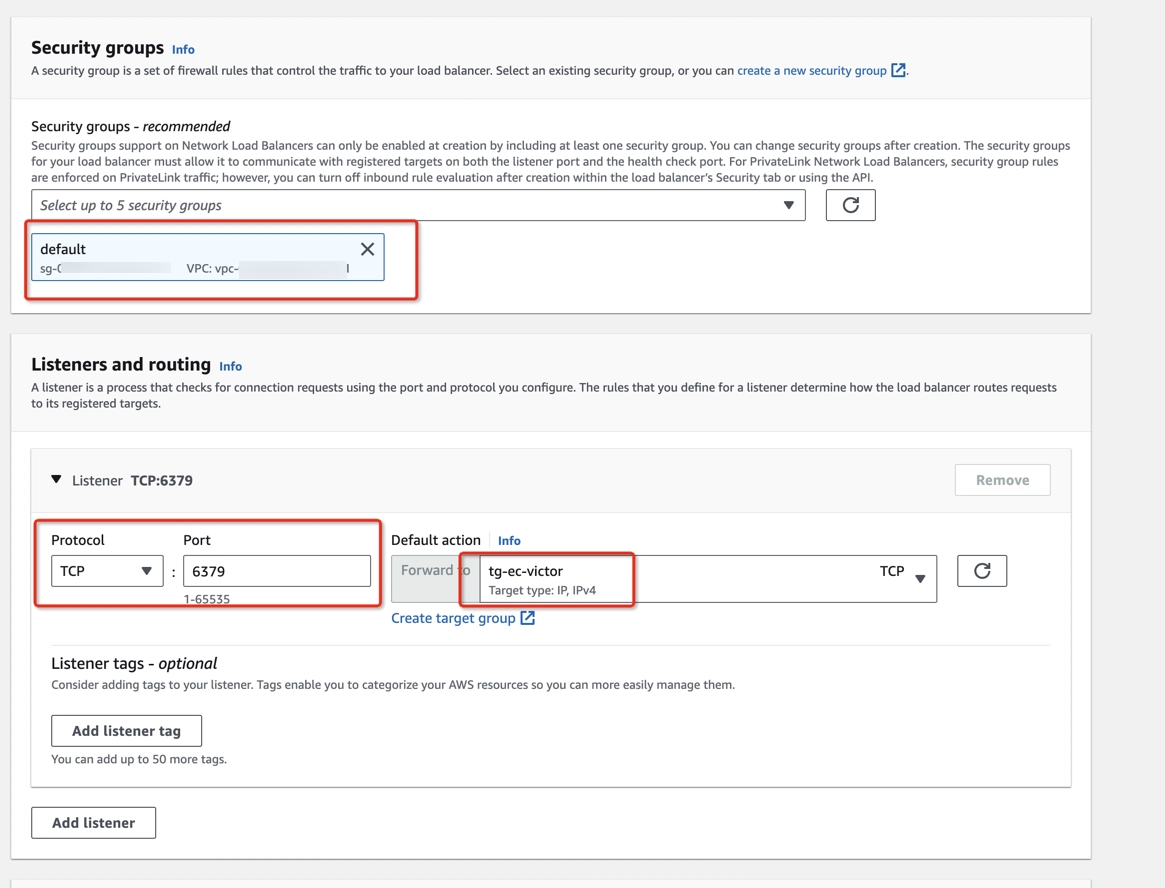
- Create an NLB with Internal scheme, IPv4 IP address type, same VPC as the ElastiCache cluster, mappings to the availability zone where the corresponding node’s subnet is allocated, TCP listener protocol, broker’s port (i.e. 6379).
- Forward to the corresponding target group created in Step 4. Please use the same subnet in which the node is running.
- Check target groups' health status. Don’t go to the next step until the target groups are healthy.
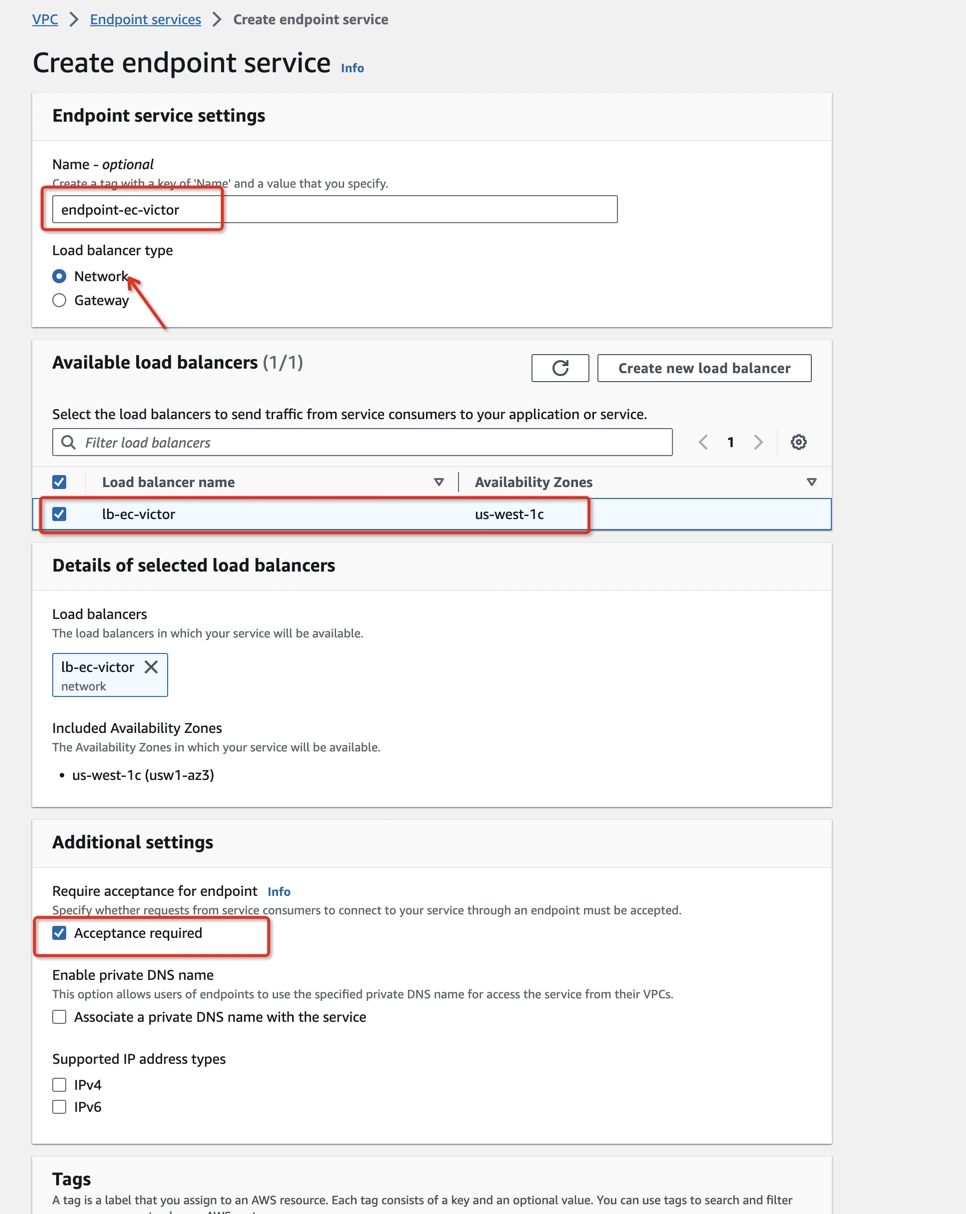
Step 6: Create the endpoint services
Create endpoint services with NLBs created previously, allowing Ververica Cloud principals to connect.
- Open Amazon VPC console > Endpoint services (https://console.aws.amazon.com/vpc/home#EndpointServices).
- Click Create endpoint service to create an endpoint service with Network Load balancer type and check the Acceptance required box in the Additional settings. This is very important to disallow unexpected connections which are not from you.
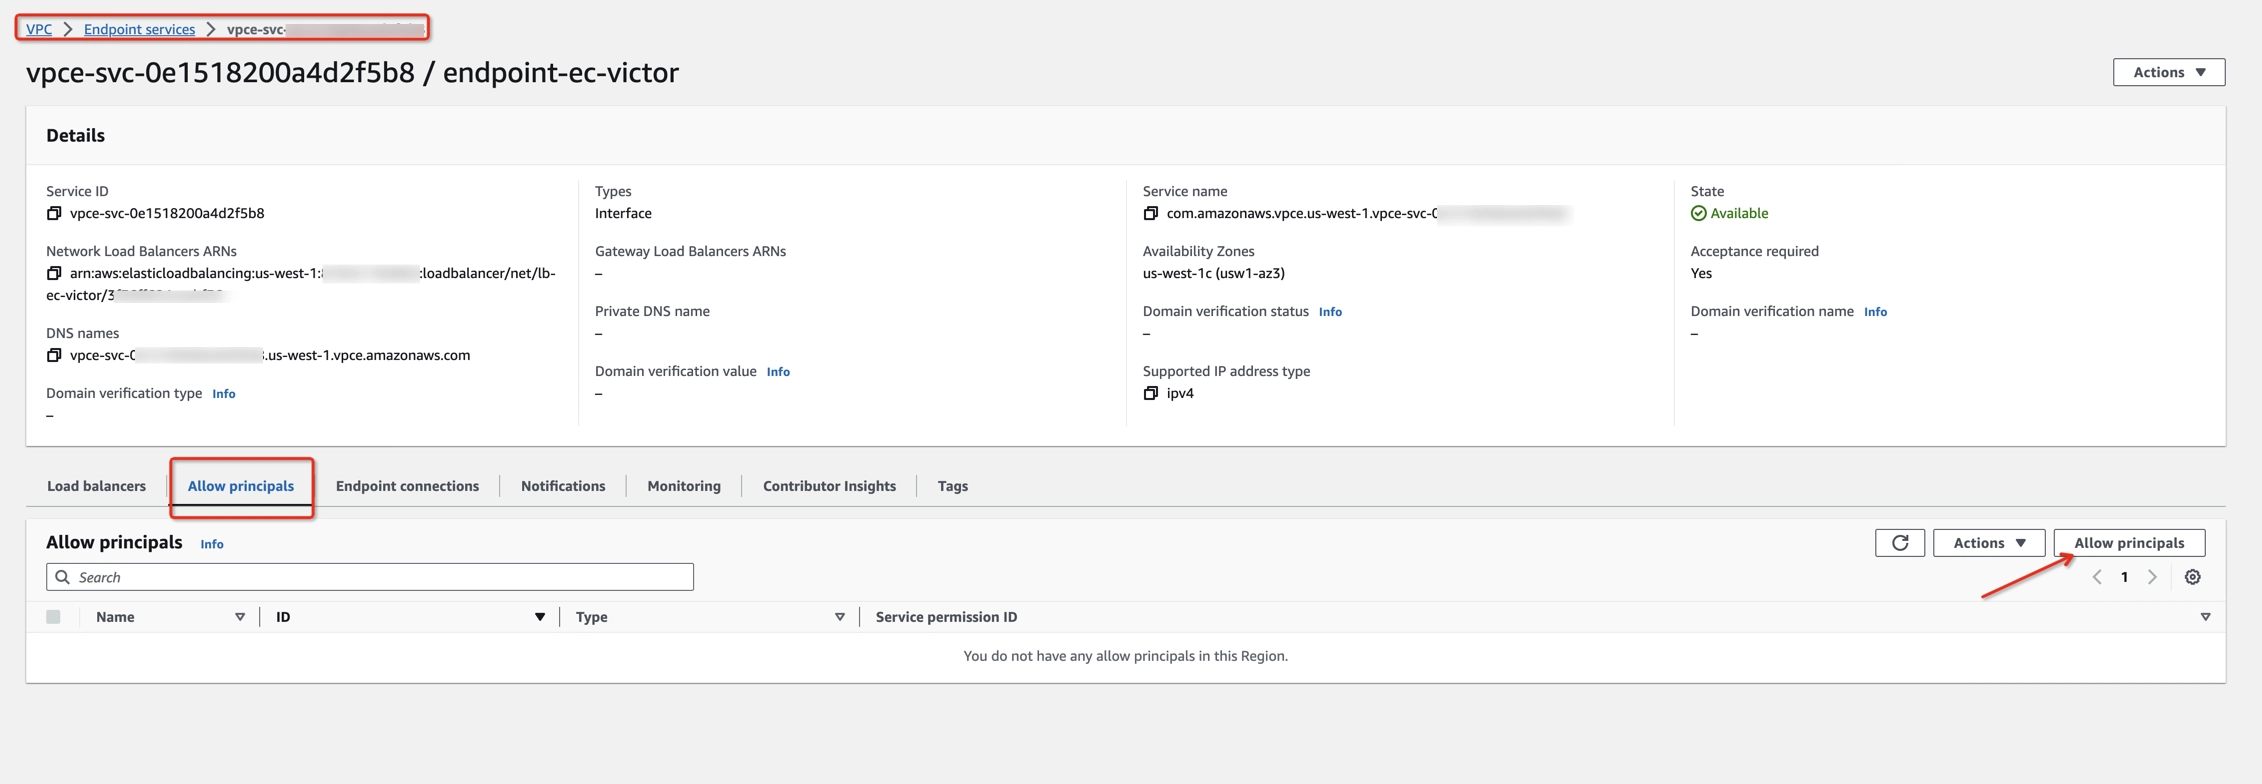
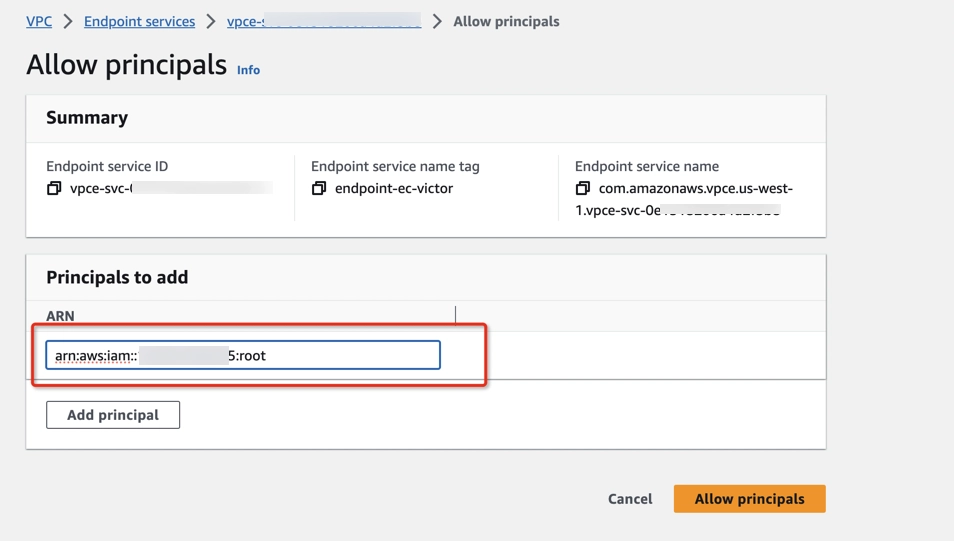
- After the endpoint service creation, go to the Allow principals tab, click Allow principals, and add arn:aws:iam::794031221915:root principals.
- Get the endpoint service name and the corresponding ElastiCache node endpoint (from the ElastiCache Dashboard node details). For example:
Step 7: Create a Private Connection in the Ververica Cloud portal
Configure AWS IAM role
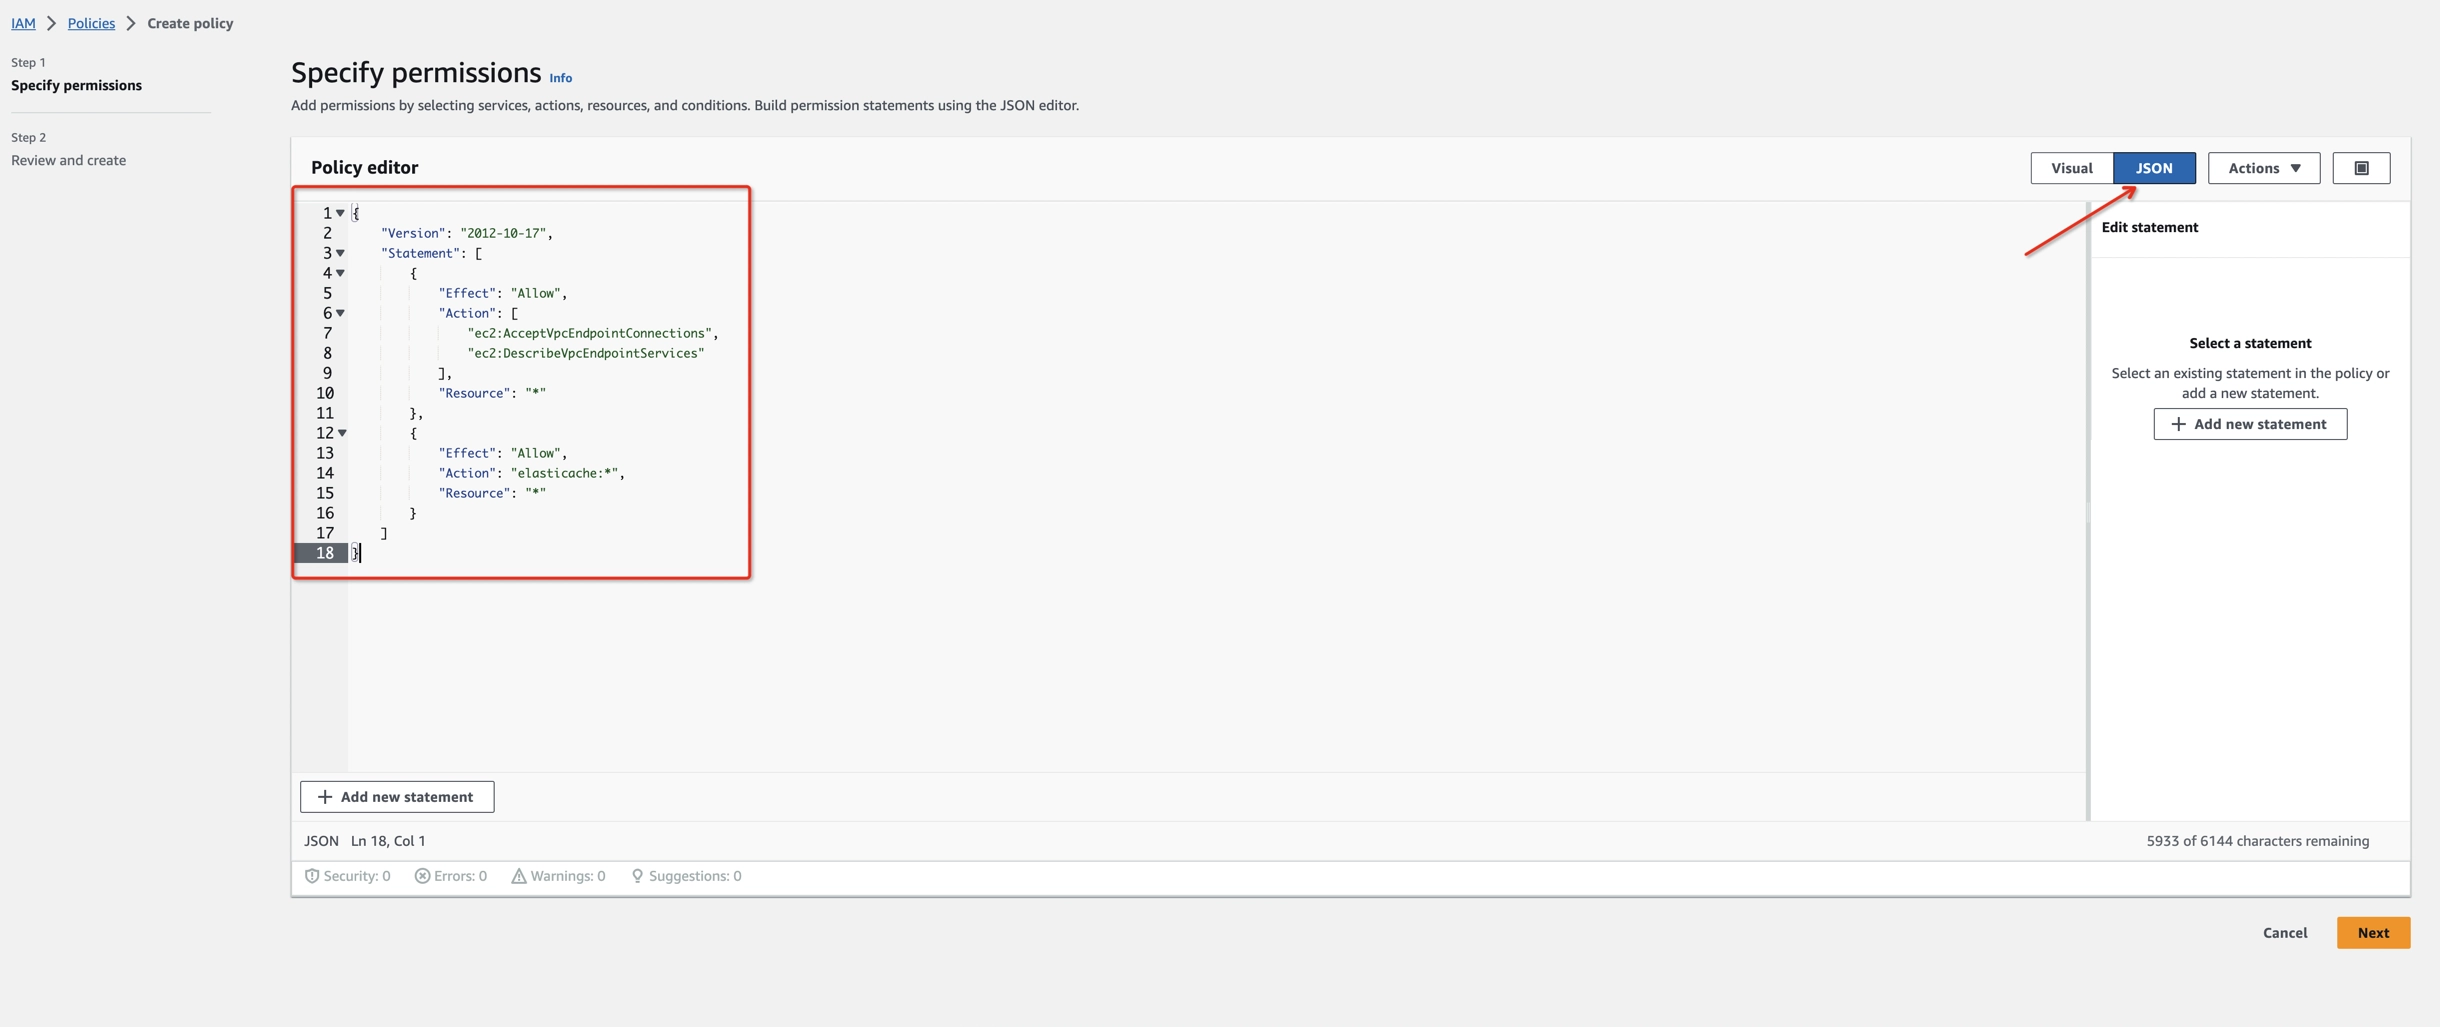
- Create an IAM Permissions Policy with the needed permissions that Ververica Cloud will assume for this role and then accept the endpoint connection request. Refer to this aws doc to learn more information about the policies.
{
    "Version": "2012-10-17",
    "Statement": [
        {
            "Effect": "Allow",
            "Action": [
                "ec2:AcceptVpcEndpointConnections",
                "ec2:DescribeVpcEndpointServices"
            ],
            "Resource": "*"
        },
        {
            "Effect": "Allow",
            "Action": "elasticache:*",
            "Resource": "*"
        }
    ]
}
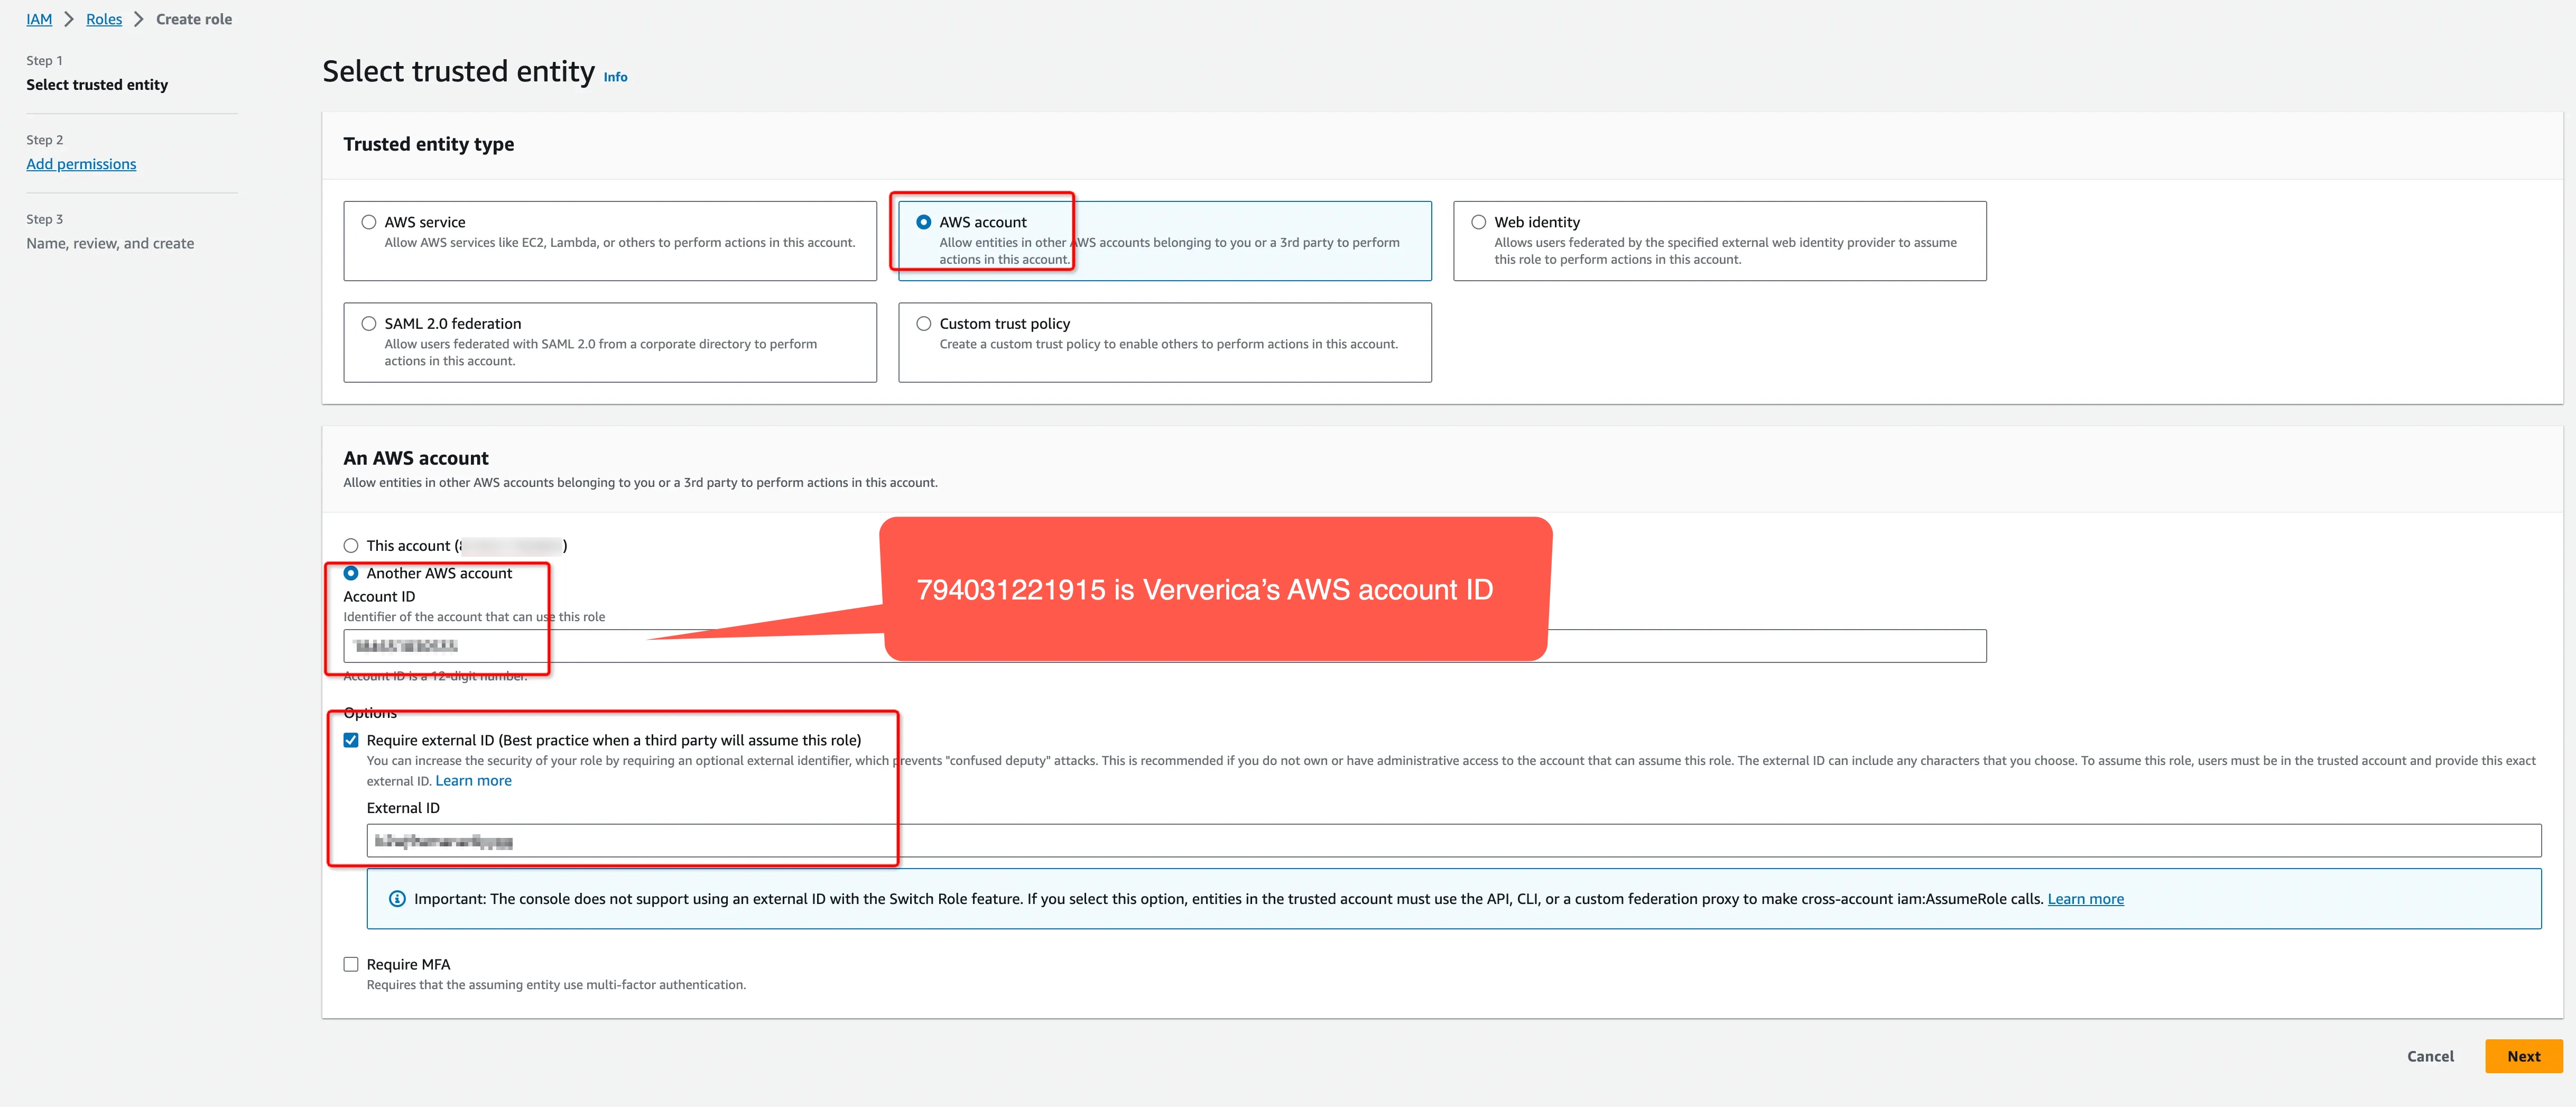
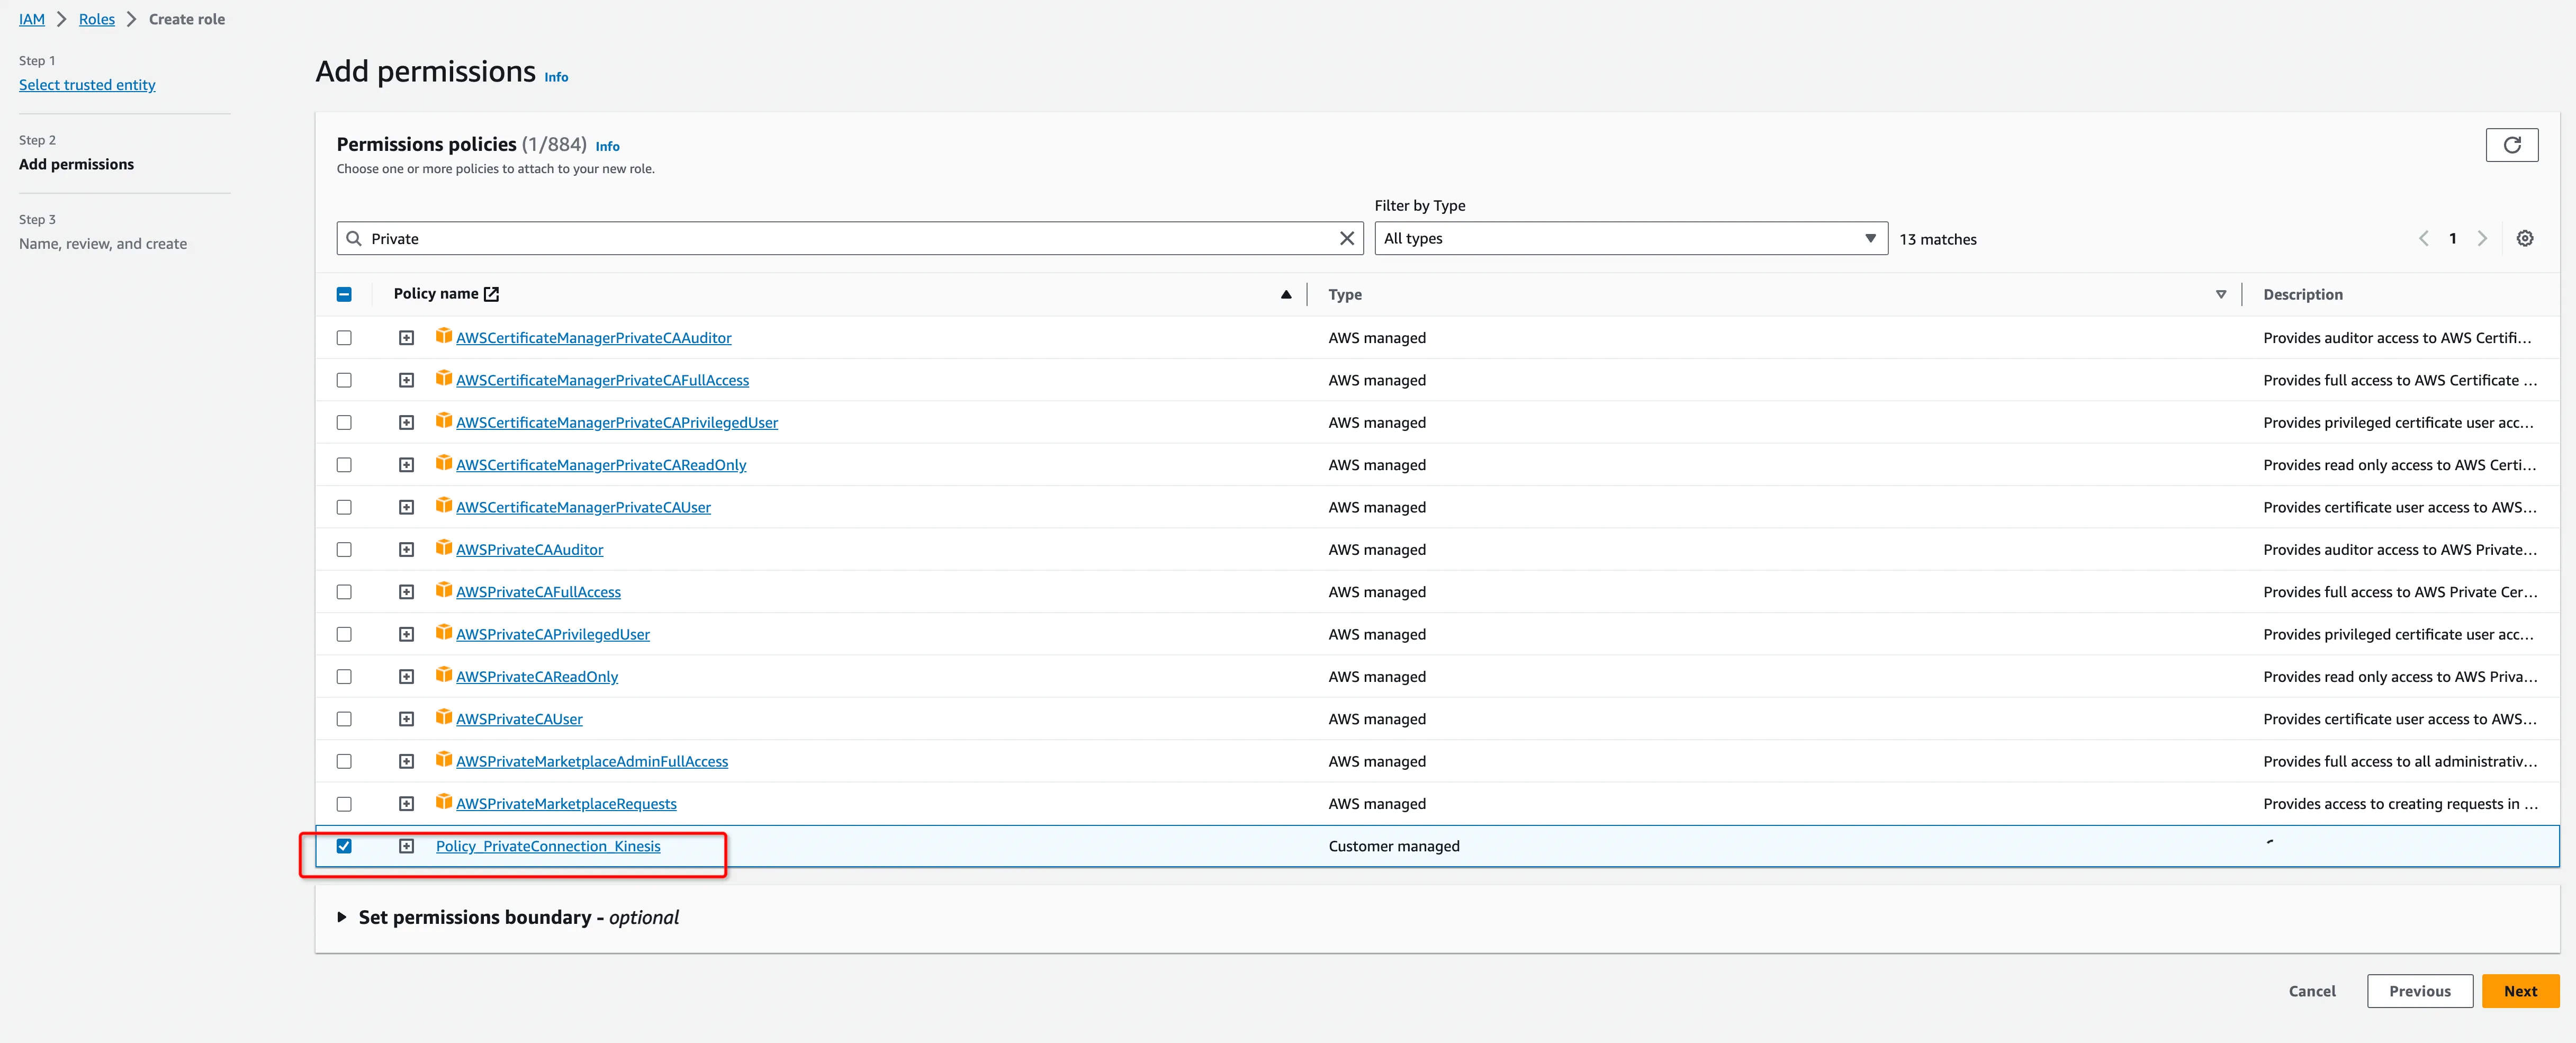
- Create an IAM Role to grant third parties like the Ververica Cloud to access your AWS resources with the previous permission policy.
The ‘External ID’ is actually the Workspace ID where you will configure this private connection. You can copy it from the top-right corner of the Private Connection page of that workspace. You can also find it in the URL when you enter the Ververica Console.
794031221915 is Ververica's AWS account ID.
Please create a dedicated IAM Role for each Ververica Cloud workspace. If the workspace is already bound with an IAM role, please update the policy instead of creating a new one. Refer to the AWS docs for how to create/update the IAM Role.
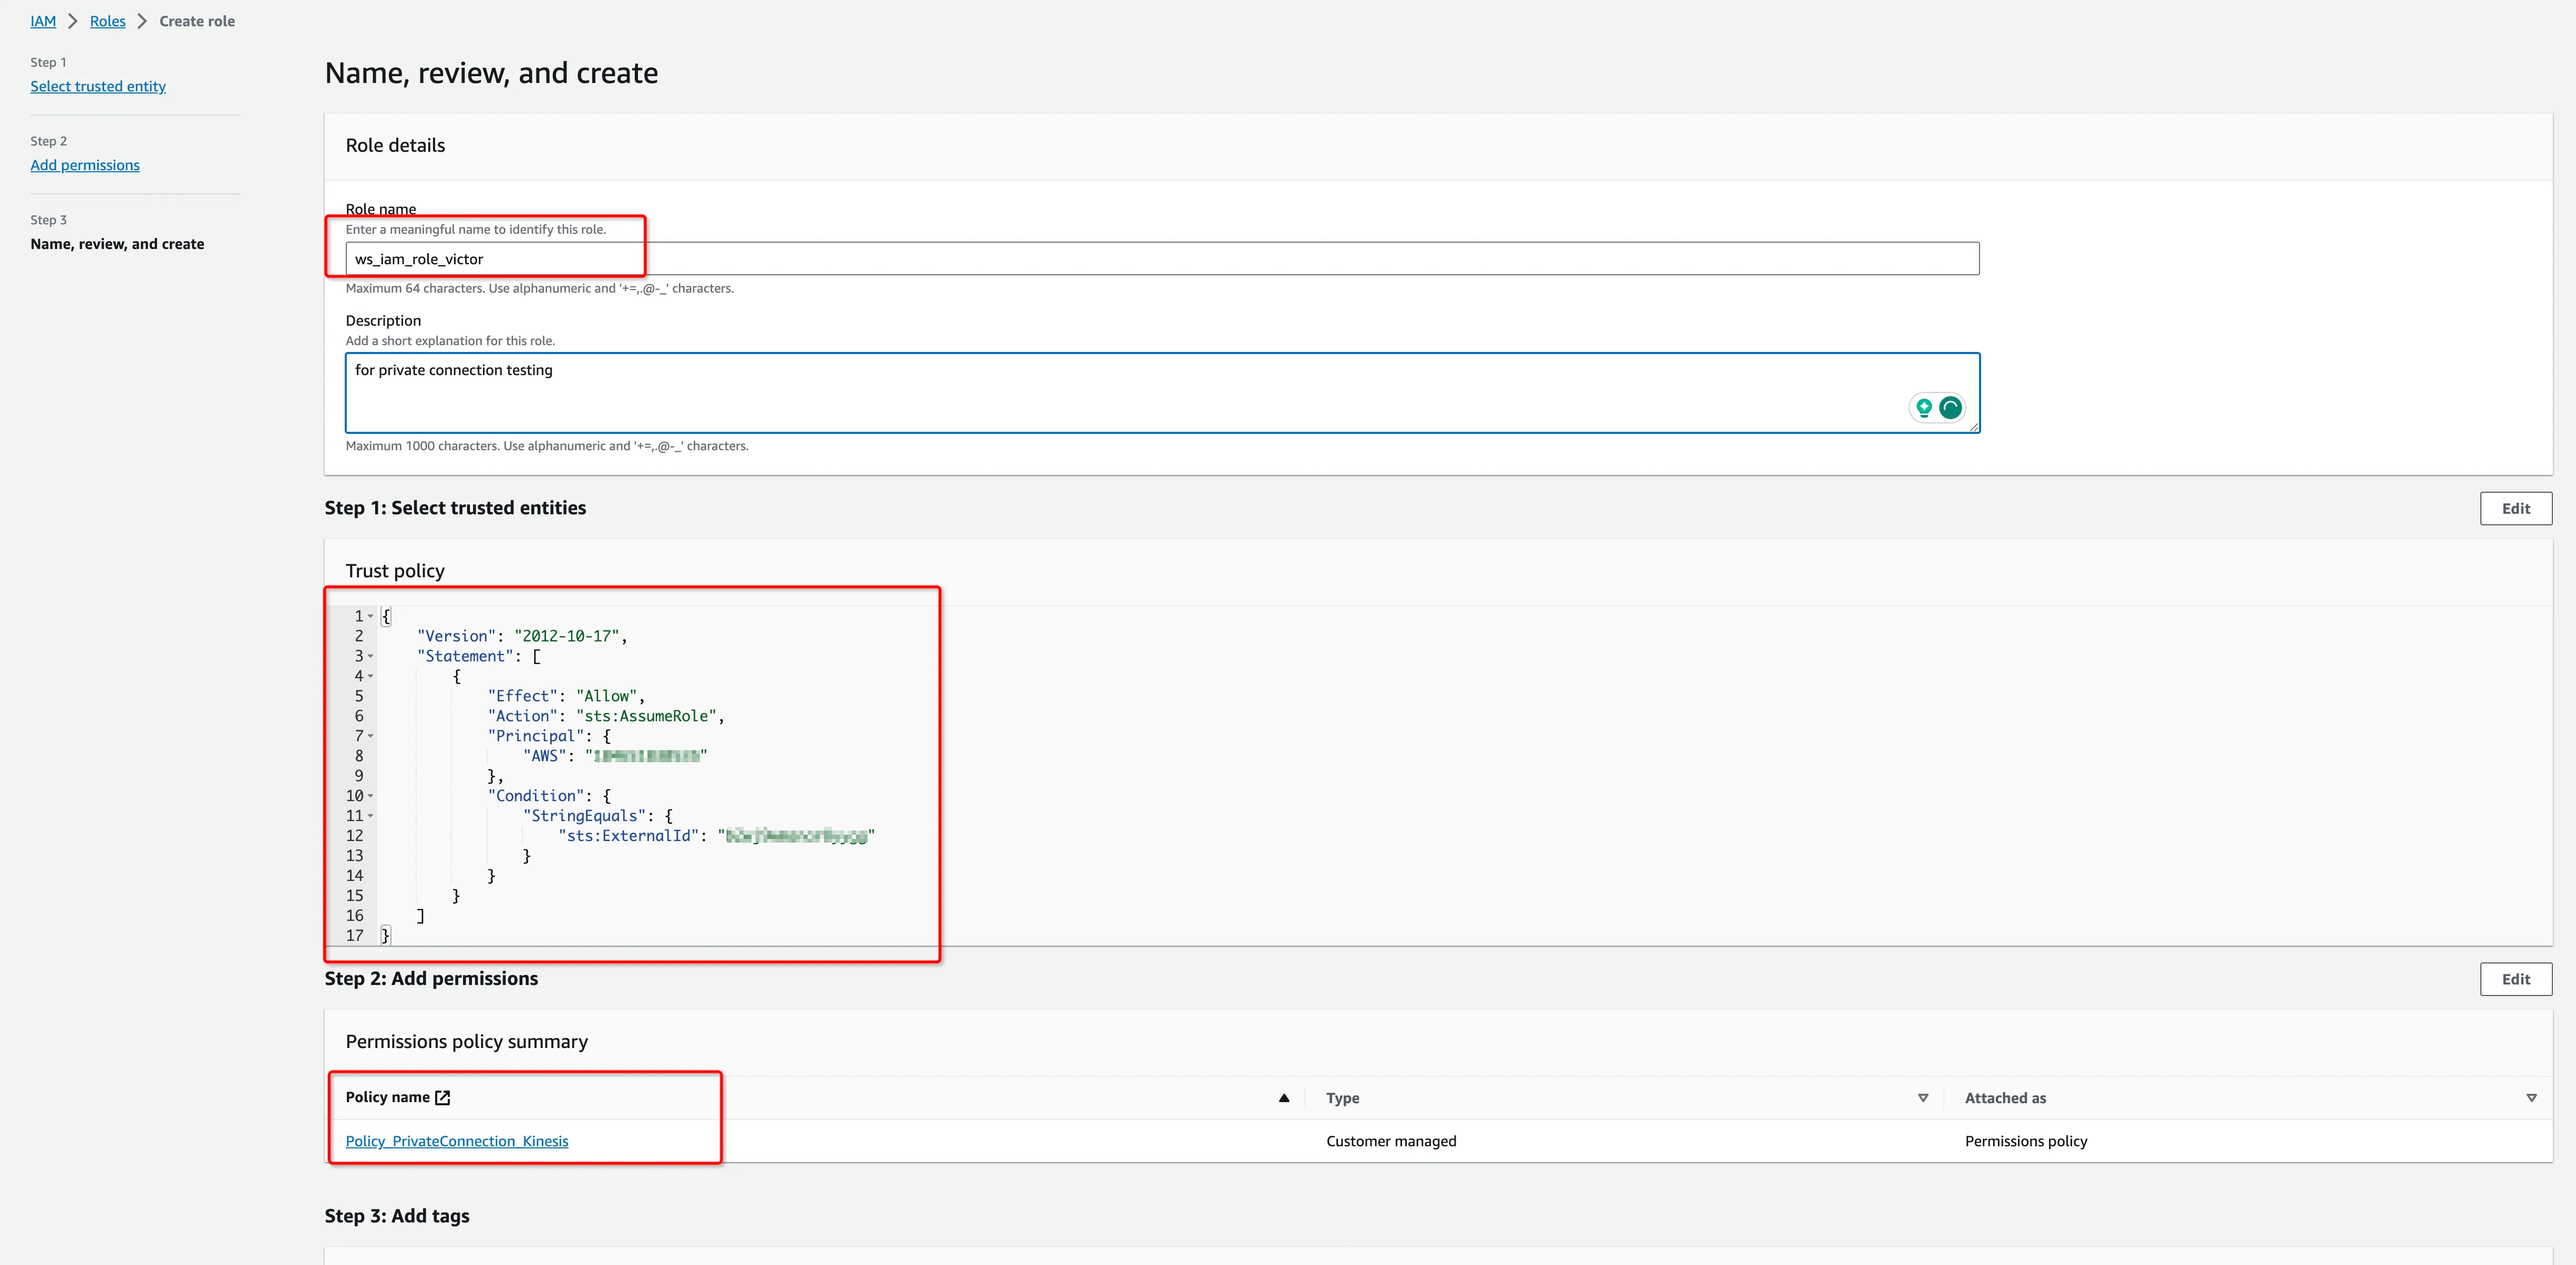
Get the ARN of this IAM Role for the next step.
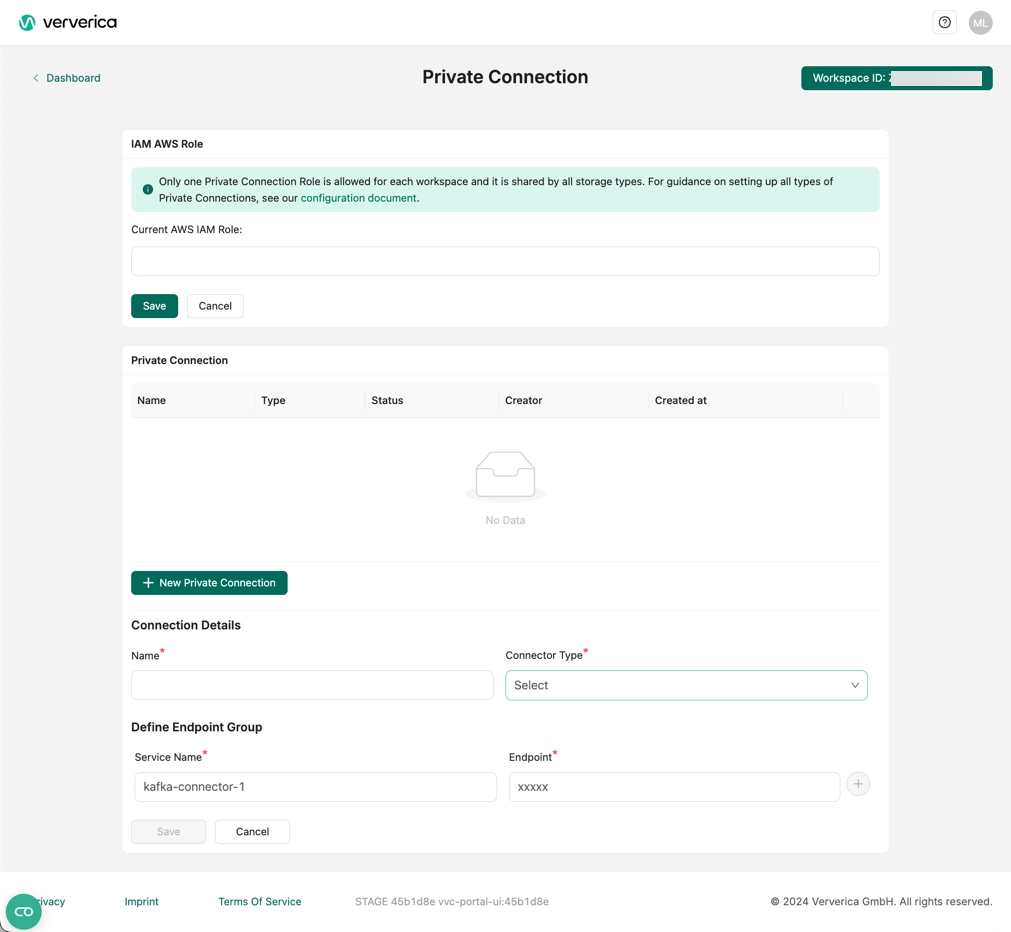
Add private connection
- Log in to Ververica Cloud and display your Dashboard.
- Click on the menu button (triple dots) at the end of the workspace entry and choose Private Connection.
- In the Private Connection page, click Edit Role.
- In the Current AWS IAM Role field, bind the IAM AWS Role and click Save.
- Click New Private Connection and fill the input box with the information in the previous step.