Get Started - Installation
In this getting started guide, we take you through the steps to install Ververica Platform and integrate it with MinIO for Universal Blob Storage. Optionally, after installation, we also demonstrate how to link the platform to a metrics and logging system.
Ververica Platform Enterprise offers a 30-day free trial license if you want to evaluate the Platform. Visit the Ververica Platform Enterprise trial request page for details.
First steps
The first steps to installing Ververica Platform are spinning up a Kubernetes cluster and installing Helm for distribution. We will walk through the installation procedures and operating systems used by these tools.
Kubernetes
Ververica Platform runs on top of Kubernetes. In order to get started locally, we recommend using minikube, but any other Kubernetes Cluster will do, too.
Minikube relies on either virtualization support by your operating system and a hypervisor (e.g. Virtualbox), or a container runtime (e.g. Docker). Check out the official installation guide for details.
Though the Ververica Platform itself runs on any Kubernetes cluster version 1.11+, other parts of the Playground require version 1.16+.
Minikube on Mac OS (homebrew)
brew install kubectl minikube
Minikube on Windows (Chocolatey)
choco install kubernetes-cli minikube
Minikube on Linux
There are packages available for most distros and package managers. Check the kubectl installation guide as well as the minikube installation guide for details.
Spin up a Kubernetes Cluster
To start minikube, use the following command, making sure to specify 8G of memory and 4 CPUs to meet platform requirements (includes a small Apache Flink® application):
minikube start --memory=8G --cpus=4
Upon success, check if all system pods are ready with the following:
kubectl get pods -n kube-system
Depending on your exact version of minikube, the output will look similar to the following with all pods running:
  NAME                               READY   STATUS    RESTARTS  AGE
  coredns-5644d7b6d9-56zhg           1/1     Running   1         2m
  coredns-5644d7b6d9-fdnts           1/1     Running   1         2m
  etcd-minikube                      1/1     Running   1         2m
  kube-addon-manager-minikube        1/1     Running   1         2m
  kube-apiserver-minikube            1/1     Running   1         2m
  kube-controller-manager-minikube   1/1     Running   1         2m
  kube-proxy-9w92r                   1/1     Running   1         2m
  kube-scheduler-minikube            1/1     Running   1         2m
  storage-provisioner                1/1     Running   2         2m
Helm
"Helm helps you manage Kubernetes applications — Helm charts help you define, install, and upgrade even the most complex Kubernetes application." — From the Helm website
Ververica Platform is distributed as a Helm chart. To install Helm, please follow the instructions in the official Helm installation guide or run one of the following commands.
Please ensure that you install Helm v3+. This can be verified by running helm version after installation.
Network prerequisites (restricted environments)
If your cluster or corporate network uses a default-deny egress policy or an internet allowlist, ensure the following domains over HTTPS (TCP 443) are reachable to install and operate Ververica Platform:
| Domain | Purpose | Notes |
|---|---|---|
registry.ververica.com | Pull container images | Fronted by CloudFront (CDN). May resolve to CloudFront hostnames. |
registry-auth.ververica.com | Registry authentication | Token exchange for image pulls. |
charts.ververica.com | Helm repository | Used by helm repo add ververica … and chart downloads. |
d18dgk0yrfbvr2.cloudfront.net | CDN edge for registry.ververica.com | Typically not needed if registry.ververica.com is allowed; can be added if your proxy/firewall requires explicit CDN hosts. |
d186wqiuu64nlf.cloudfront.net | CDN edge for registry.ververica.com | Same as above. |
Prefer domain-based allowlists rather than IPs: CDN and registry endpoints can change IPs without notice.
ntp.ubuntu.com is not required by Ververica Platform. Any NTP requirements are environment/OS policies specific to your cluster nodes.
Helm on Mac OS (homebrew)
brew install helm
Helm on Windows (Chocolatey)
choco install kubernetes-helm
Helm on Linux
There is a package available for most distros and package managers. For details, check the official installation guide.
Set Up the Playground
With Kubernetes and Helm installed, the next step is setting up the Ververica Platform playground. For this guide, clone the Ververica Platform playground repository which contains scripts and Helm values files. After cloning the repository, all commands are run from the repository's root directory.
git clone --branch release-2.15 https://github.com/ververica/ververica-platform-playground.git
cd ververica-platform-playground
Playground anatomy
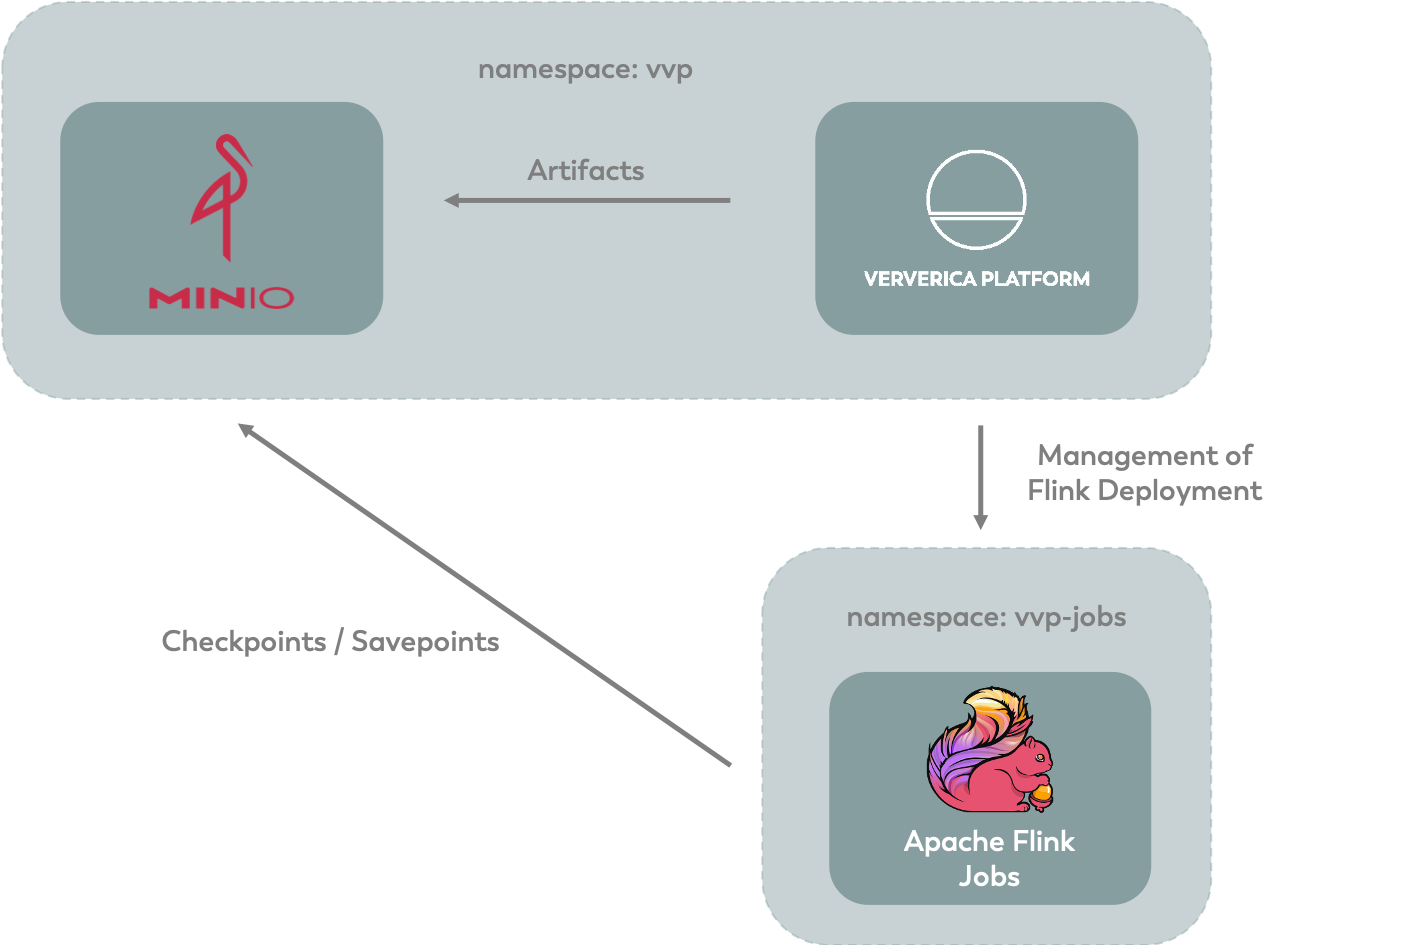
For this playground, we use two Kubernetes namespaces: vvp and vvp-jobs.
vvp hosts the control plane of Ververica Platform and other services, while the Apache Flink® jobs managed by the platform will run in the vvp-jobs namespace.
In addition to Ververica Platform, we will set up MinIO in the vvp namespace, which will be used for artifact storage and Apache Flink® checkpoints & savepoints (see Universal Blob Storage).
Install the components
TL;DR
You can skip the detailed installation steps by running the single command setup script below.
./setup.sh --edition enterprise
Detailed installation steps
If you did not install using the script above, the following detailed steps achieve the same result.
Kubernetes Namespaces
Before installing any of the components, we need to create the Kubernetes namespaces vvp and vvp-jobs with the following command:
kubectl create namespace vvp
kubectl create namespace vvp-jobs
MinIO
Install MinIO with Helm, using the Helm chart from the stable repository. If you have never added the stable Helm repository, first use the following command:
helm repo add stable https://charts.helm.sh/stable
Next, install MinIO with the following command:
helm --namespace vvp \
  install minio stable/minio \
  --values values-minio.yaml
Ververica Platform
Lastly, install Ververica Platform using helm.
To install Enterprise Edition, you first need to add your license text
to the values file values-license.yaml under vvp.license.data. If
you want to evaluate the Platform for intended commercial use, you can
request a 30 day free trial license from the Ververica
website and use the free
trial license for installation.
The values-license.yaml file should look similar to:
  ### Provide Ververica Platform License (free trial: ververica.com/enterprise-trial)
  vvp:
    license:
      data: {
        "kind": "License",
        "apiVersion": "v1",
        "metadata": {
          "id": "53b8cf22-1af2-44bd-a7ba-7420418f6572",
          "createdAt": "2020-02-21T12:56:52.407899Z",
          "annotations": {
            "signature": "<omitted>",
            "licenseSpec": "ewogICJsaWNlbnNlSWQiIDogIjUzYjhjZjIyLTFhZjItNDRiZC1hN2JhLTc0MjA0MThmNjU3MiIsCiAgImxpY2Vuc2VkVG8iIDogInRlc3QiLAogICJleHBpcmVzIiA6ICIyMDIwLTAzLTIyVDEyOjU2OjUxLjg3MzU1M1oiLAogICJwYXJhbXMiIDogewogICAgInF1b3RhLnR5cGUiIDogIlVOTElNSVRFRCIsCiAgICAidHJpYWwiIDogInRydWUiCiAgfQp9"
          }
        },
        "spec": {
          "licenseId": "53b8cf22-1af2-44bd-a7ba-7420418f6572",
          "licensedTo": "My Company Inc.",
          "expires": "2020-03-22T12:56:51.873553Z",
          "params": {
            "quota.type": "UNLIMITED",
            "trial": "true"
          }
        }
      }
Then run the commands:
 helm repo add ververica https://charts.ververica.com
 helm install vvp ververica/ververica-platform \
  --namespace vvp \
  --values values-vvp.yaml \
  --values values-license.yaml
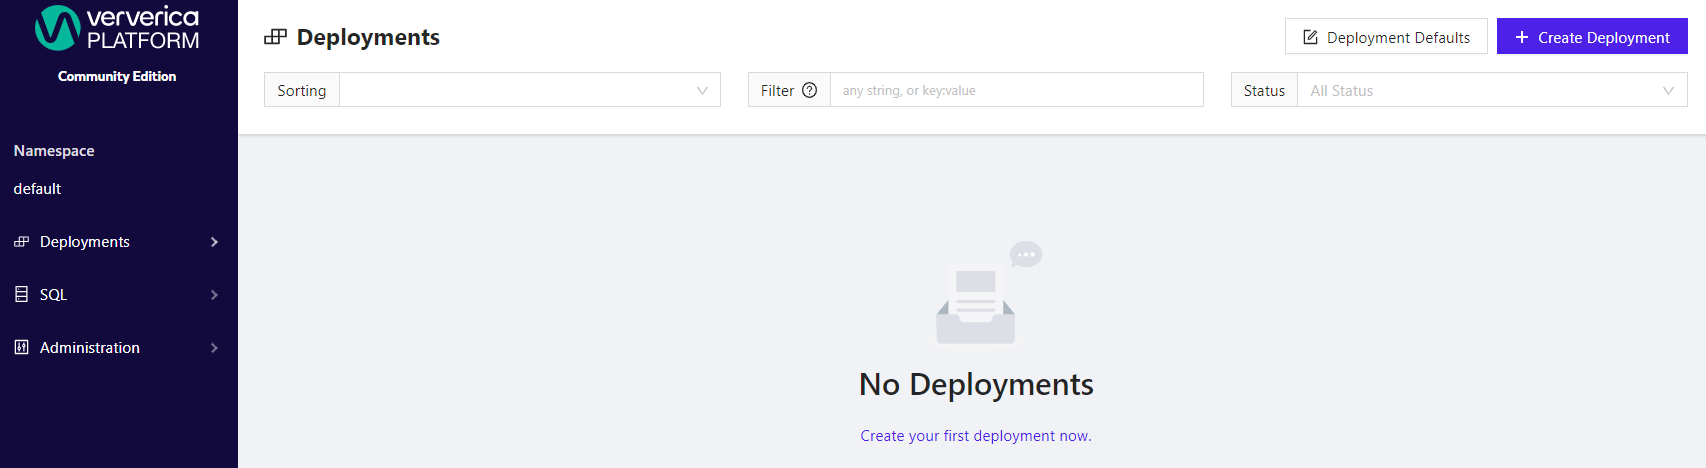
To access the web user interface or the REST API, configure a port forward to the Ververica Platform Kubernetes service with the following:
kubectl --namespace vvp port-forward services/vvp-ververica-platform 8080:80
The web interface and API are now available under localhost:8080. The UI shows that there are no deployments yet.
Logging and metrics integrations (Optional)
Ververica Platform integrates with log and metrics collection and query/visualization systems to help monitor and debug your Flink applications.
The setup.sh script included in the playground repository accepts flags --with-logging and --with-metrics that enable additional demo components.
The --with-logging and --with-metrics flags can be used separately or together, and they can be applied after the initial installation by running setup.sh again.
The flags incorporate the following demo stacks:
-
--with-logging:- Elasticsearch®, for indexing logs.
- Fluentd, a log collector and aggregator.
- Kibana, a web interface over Elasticsearch®, for querying Flink application logs.
-
--with-metrics:- Prometheus, a metrics collection and storage system, via the Prometheus Operator.
- Grafana, a time series visualization web application.
This setup uses Global Deployment Defaults to ensure each Flink job is configured to use the built-in Prometheus metrics reporter and each Kubernetes pod running Flink gets an annotation to make it discoverable by the Prometheus server.
Logging
To view application logs, run the following command to port-forward Kibana to your local network:
kubectl --namespace vvp port-forward services/kibana 5601:5601
The web interface is now available under localhost:5601.
When viewing a deployment, select Logs to be linked to Kibana with a pre-filled query identifying only logs relevant to that deployment.
The configuration is made up of the following files:
-
values-elasticsearch.yaml: Configures a single-node ElasticSearch cluster. -
values-fluentd.yaml: Establishes the connection to ElasticSearch to write logs. -
values-kibana.yaml: Configures the Kibana connection to ElasticSearch to read logs and import dashboards for logging. -
values-vvp-add-logging.yaml: Enables theLogsin Ververica Platform on a deployment or job to be linked to Kibana on the local network.
Metrics
To view application metrics, run the following command to port-forward Grafana to your local network:
kubectl --namespace vvp port-forward services/grafana 3000:80
The web interface is now available under localhost:3000.
When viewing a deployment, select Metrics to be linked to a sample monitoring dashboard in Grafana for that deployment.
The configuration is made up of the following files:
-
values-prometheus-operator.yaml: Disables unnecessary components and adds Playground-specific resource discovery. -
prometheus-operator-resources/service-monitor.yaml: Adds a Kubernetes Service definition to expose Flink Pod metrics and adds a Prometheus Operator ServiceMonitor to declare the scraping configuration of that Service. -
values-grafana.yaml: Adds a preconfigured datasource and dashboard and disables authentication. -
values-vvp.yaml: Sets the Prometheus metrics reporter for all deployments in the globalDeploymentDefaults section. -
values-vvp-add-metrics.yaml: Enables the Metrics button on a deployment or job to link to Grafana on the local network.
Clean Up
Run the script ./teardown.sh to clean up all the applications deployed and namespaces created in this guide. Alternatively, run manually with the following command:
kubectl delete namespace vvp vvp-jobs
What's next?
Continue learning with either of the following guides:
- Choose Getting Started — Flink SQL to learn how to develop and operate Flink SQL applications with Ververica Platform.
- Choose Getting Started — Flink Operations to learn how Ververica Platform facilitates operations and application lifecycle management for Apache Flink®.