Manage MySQL catalog
After you configure a MySQL catalog, you can access the tables of a MySQL instance in the console of fully managed Flink. This topic describes how to configure, view, use, and delete a MySQL catalog in the console of fully managed Flink.
Background Information
When you use a MySQL catalog, take note of the following points:
- You can directly access a table of a MySQL instance without the need to execute DDL statements to register the MySQL table. This improves the efficiency and accuracy of data development.
- Tables of MySQL catalogs can be used as MySQL Change Data Capture (CDC) source tables, MySQL result tables, and MySQL dimension tables in Flink SQL jobs.
- Catalogs of self-managed MySQL databases are supported.
- Sharding-based logical tables can be directly accessed.
- You can use the CREATE DATABASE AS and CREATE TABLE AS statements to synchronize the full data of a database, the merged data of sharded tables in a sharded database, and changes in table schemas based on MySQL data sources.
Limits
You cannot modify the DDL statements that are related to catalogs.
You can only query data in databases. You cannot create databases.
If a table of a MySQL catalog is used as a MySQL CDC source table, you can read data from the source table only in streaming mode. If a table of a MySQL catalog is used as a dimension table or a result table, streaming processing is supported.
Only MySQL 5.7 and MySQL 8.0.X are supported.
When reading data from a table in the MySQL catalog, you can use the dynamic table option to disable SSL for that specific query. Here's an example of a query that does this:
 SELECT * FROM `my-aws-mysql`.`vvc`.user_1
 /*+ OPTIONS('jdbc.properties.useSSL' = 'false') */
By including the
OPTIONSclause with'jdbc.properties.useSSL' = 'false', you ensure that the query does not use SSL encryption when connecting to the MySQL database.
When writing data to a MySQL table in the MySQL catalog, you can override the connection URL by using the dynamic table option to disable TLS. Here's an example of how to do this using Flink SQL:
INSERT INTO `my-aws-mysql`.`vvc`.user_2
/*+ OPTIONS('url' = 'jdbc:mysql://your_hostname:3306/your_database_name?useSSL=false') */
Replace
your_hostnamewith the actual hostname of your MySQL server, andyour_database_namewith the name of the database you want to connect to. This query will write data fromsource_tableinto theuser_2table in the MySQL catalog with TLS disabled.
If a table of a MySQL catalog is used as a MySQL CDC source table, you must enable binary logging on the self-managed MySQL database.
Create a MySQL catalog in the UI
- Log in to Ververica Cloud.
- On the Dashboard page, locate the workspace you want to manage, click the title of the workspace or this icon ⋮, and select Open Console.
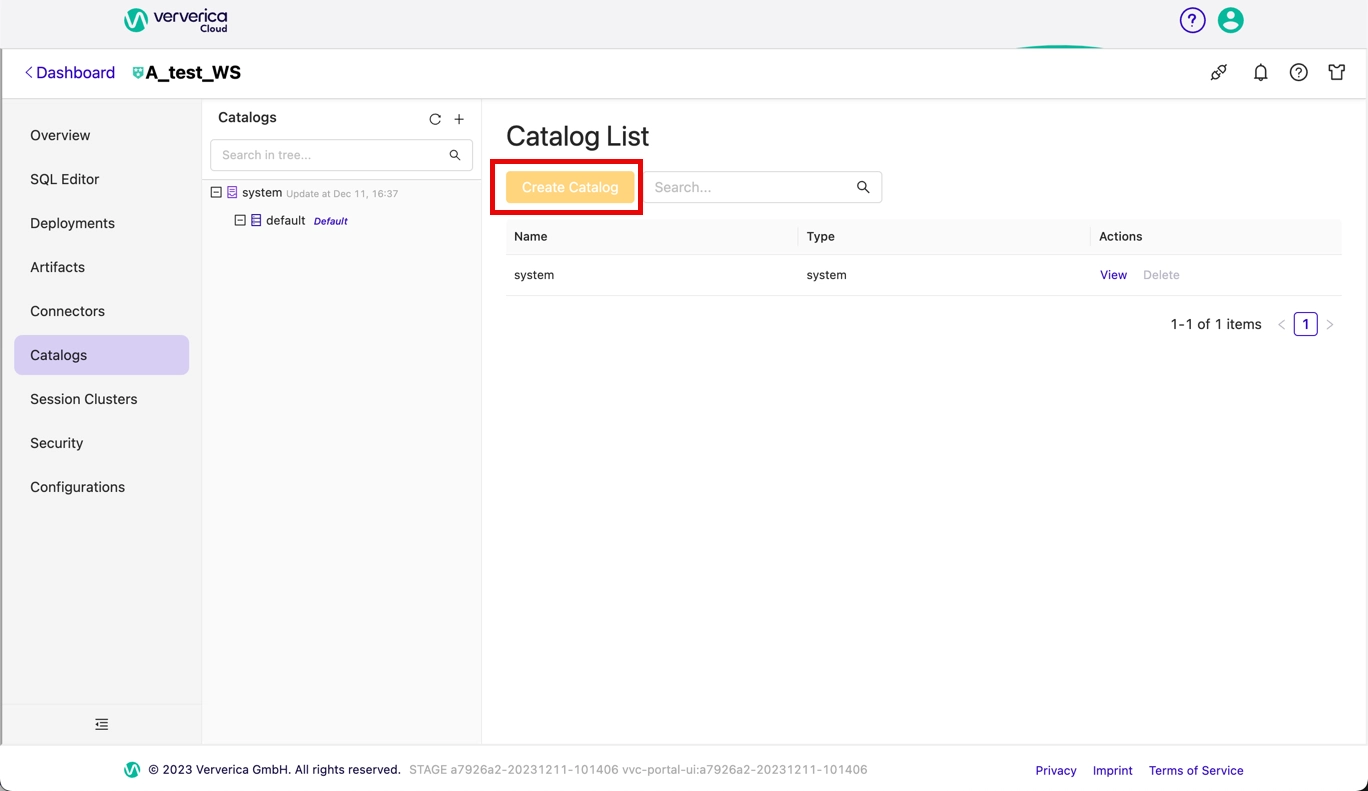
- In the left-side navigation pane of the Console, click Catalogs.
- On the Catalog list page, click Create Catalog.
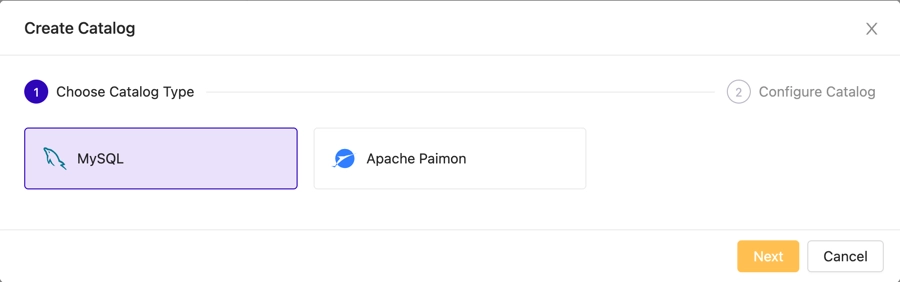
- In the Create Catalog dialog box, select MySQL and click Next.
- Configure the parameters.
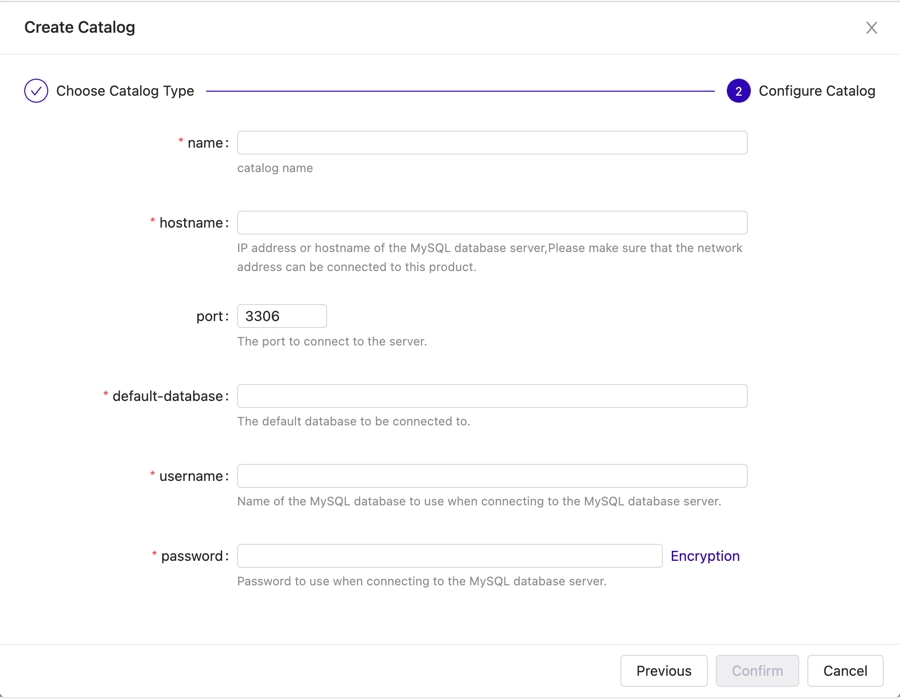
After you create a MySQL catalog, the parameter configuration cannot be modified. If you want to modify the parameter configuration, you must delete the MySQL catalog that you created and create a MySQL catalog again.
| Parameter | Description | Required |
|---|---|---|
| name | Catalog name. | Yes |
| hostname | IP address or hostname of the MySQL database server. Please make sure that the network address can be connected to this product. | Yes |
| port | The port to connect to the server. | Yes |
| default-database | Name of the MySQL database to use when connecting to the MySQL database server. | Yes |
| username | Name of the MySQL database to use when connecting to the MySQL database server. | Yes |
| password | Password to use when connecting to the MySQL database server. | Yes |
- Click Confirm. You can see the created catalog on the catalogs list page in the Catalogs tab, as well as on the SQL Editor page (the right side Catalogs menu).
Create a MySQL catalog by executing an SQL statement
- Log in to Ververica Cloud.
- On the Dashboard page, locate the workspace you want to manage, click the title of the workspace or this icon ⋮, and select Open Console.
- In the left-side navigation pane of the Console, click SQL.
- In the upper-left corner of the SQL Editor page, click New.
- On the SQL Scripts tab of the New Draft dialog box, click Blank Stream Draft and click Next.
- Configure the parameters of the draft. For more information, see the parameters table above, in the UI section.
- Click Create.
In the script editor, enter the following statement to create a MySQL catalog:
    CREATE CATALOG <catalogname> WITH(
      'type' = 'mysql',
      'hostname' = '<hostname>',
      'port' = '<port>',
      'username' = '<username>',
      'password' = '<password>',
      'default-database' = '<dbname>',
      'catalog.table.metadata-columns' = '<metadata>'
    );
| Parameter | Description | Required |
|---|---|---|
| catalogname | The name of the MySQL catalog. | Yes |
| type | The type of the catalog. Set the value to mysql. | Yes |
| hostname | The IP address or hostname that is used to access the MySQL database. | Yes |
| port | The port number of the MySQL database. Default value: 3306. | No |
| username | The username that is used to access the MySQL database. | Yes |
| password | The password that is used to access the MySQL database. | Yes |
| default-database | The name of the default MySQL database. | Yes |
| catalog.table.metadata-columns | Specifies the metadata columns in a MySQL CDC source table that you want to add to the schema of a table when you query the table. Separate multiple metadata columns with semicolons (;). Example: op_ts;table_name;database_name. By default, no metadata column is added. | No |
If you specify the catalog.table.metadata-columns parameter, the specified metadata columns are added to the schema of the returned table. The metadata columns are available only in MySQL CDC source tables. Therefore, the tables that are created in the MySQL catalog can be used as only source tables and cannot be used as result tables or dimension tables.
You can select the SQL text and click the hovered Run button to execute the selected SQL, then the catalog will be created.
- You can see the created catalog on the catalogs list page in the Catalogs tab, as well as on the SQL Editor page (the right side Catalogs menu).
View the metadata of a MySQL catalog
After you configure a MySQL catalog, you can perform the following steps to view the metadata of the MySQL catalog.
- Log in to Ververica Cloud.
- On the Dashboard page, locate the workspace you want to manage, click the title of the workspace or this icon ⋮, and select Open Console.
- In the left-side navigation pane of the Console, click Catalogs.
- On the Catalog list page, select the MySQL catalog whose metadata you want to view.
- View information about databases, and tables in the MySQL catalog.
If you want to view the databases and tables in the catalog, you can click View in the Actions column.
Use a MySQL catalog
Read data from a MySQL CDC source table
    INSERT INTO ${other_sink_table}
    SELECT ...
    FROM `${mysql_catalog}`.`${db_name}`.`${table_name}` /*+ OPTIONS('server-id'='6000-6018') */;
- When you use a table in a MySQL catalog, you can use SQL hints to specify the time zone of the MySQL database server for the table. For example, you can use mycatalog.mytable /+ OPTIONS('server-time-zone'='Asia/Shanghai') /.
- If you want to use a table of a MySQL catalog as the MySQL CDC source table, we recommend that you use SQL hints to set the server-id parameter to a unique value for each deployment. If you want to run multiple deployments to read data from the source table at the same time, you must set the server-id parameter to a value range. The number of server-id values in the value range must be greater than or equal to the parallelism of a deployment. For example, you can use mycatalog.mytable /+ OPTIONS('server-time-zone'='Asia/Shanghai', 'server-id' = '6000-6008') /.
Read data from the sharding-based MySQL logic tables
MySQL catalogs allow you to configure the databases and tables in a sharded database as a logical table in a query statement by using regular expressions and executing the query statement to read data from the logical table. For example, if a sharded MySQL database has tables, such as user01, user02, and user99, in database shards from db01 to db10 and the schemas of all the tables are compatible with each other, you can access all the tables in the database shards by using the following regular expression:
SELECT ... FROM `db.*`.`user.*` /*+ OPTIONS('server-id'='6000-6018') */;
The query result contains two additional system fields _db_name (STRING) and _table_name (STRING). The two fields and the primary key of the original tables are used as the new joint primary key of the logical table to ensure that the joint primary key is unique. If the primary keys of the tables from user01 to user99 are id, the joint primary key of the logical table named user is (_db_name, _table_name, id). For more information about how to read data from sharded tables in a sharded database by using regular expressions, see CREATE TABLE AS statement.
Execute the CREATE TABLE AS and CREATE DATABASE AS statements to synchronize MySQL data changes and schema changes in real-time
    USE CATALOG `${target_catalog}`;

    -- Single-table synchronization: Synchronize schema changes and data changes of tables in real time.
    CREATE TABLE IF NOT EXISTS `${target_table_name}`
    WITH (...)
    AS TABLE `${mysql_catalog}`.`${db_name}`.`${table_name}`
    /*+ OPTIONS('server-id'='6000-6018') */;

    -- Database synchronization: Synchronize schema changes and data changes of the database in real time.
    CREATE DATABASE `${target_db_name}` WITH (...)
    AS DATABASE `${mysql_catalog}`.`${db_name}` INCLUDING ALL TABLES
    /*+ OPTIONS('server-id'='6000-6018') */;
For more examples, see CREATE TABLE AS statement or CREATE DATABASE AS statement.
Read data from a MySQL dimension table
    INSERT INTO ${other_sink_table}
    SELECT ...
    FROM ${other_source_table} AS e
    JOIN `${mysql_catalog}`.`${db_name}`.`${table_name}` FOR SYSTEM_TIME AS OF e.proctime AS w
    ON e.id = w.id;
Write the result data to a MySQL table
    INSERT INTO `${mysql_catalog}`.`${db_name}`.`${table_name}`
    SELECT ...
    FROM ${other_source_table}
Delete a MySQL catalog
You can delete a MySQL catalog in the UI or by executing an SQL statement. We recommend that you delete a MySQL catalog in the UI.
Delete a MySQL catalog in the UI
- Log in to Ververica Cloud.
- On the Dashboard page, locate the workspace you want to manage, click the title of the workspace or this icon ⋮, and select Open Console.
- In the left-side navigation pane of the Console, click Catalogs.
- On the Catalog list page, choose the required catalog and click on Delete in the Actions column.
- In the message that appears, click Delete.
- View the catalog that you delete in the Catalogs pane on the left side of the Catalog List page. After the catalog is deleted, the catalog does not exist on this page.
Delete a MySQL catalog by executing an SQL statement
- Log in to Ververica Cloud.
- On the Dashboard page, locate the workspace you want to manage, click the title of the workspace or this icon ⋮, and select Open Console.
- In the left-side navigation pane of the Console, click SQL Editor.
- In the upper-left corner of the SQL Editor page, click New.
- On the SQL Scripts tab of the New Draft dialog box, click Blank Stream Draft and click Next.
- Configure the parameters of the draft. For more information, see Create a Draft. Then, click Create.
- In the script editor, enter the following statement:
DROP CATALOG ${catalog_name}
catalog_name is the name of the MySQL catalog that you want to delete in the console of fully managed Flink.
After you delete a MySQL catalog, the running deployments are not affected. However, the deployments that use a table of the catalog can no longer find the table if the deployments are published or restarted. Proceed with caution when you delete a MySQL catalog.
You can select the DROP CATALOG ${catalog_name} text and click the hovered Run button to execute the selected SQL, then the catalog will be deleted.
- On the left side of the SQL Editor page, click the Catalogs tab to check whether the catalog is deleted.