Amazon MSK
Amazon Managed Streaming for Apache Kafka (MSK) is a fully-managed service that makes it easy to build and run applications using Apache Kafka. It offers seamless integration, eliminating the need to manage the underlying infrastructure while preserving native Kafka capabilities. MSK automatically manages the Kafka clusters, ensuring high availability, fault tolerance, and scalability. This service simplifies the setup, scaling, and maintenance of Kafka clusters in the cloud, allowing developers to focus on application building and innovation, leveraging the power and flexibility of real-time data streaming.
Below is an example of configuring the AWS MSK to connect to Ververica Cloud via the private connection. This approach also applies to other user-managed Kafka services (i.e. BYOC or AWS EMR Kafka).
Prerequisites
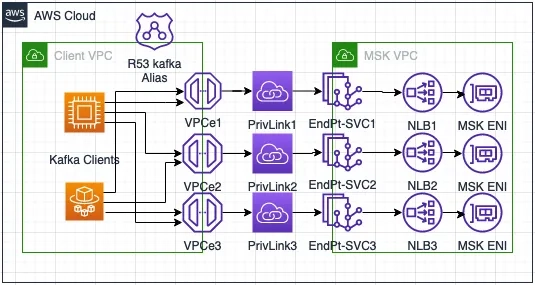
You must have an IAM user with the necessary permissions for creating the IAM role and the MSK cluster. Please be aware that the serverless MSK cannot be supported. The following steps assume creating a dedicated private connection (including target group, NLB, and endpoint service) for each MSK broker. You need to adjust the parameters if you share a private connection with all the brokers. The figure below illustrates how the private connection works per broker.
Step-1: Create an MSK Cluster
- Open the AWS Management Console and go the the MSK Dashboard at https://console.aws.amazon.com/msk/home
- In the search bar, type MSK and in the drop-down menu, select Cluster.
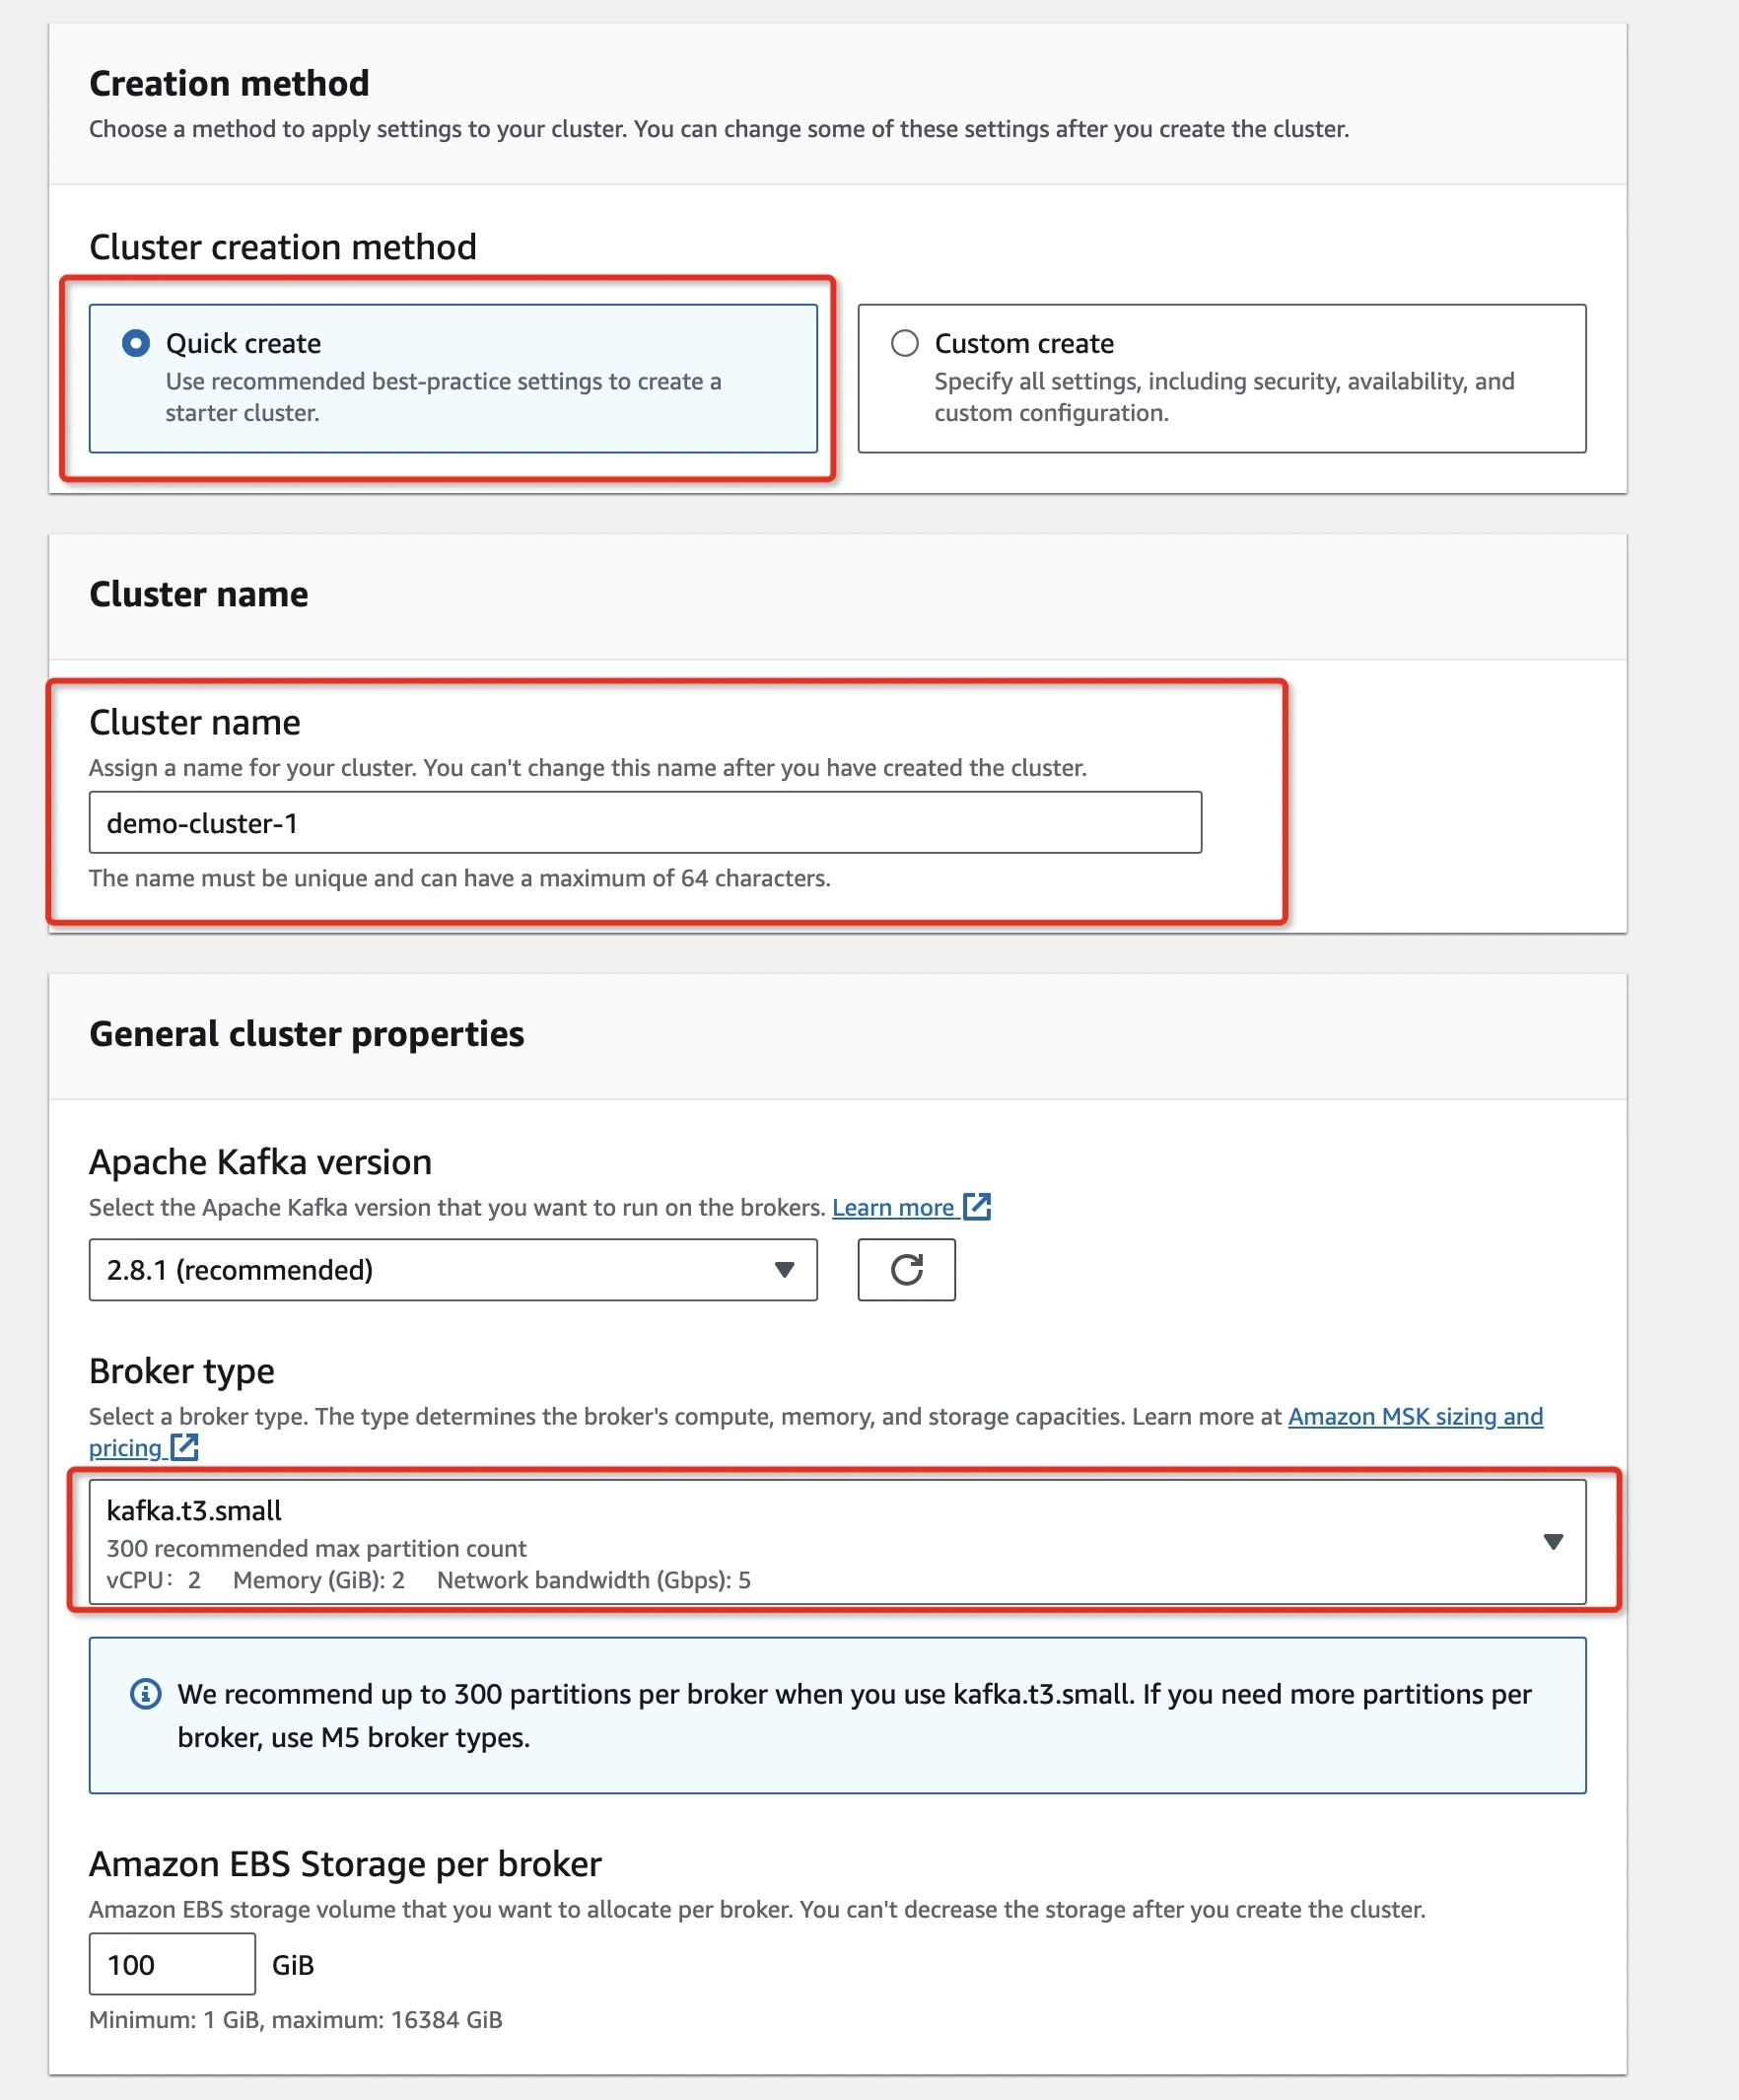
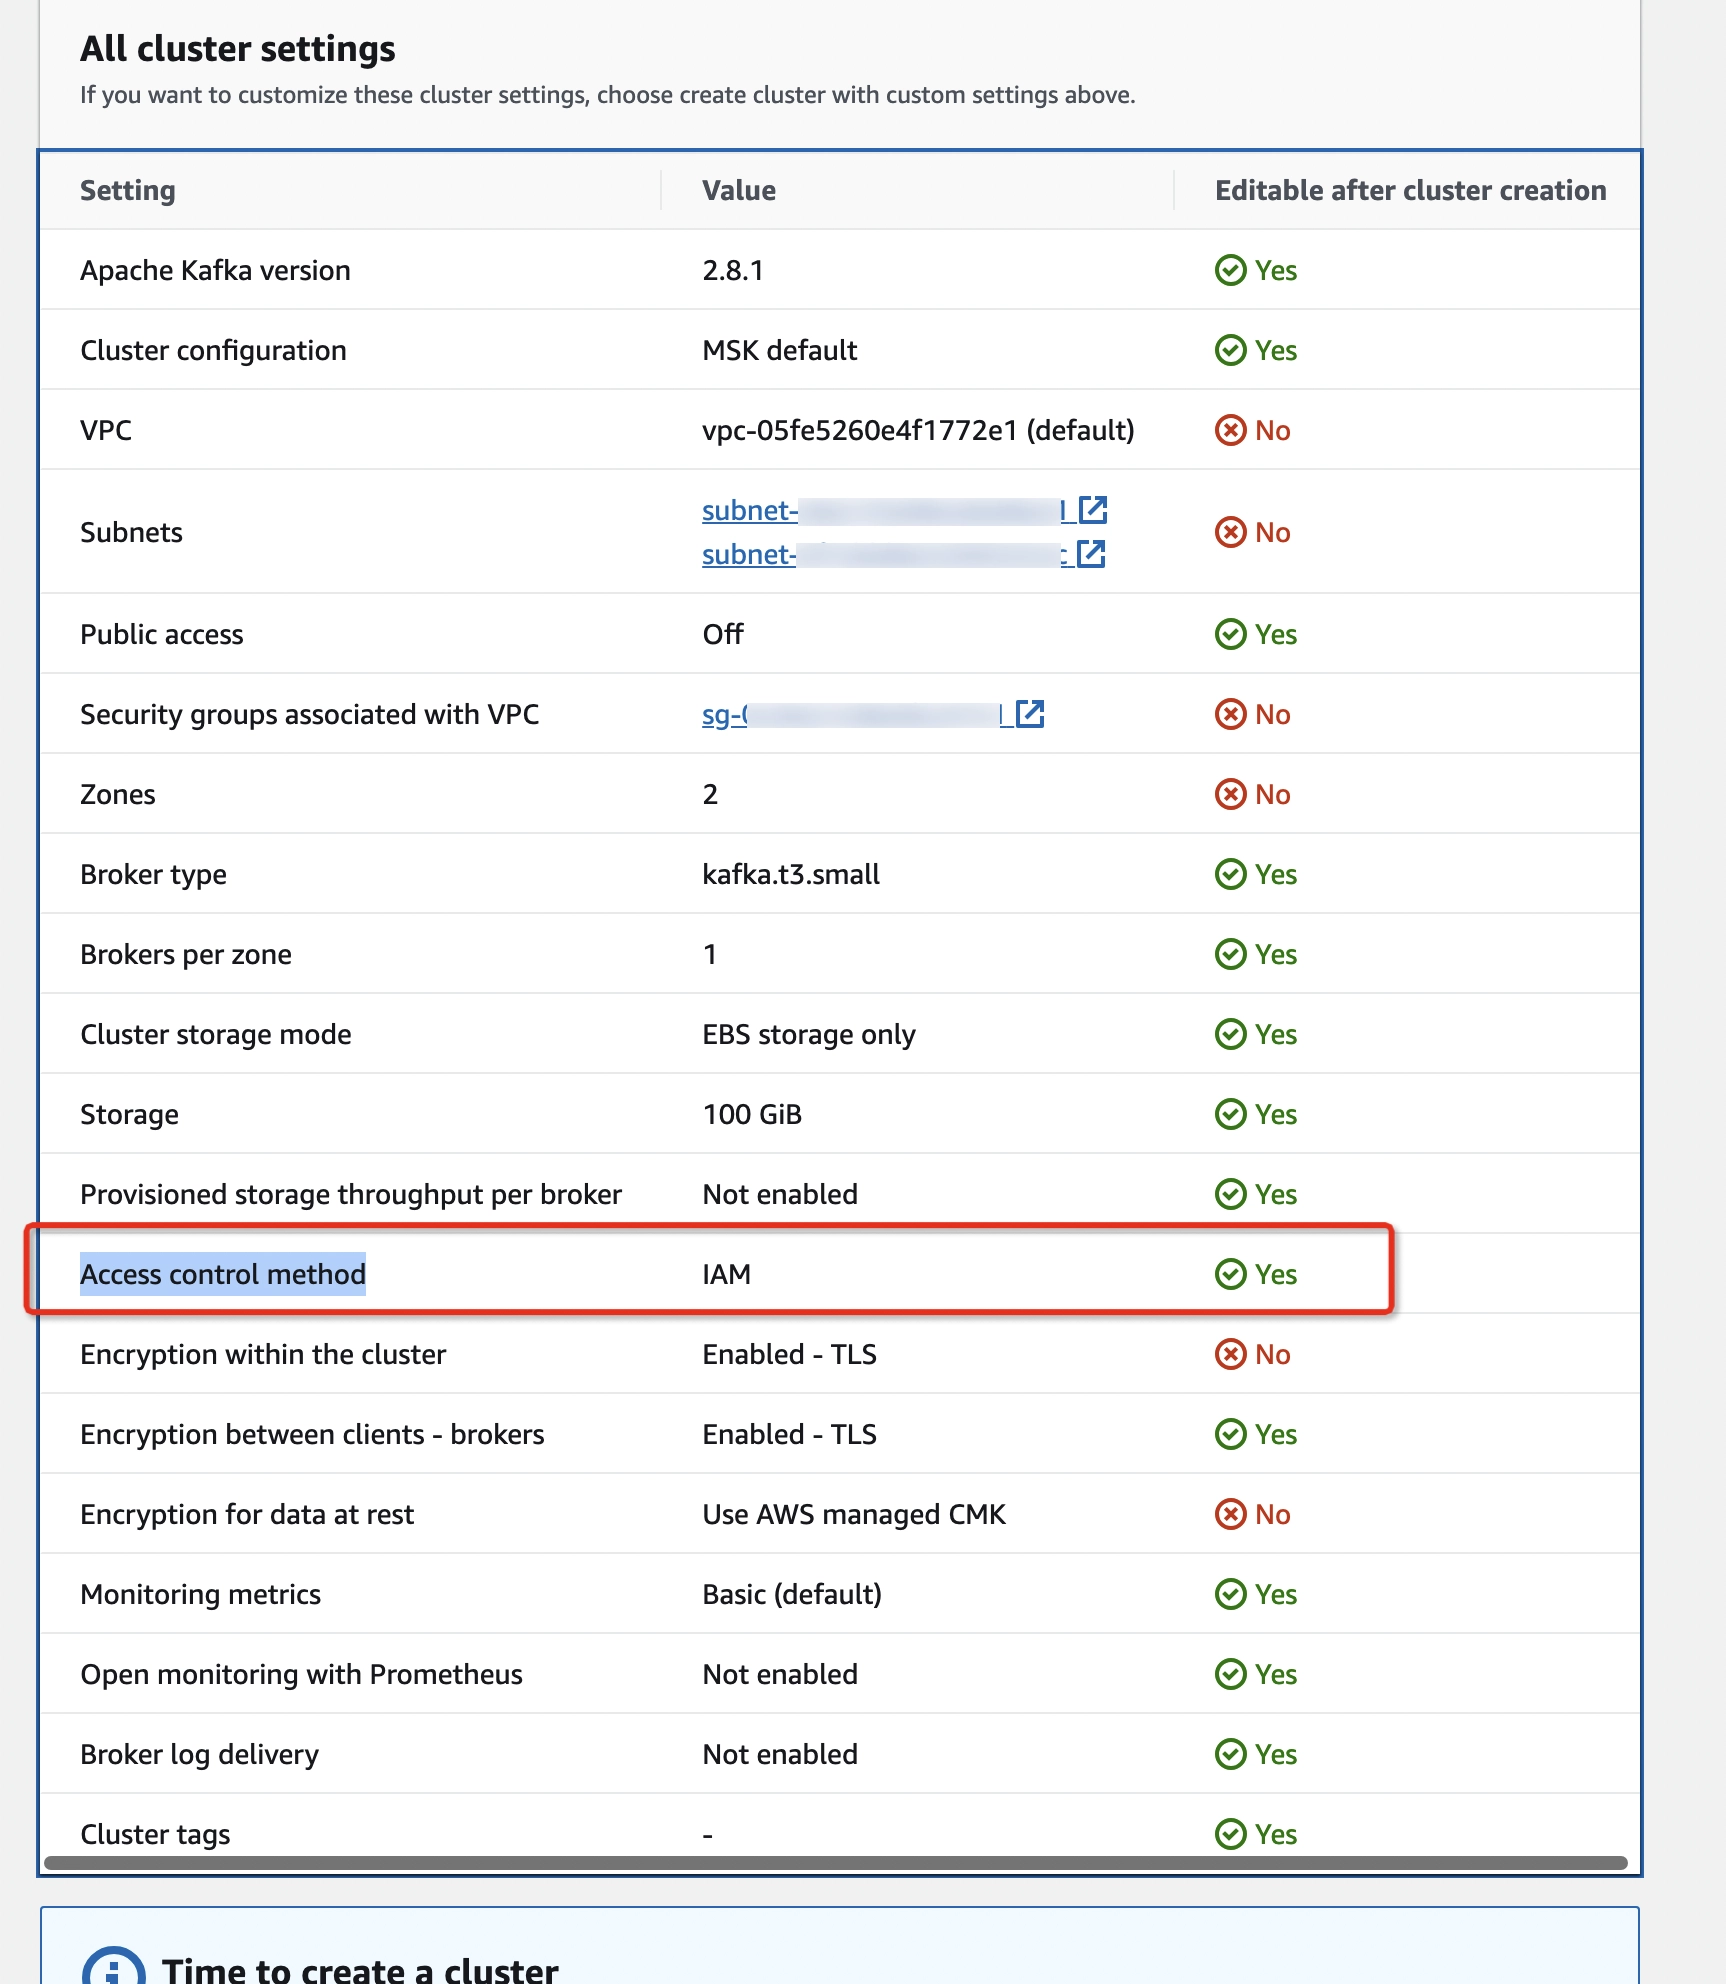
- Click Create Cluster to create a kafka cluster quickly with kafka.t3.small, two brokers, and the IAM Access control method (by default).
The MSK cluster creation takes around 30 minutes and you can change the Access Control method after the cluster creation finishes. Depending on the AWS region, you may have two Cluster types available to select from:
- Serverless
- Provisioned If that’s the case, choose a provisioned one and select kafka.t3.small from Broker type drop-down menu.
Step 2: Configure Network Setting for MSK Brokers
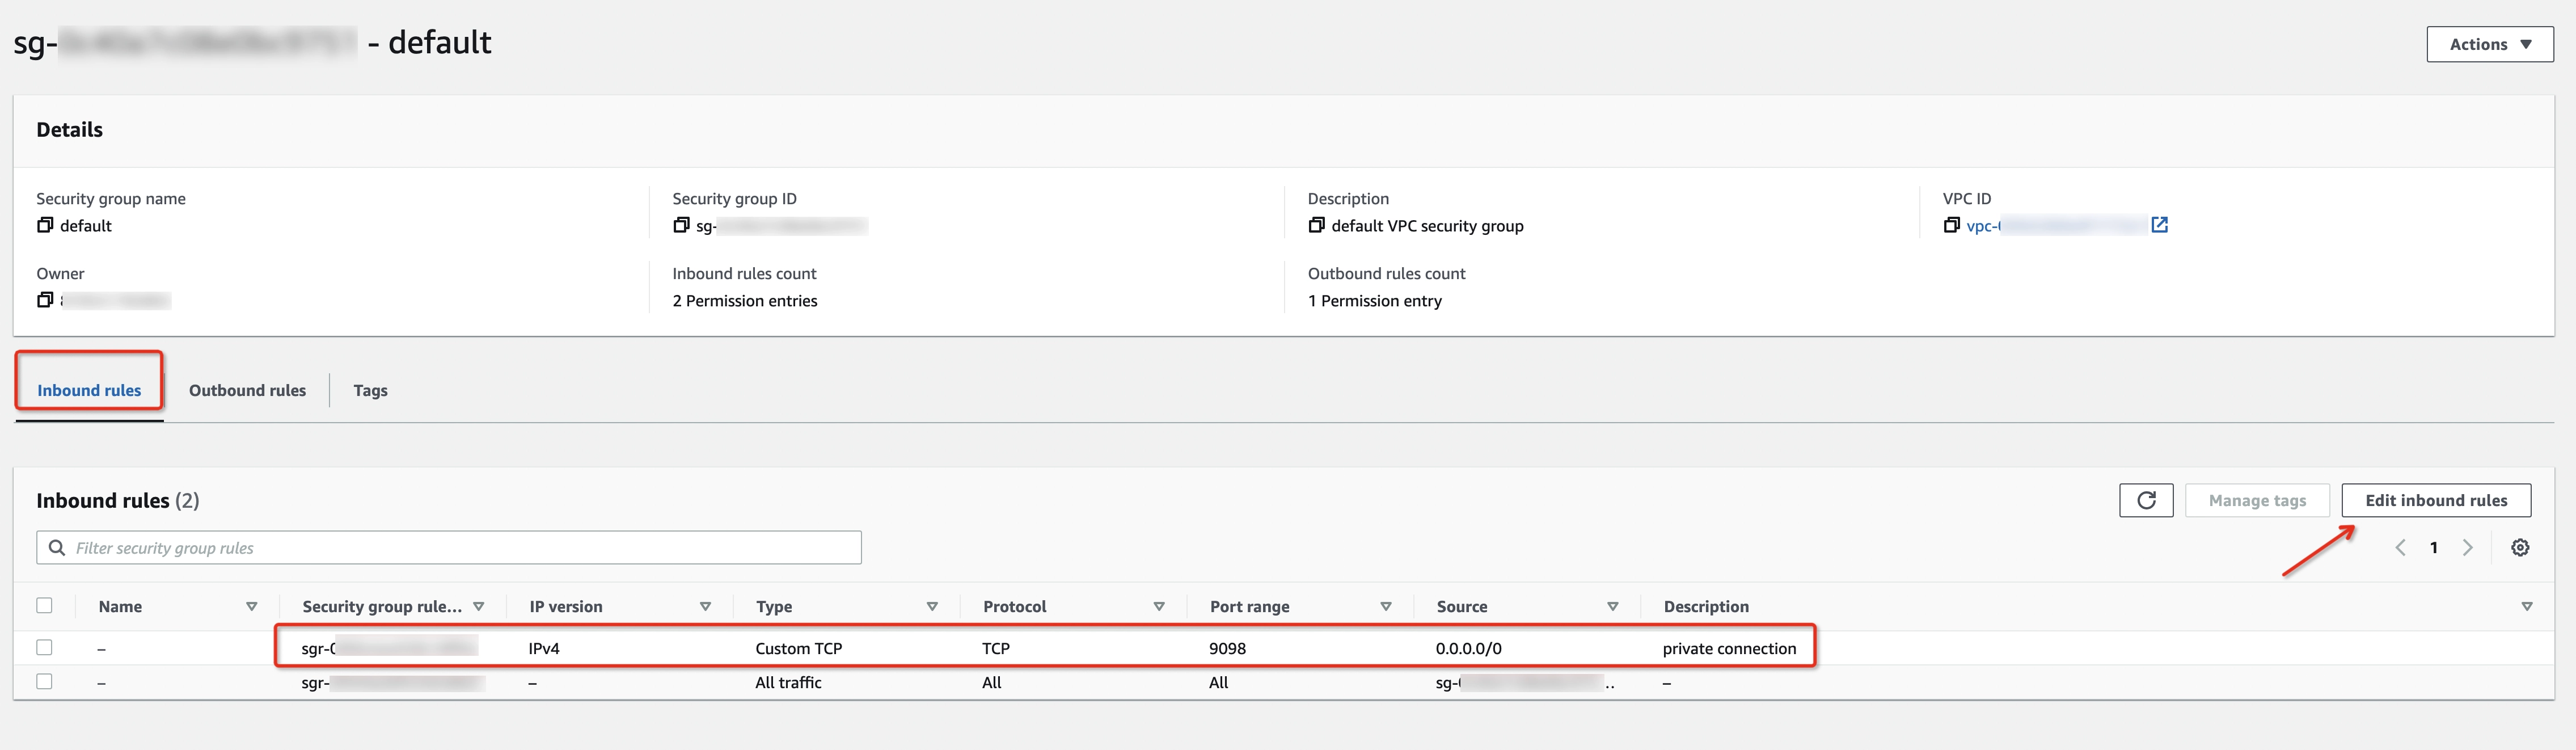
The inbound rules of MSK-related security groups need to be configured to allow the MSK brokers to be accessed through private connection.
- Open the AWS Management Console and go to the MSK Dashboard at https://console.aws.amazon.com/msk/home
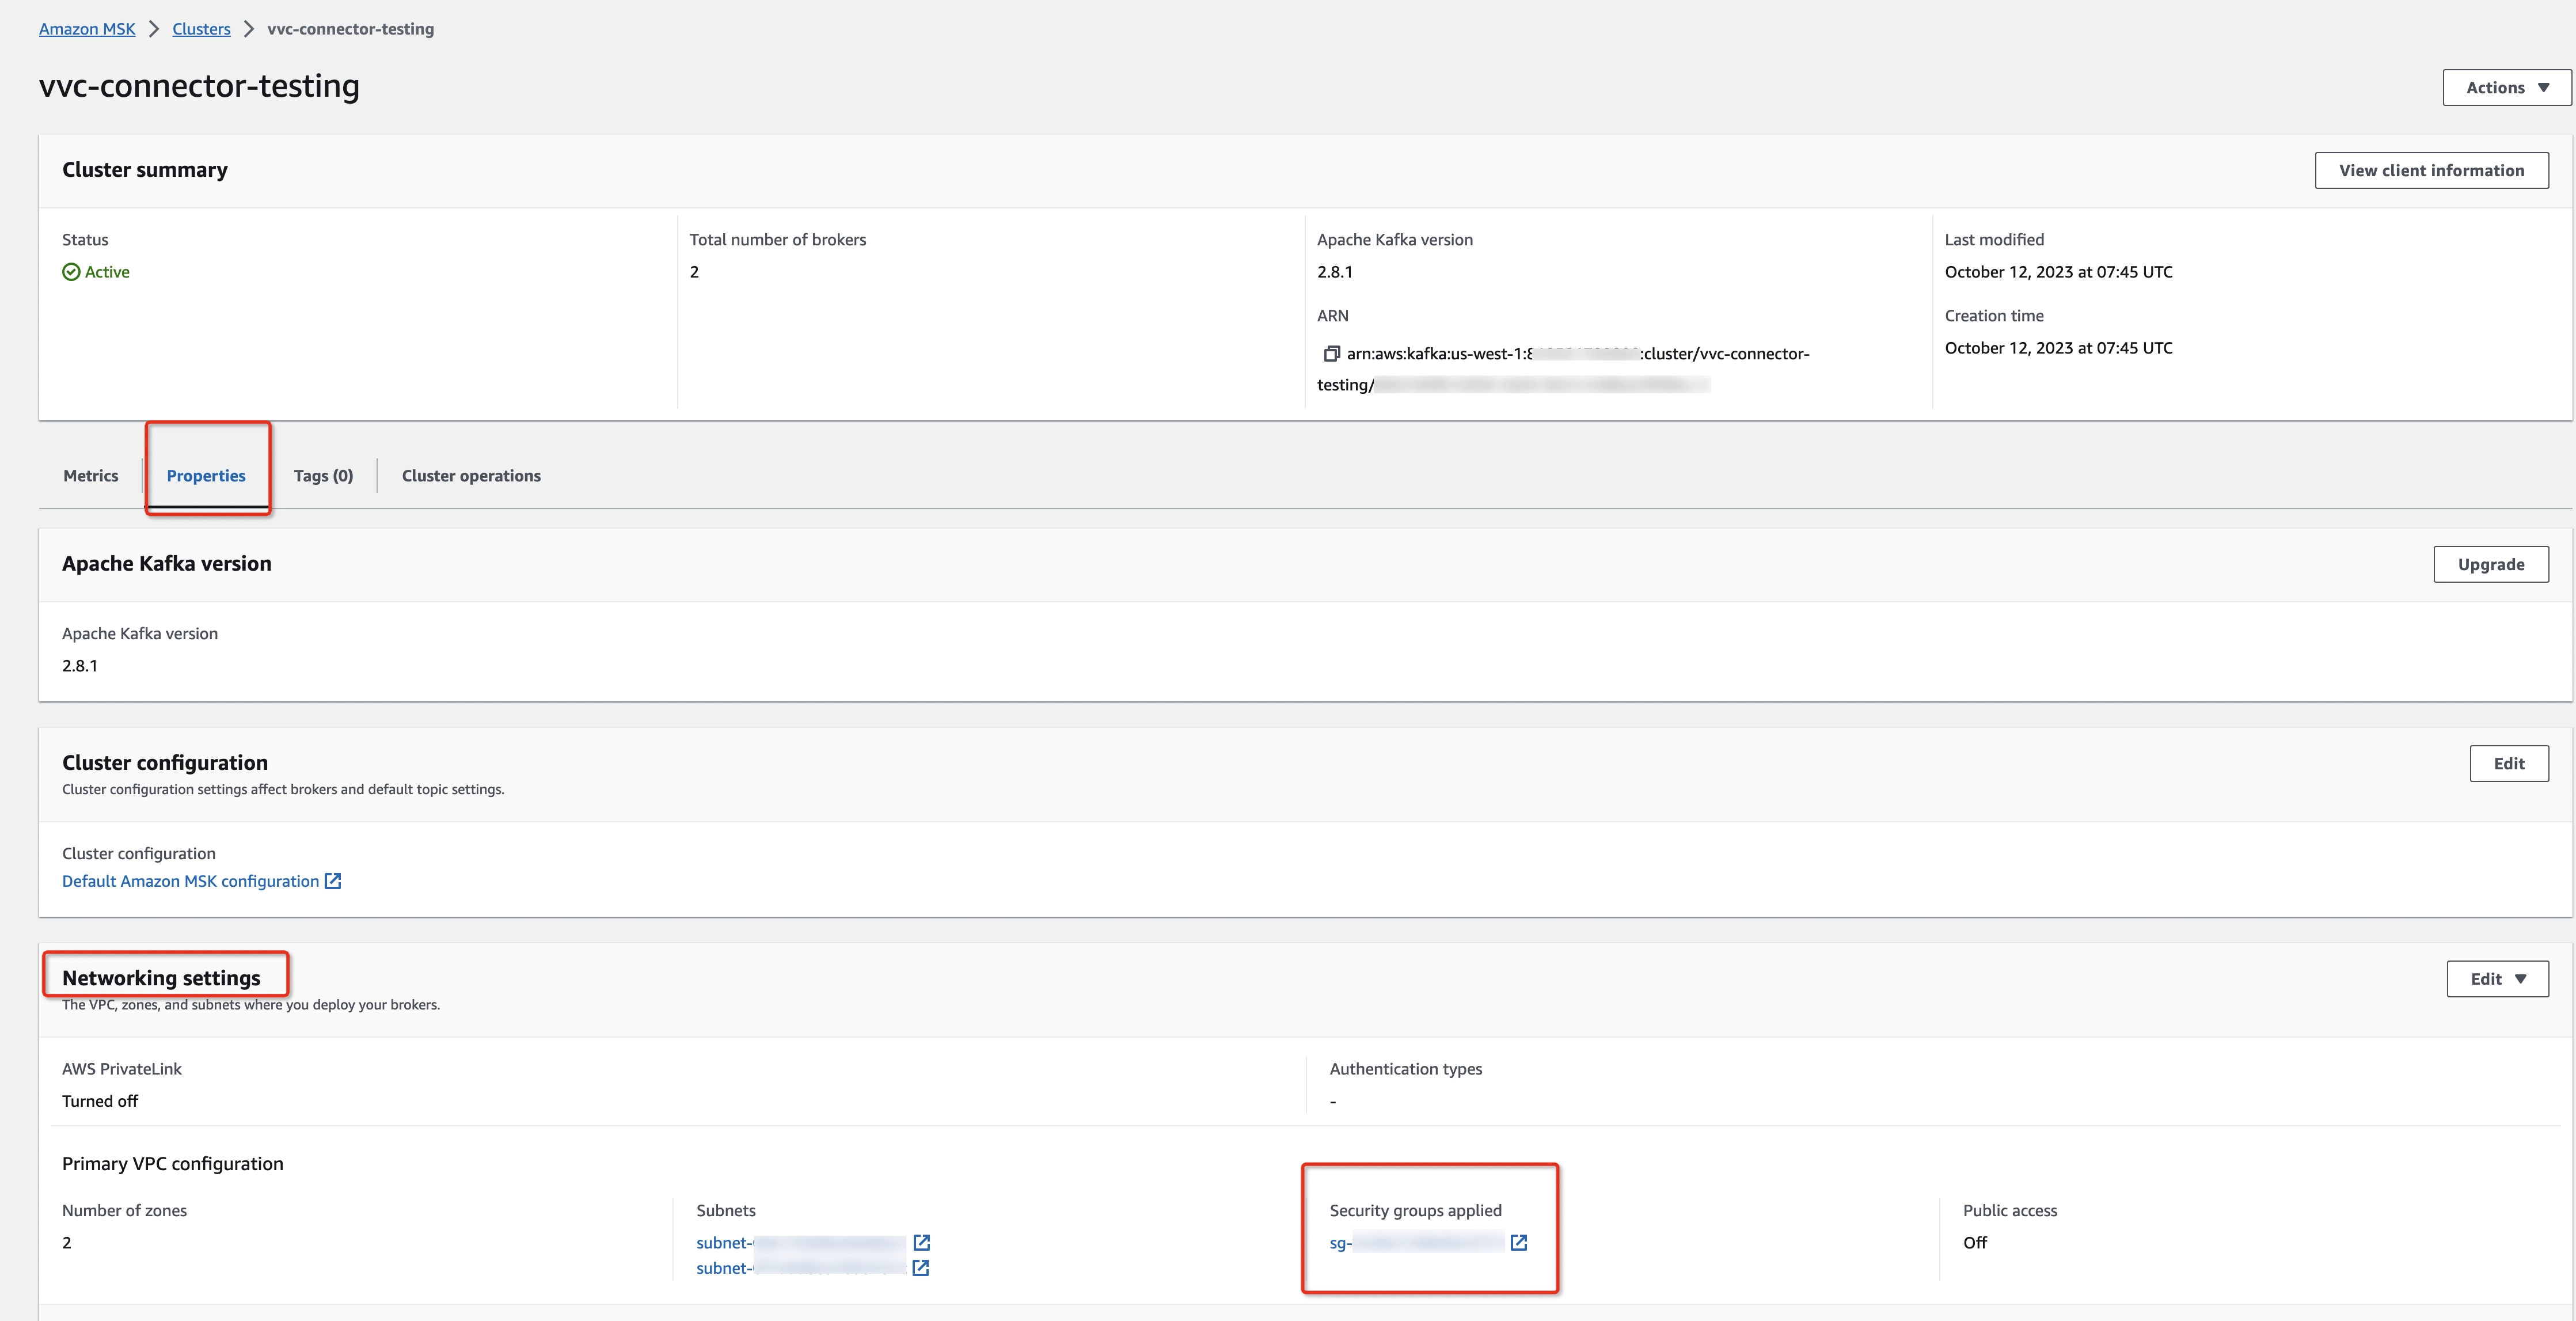
- Navigate to MSK Clusters > Clusters > [Your MSK cluster] > Properties > Networking settings > Security groups applied.
- In the Inbound rules tab, click Edit inbound rules.
- Add a rule with the below protocol, broker’s port, and source:
- Protocol: TCP
- Port range: broker’s target port for the client to connect, 9092 for plaintext, 9094 for TLS encryption, and 9098 for IAM Authentication type
- Source: 0.0.0.0/0, which allows all the connections from VVC VPC CIDR
Since we use IAM access control method by default, we will continue to use 9098 as the broker’s port in the following steps. If you want to use other ports (i.e. 9092, 9094), please change the Cluster setting accordingly.
Step 3: Create Target Groups
-
Create a target group for each MSK broker, which will be used for NLB forwarding.
-
Open the AWS Management Console and go to the MSK Dashboard at https://console.aws.amazon.com/msk/home
-
Check and record every broker's availability zone and IP address:
- Navigate to MSK Clusters > Clusters > [Your MSK cluster] > Properties > Brokers > Broker details
- Set Client subnets and Client VPC IP address as visible in Preferences (a new column will appear in the Broker details table).

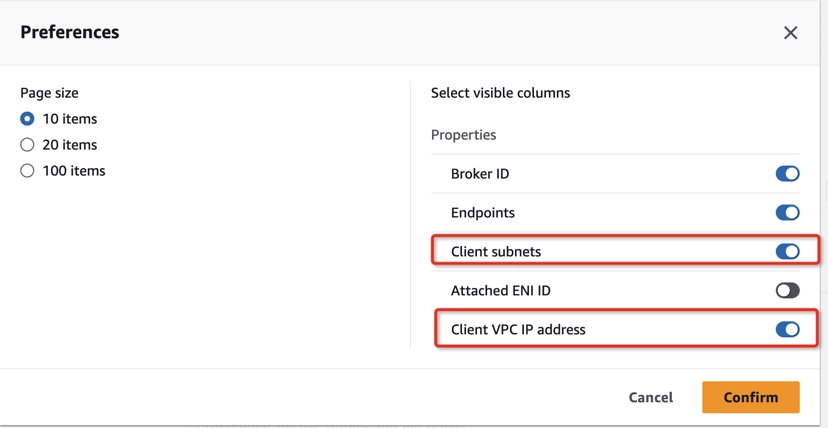
-
Get the Broker Endpoint, Availability Zone (from the Client subnets detail page), and Client VPC IP address. For example:
| Broker Endpoint | Availability Zone | Client VPC IP Address |
|---|---|---|
| b-1.vvcconnectortesting.xxxxxx.c4.kafka.us-west-1.amazonaws.com | us-west-1a | xxx.xx.30.54 |
| b-2.vvcconnectortesting.xxxxxx.c4.kafka.us-west-1.amazonaws.com | us-west-1c | xxx.xx.7.86 |
-
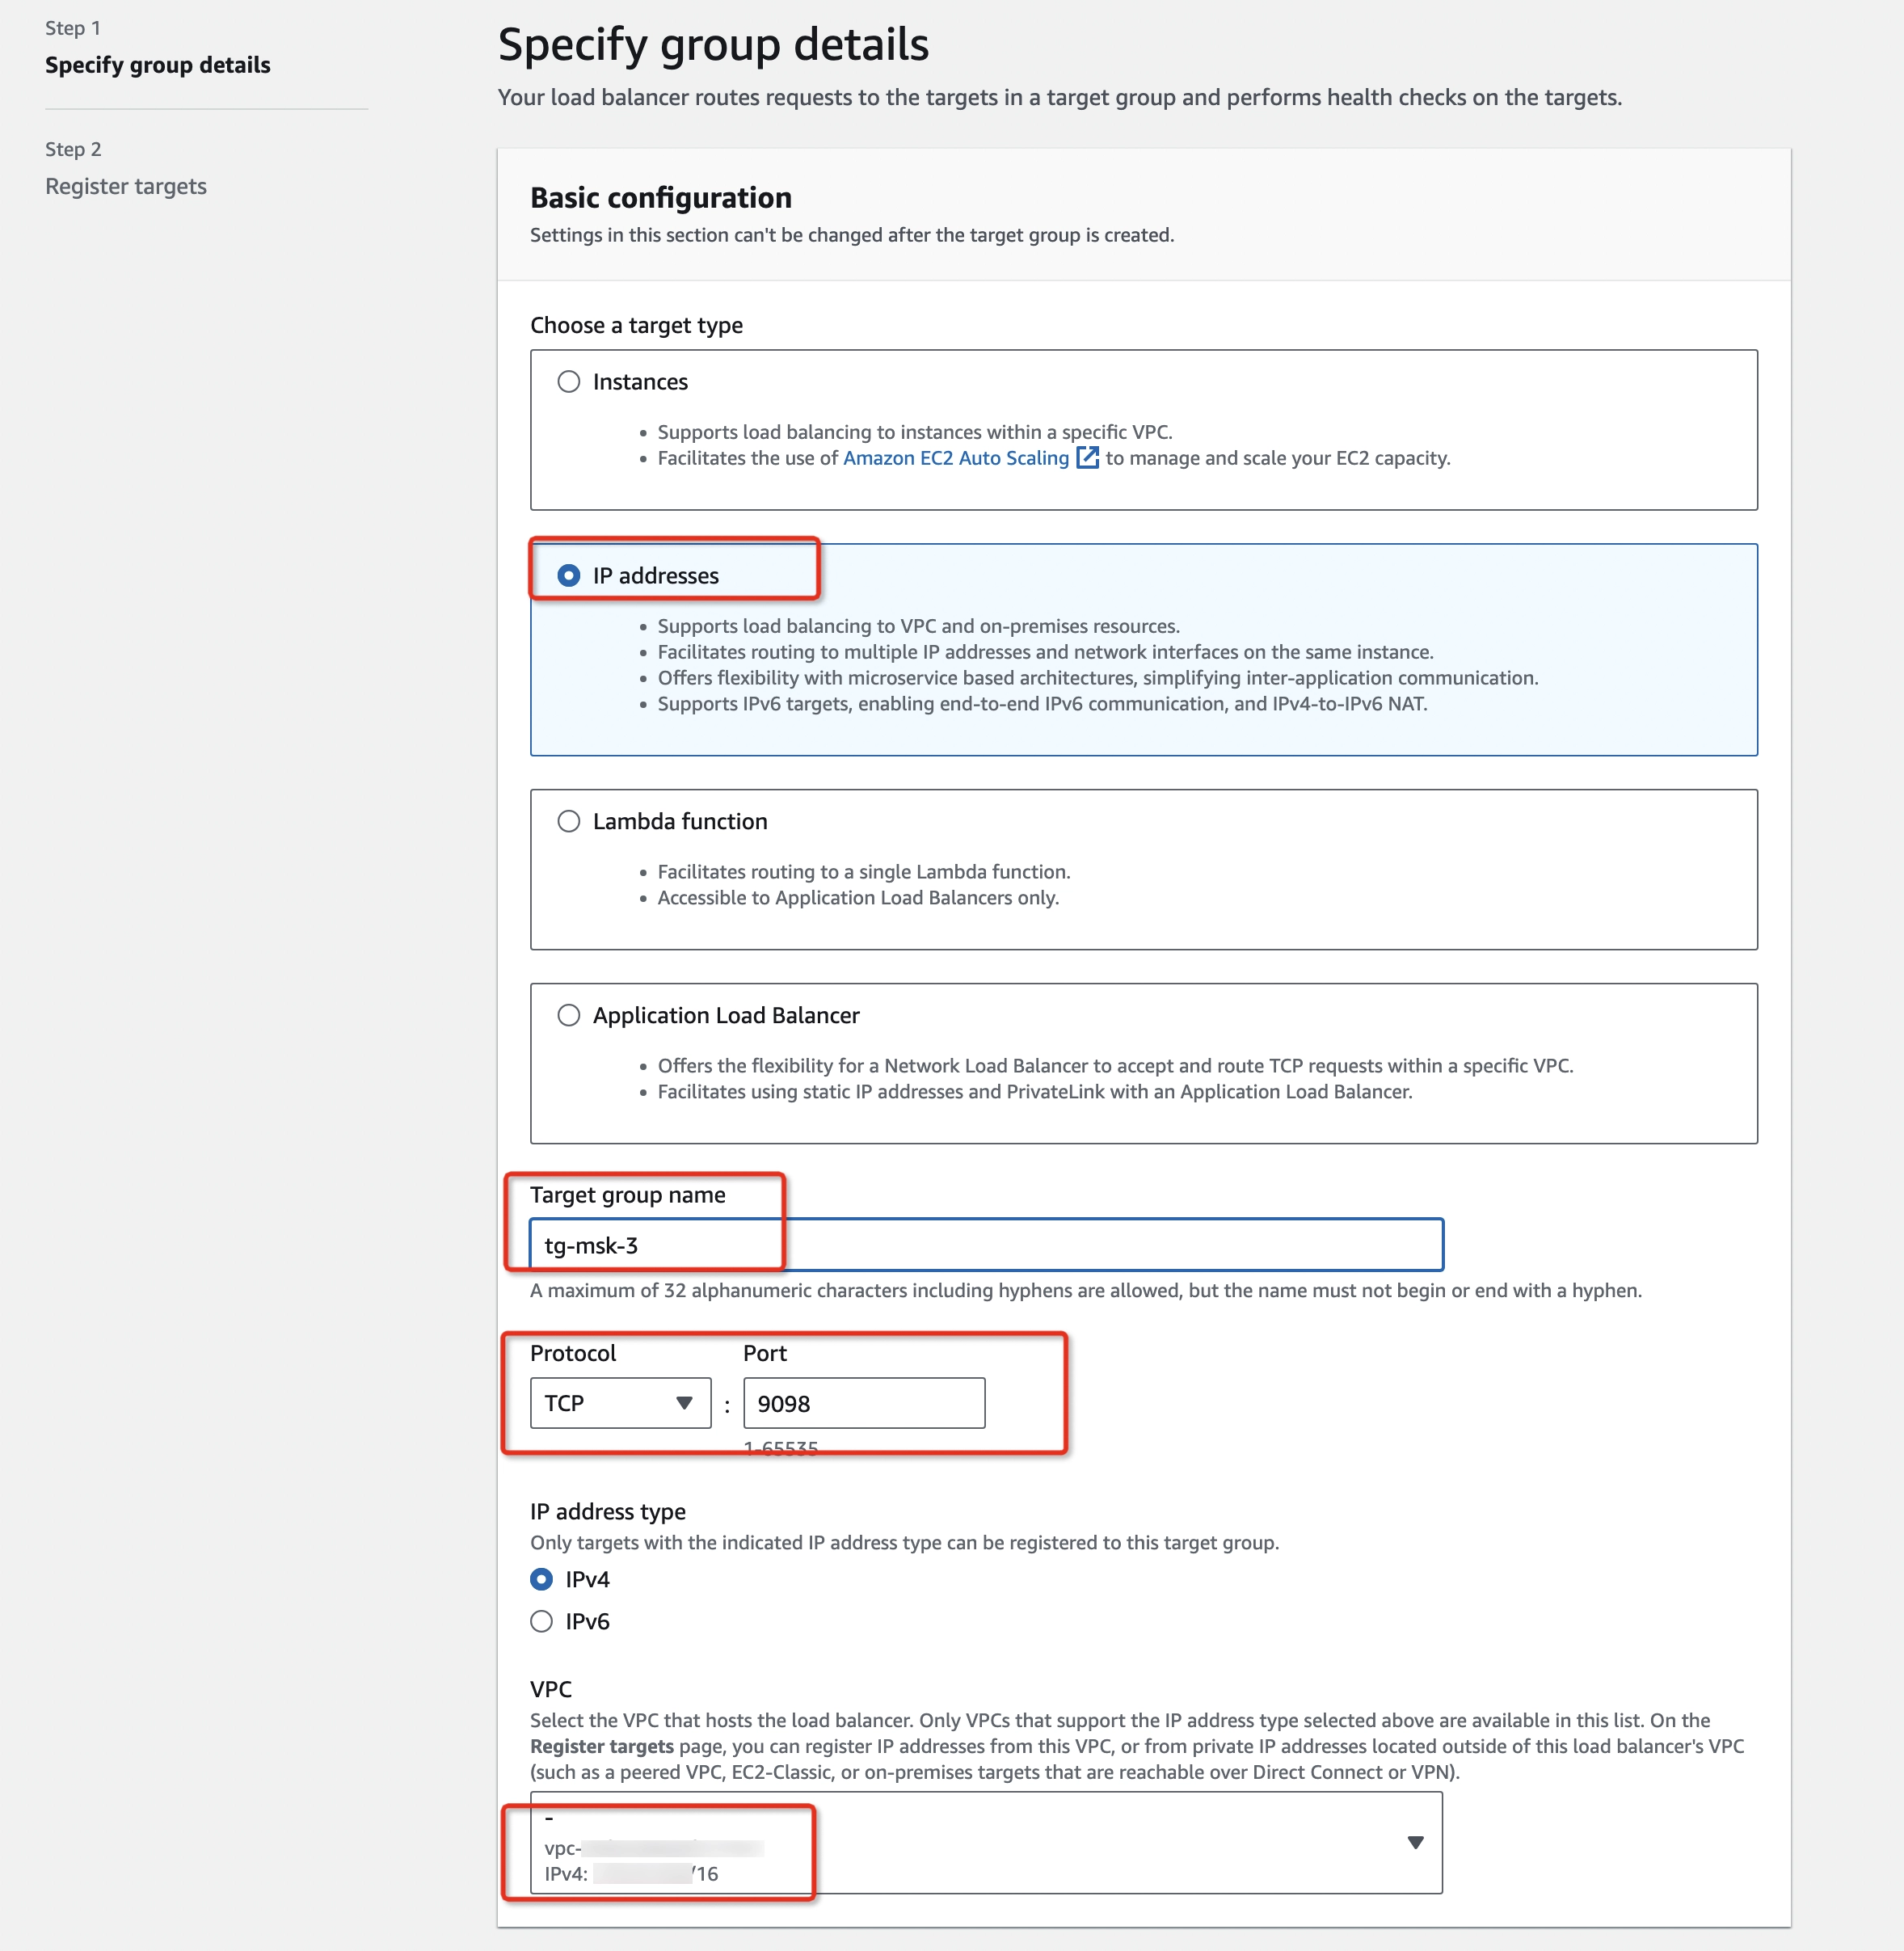
Open Amazon EC2 Console -> Load Balancing -> Target Groups (https://console.aws.amazon.com/ec2/home#TargetGroups)
-
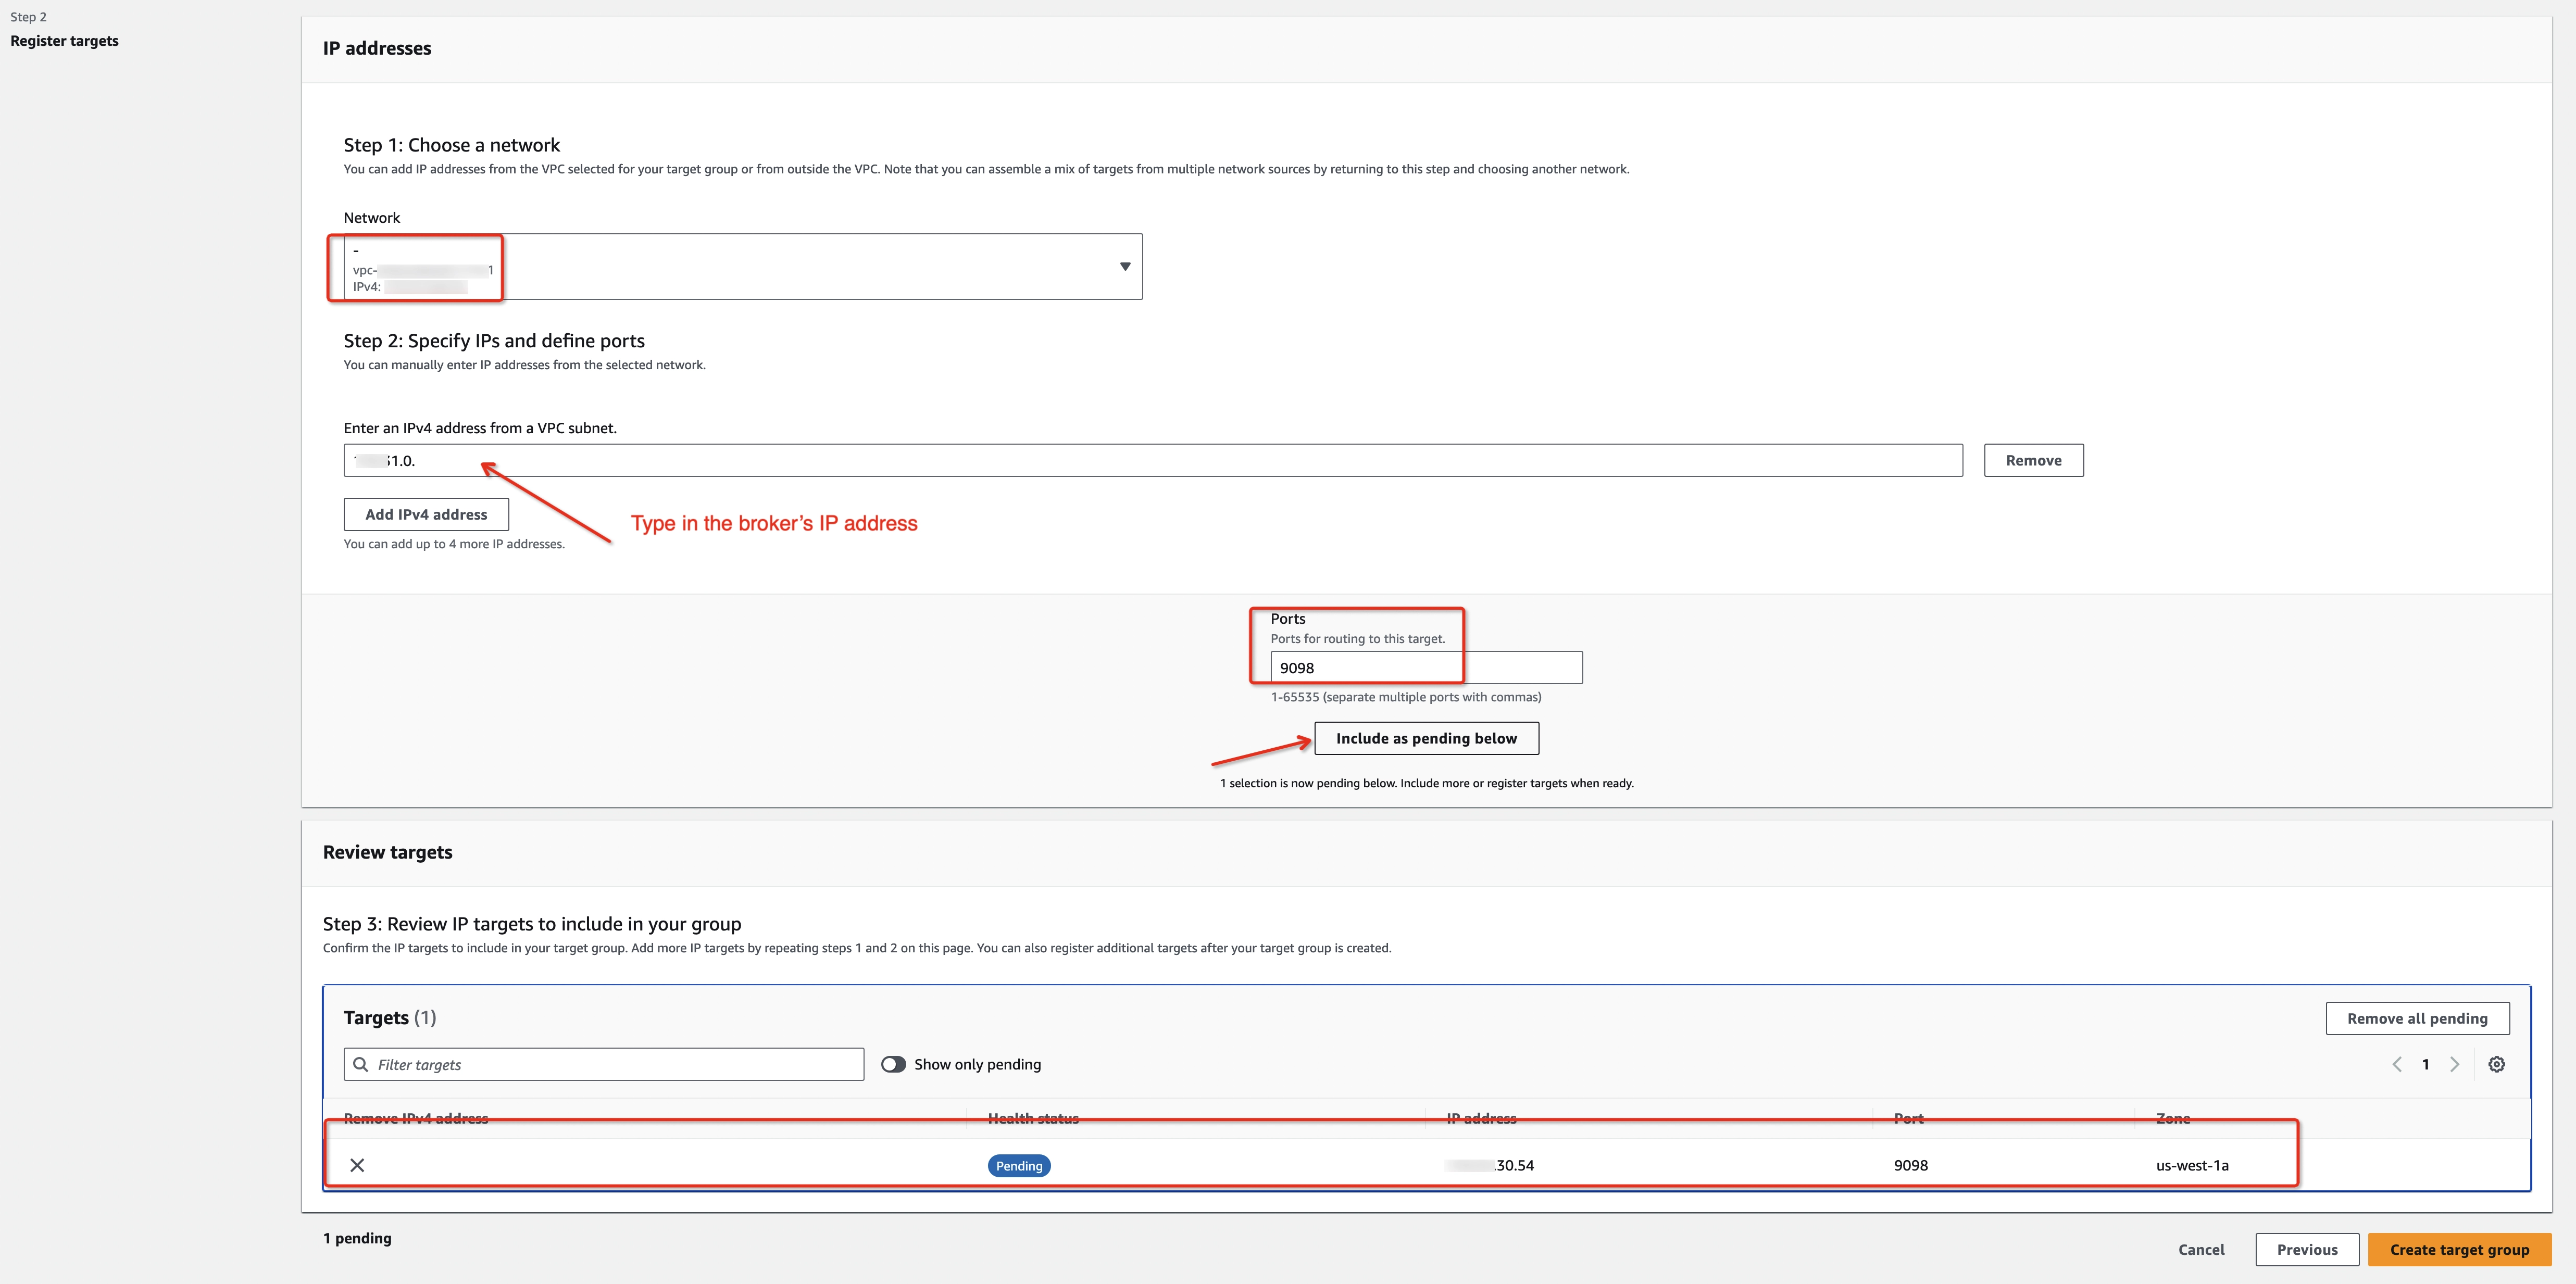
Click Create target group button with the below information:
- Target type: IP addresses
- Protocol: TCP
- Broker’s port: 9098
- Same VPC as MSK cluster
- Add the broker's IP address to the target list when registering targets via the Include as pending below button.
Step 4: Create NLBs
Create a Network Load Balancer (NLB) for each MSK broker, which will be targeting the previous target group:
- Open Amazon EC2 console > Load Balancing > Load Balancers (https://console.aws.amazon.com/ec2/home#LoadBalancers)
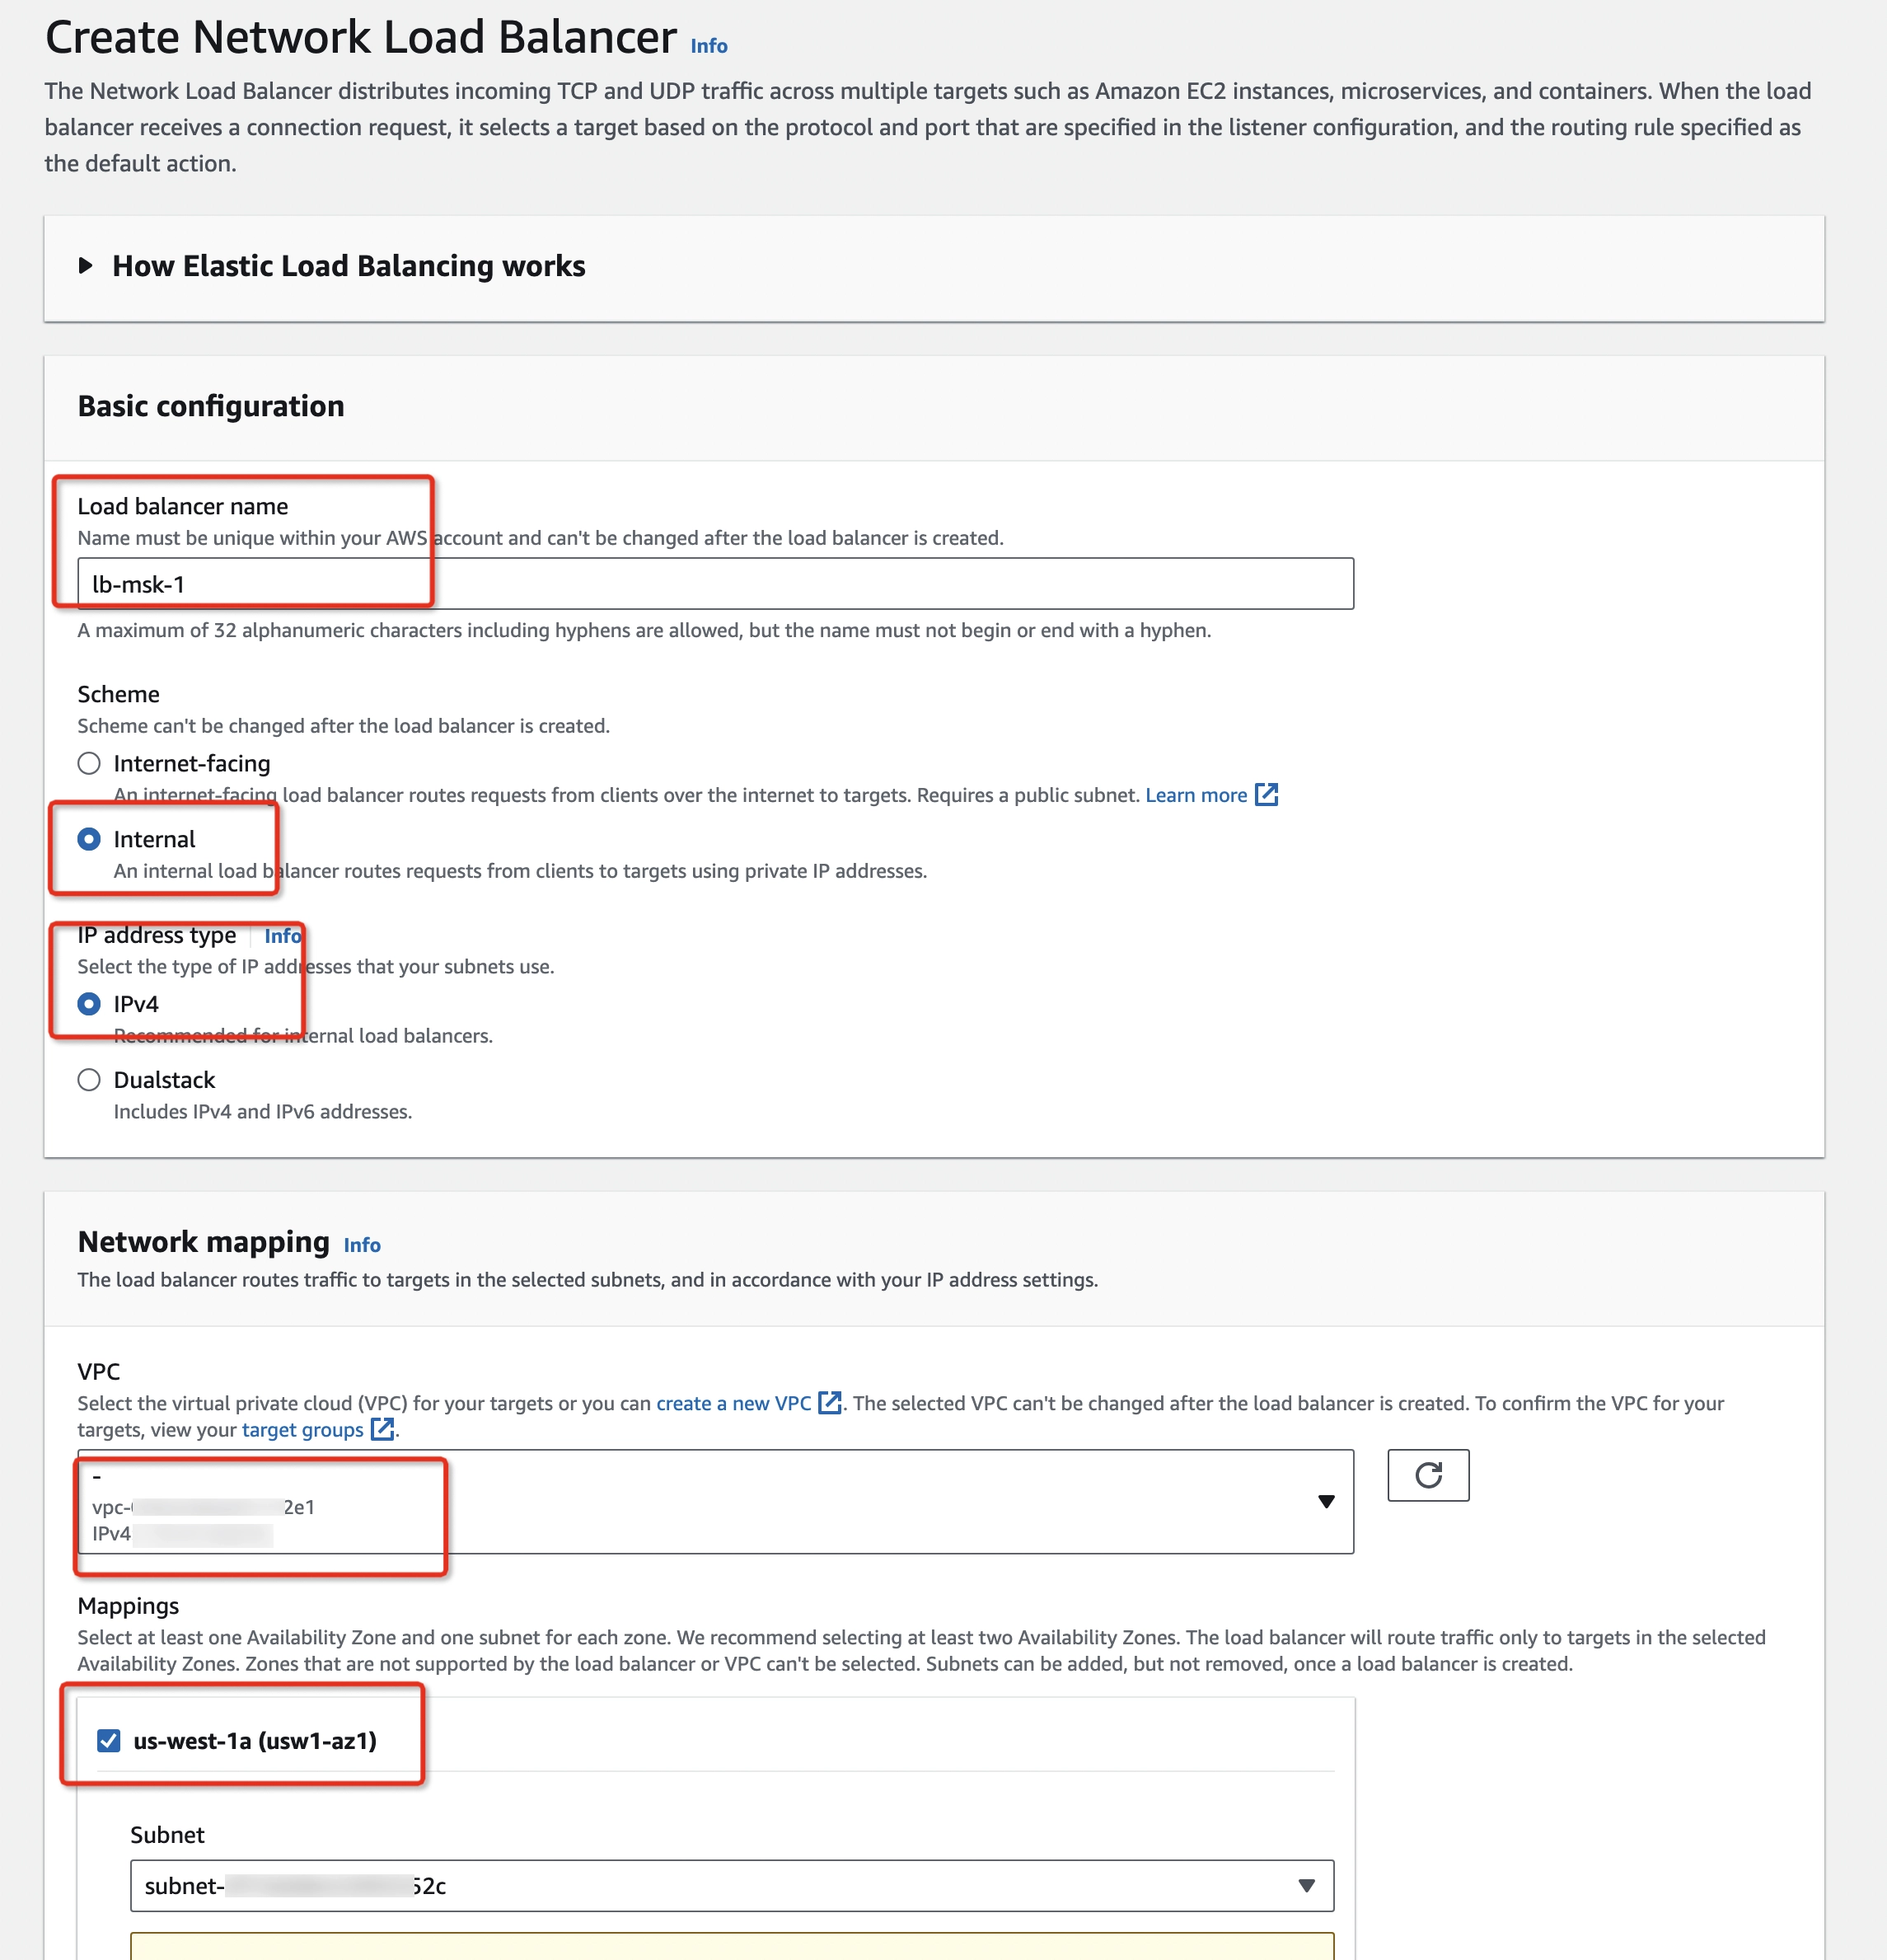
- Create an NLB with the following:
- Internal scheme
- IPv4 IP address type
- Same VPC as the MSK cluster
- Mappings to the availability zone where the corresponding broker's subnet is allocated
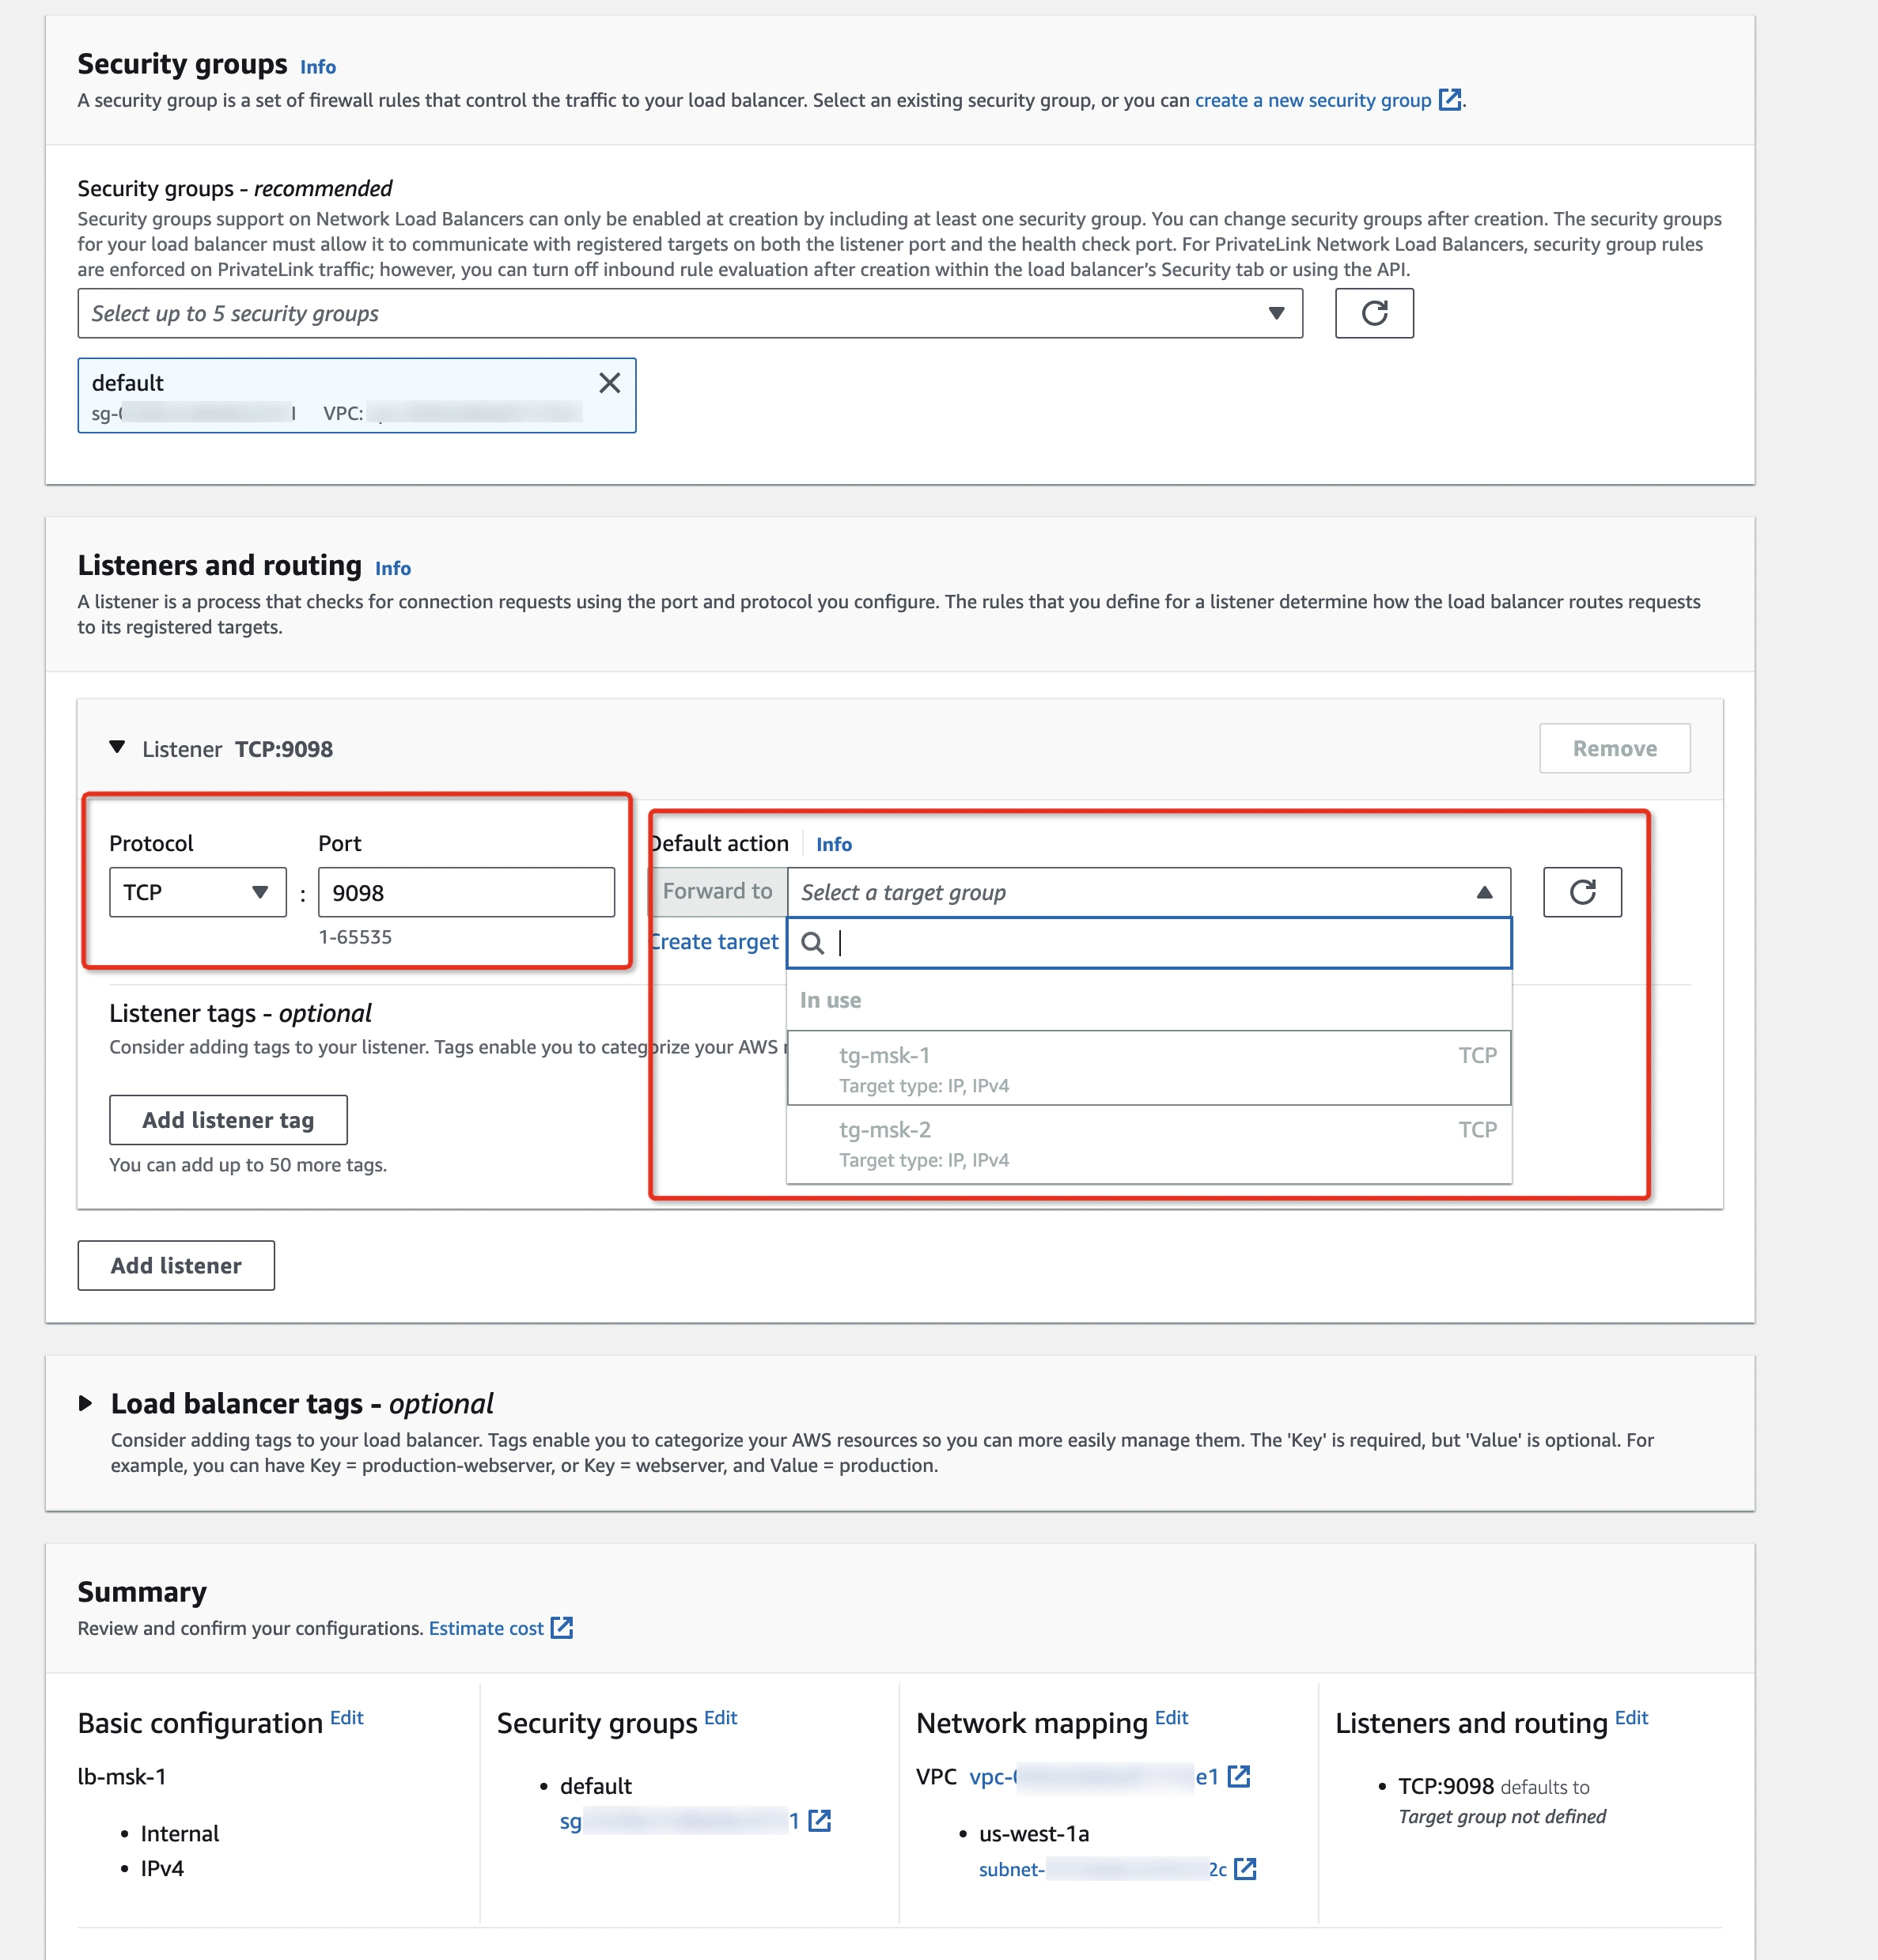
- TCP listener protocol
- Broker’s port (i.e. 9098)
- Forward to the corresponding target group created in Step 2
- Use the same subnet in which the broker is running
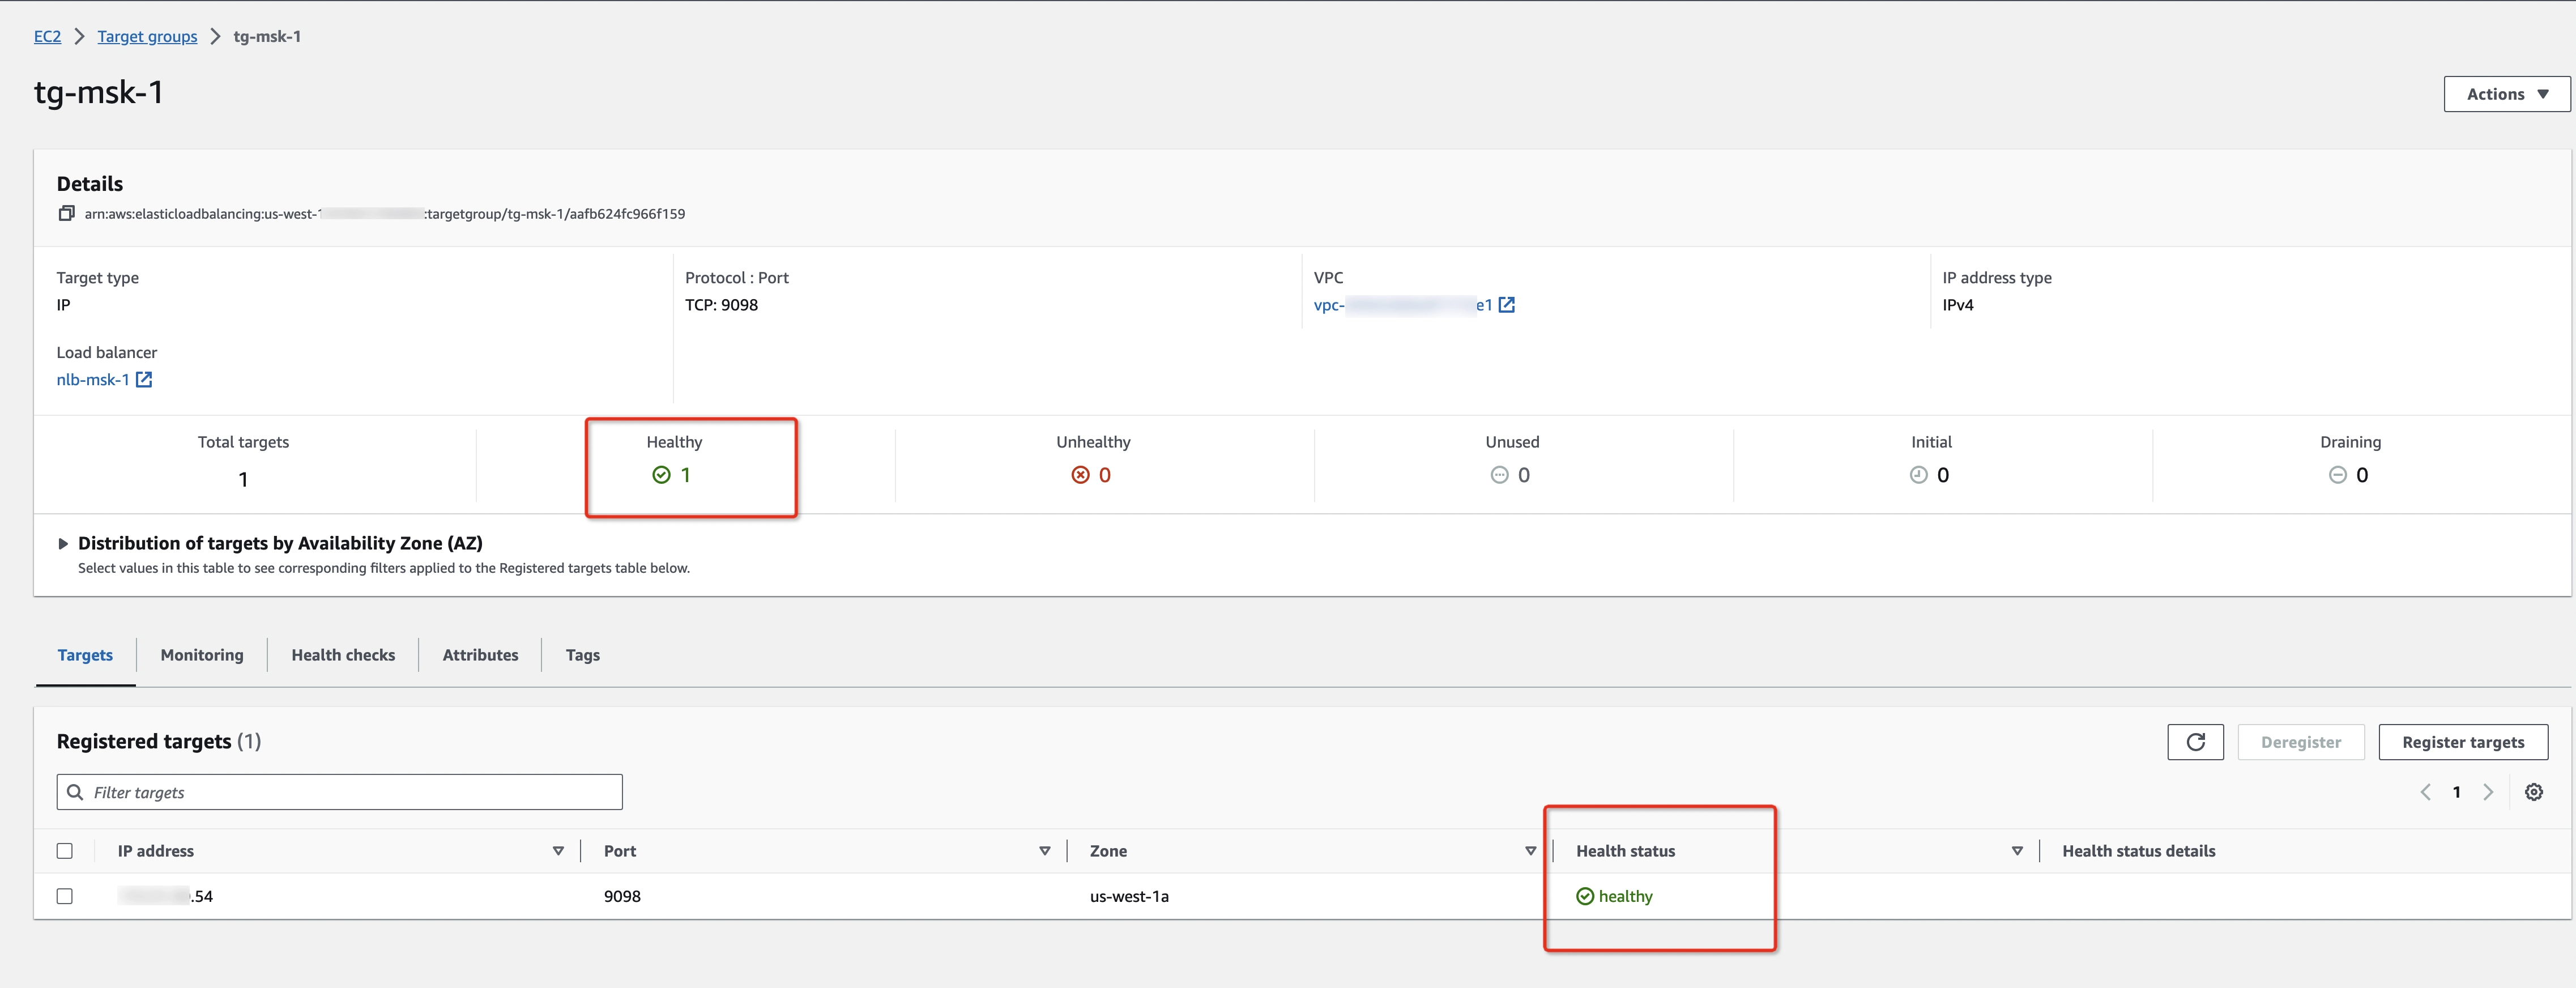
- Check target groups' health status. Don’t go to the next step until the target groups are healthy.
Step 5: Create the Endpoint Services
Create endpoint services with NLBs created in Step 4, allowing Ververica Cloud principals to connect:
-
Open Amazon VPC console > Endpoint services (https://console.aws.amazon.com/vpc/home#EndpointServices)
-
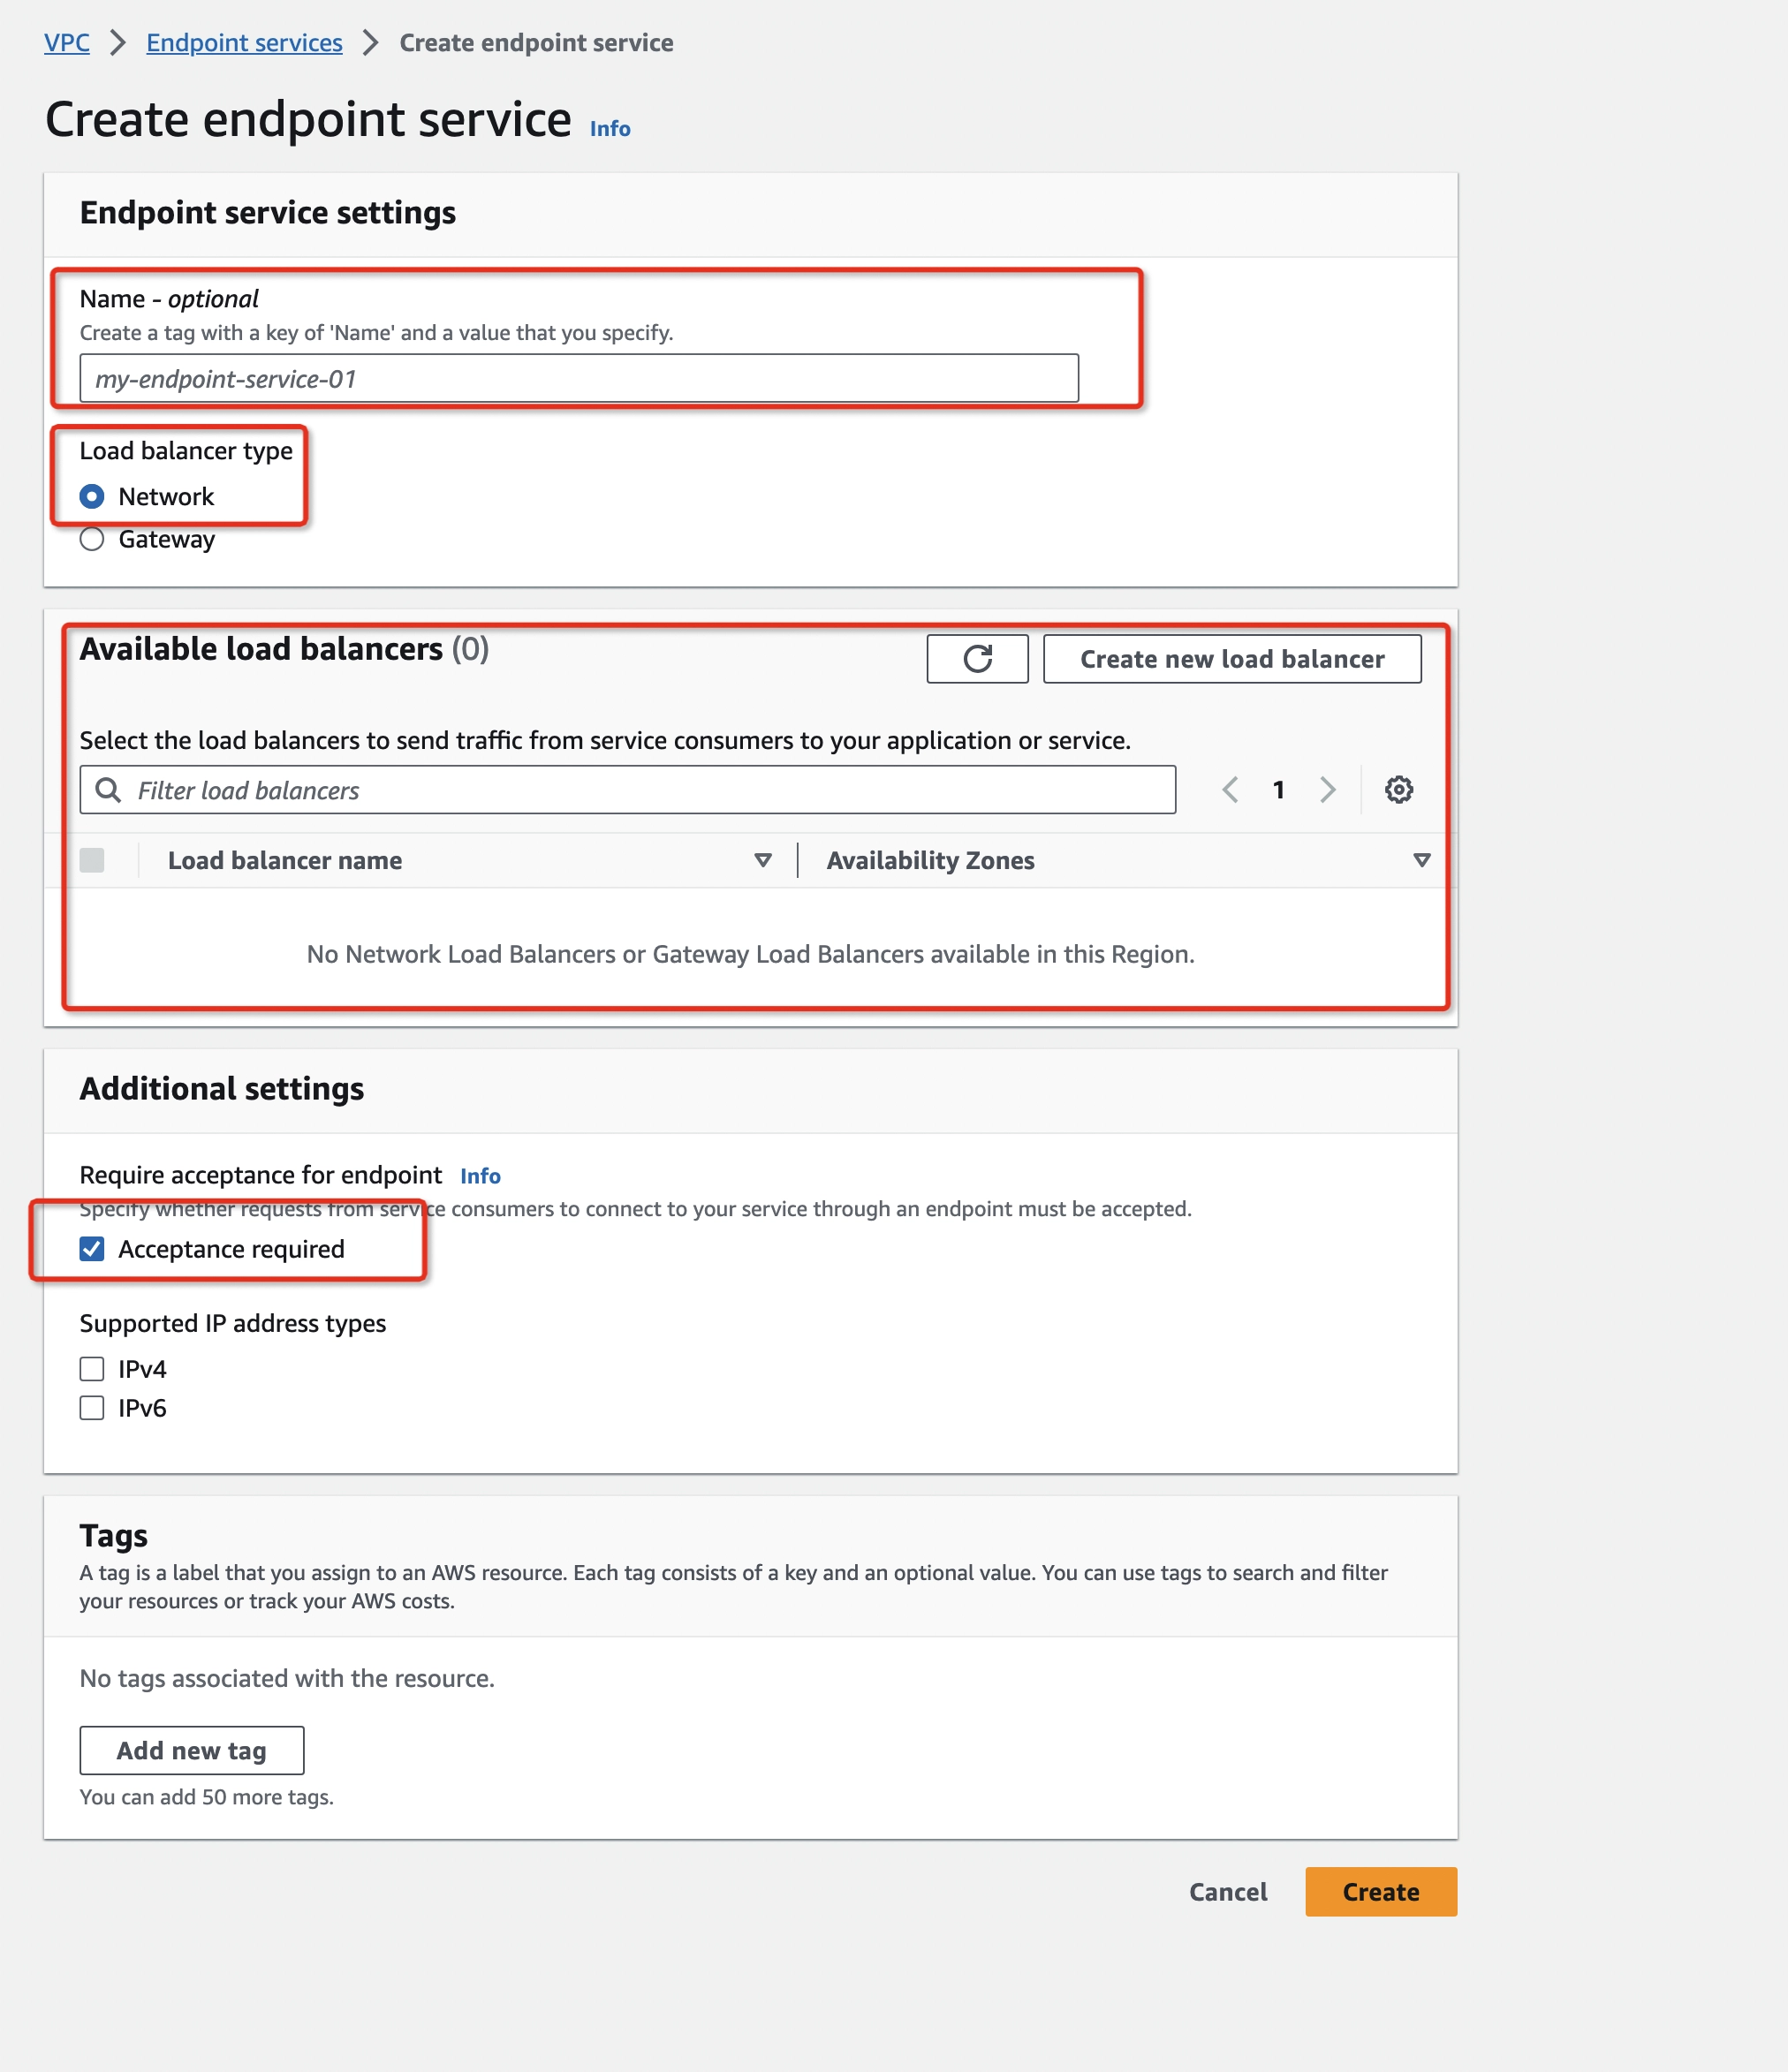
Click Create endpoint service to create an endpoint service with Network Load balancer type and check the Acceptance required box in the Additional settings. This is very important to disallow unexpected connections which are not from you.
-
If you don't see any Network Load Balancers, click the refresh button. After a while the one you just created will appear.
-
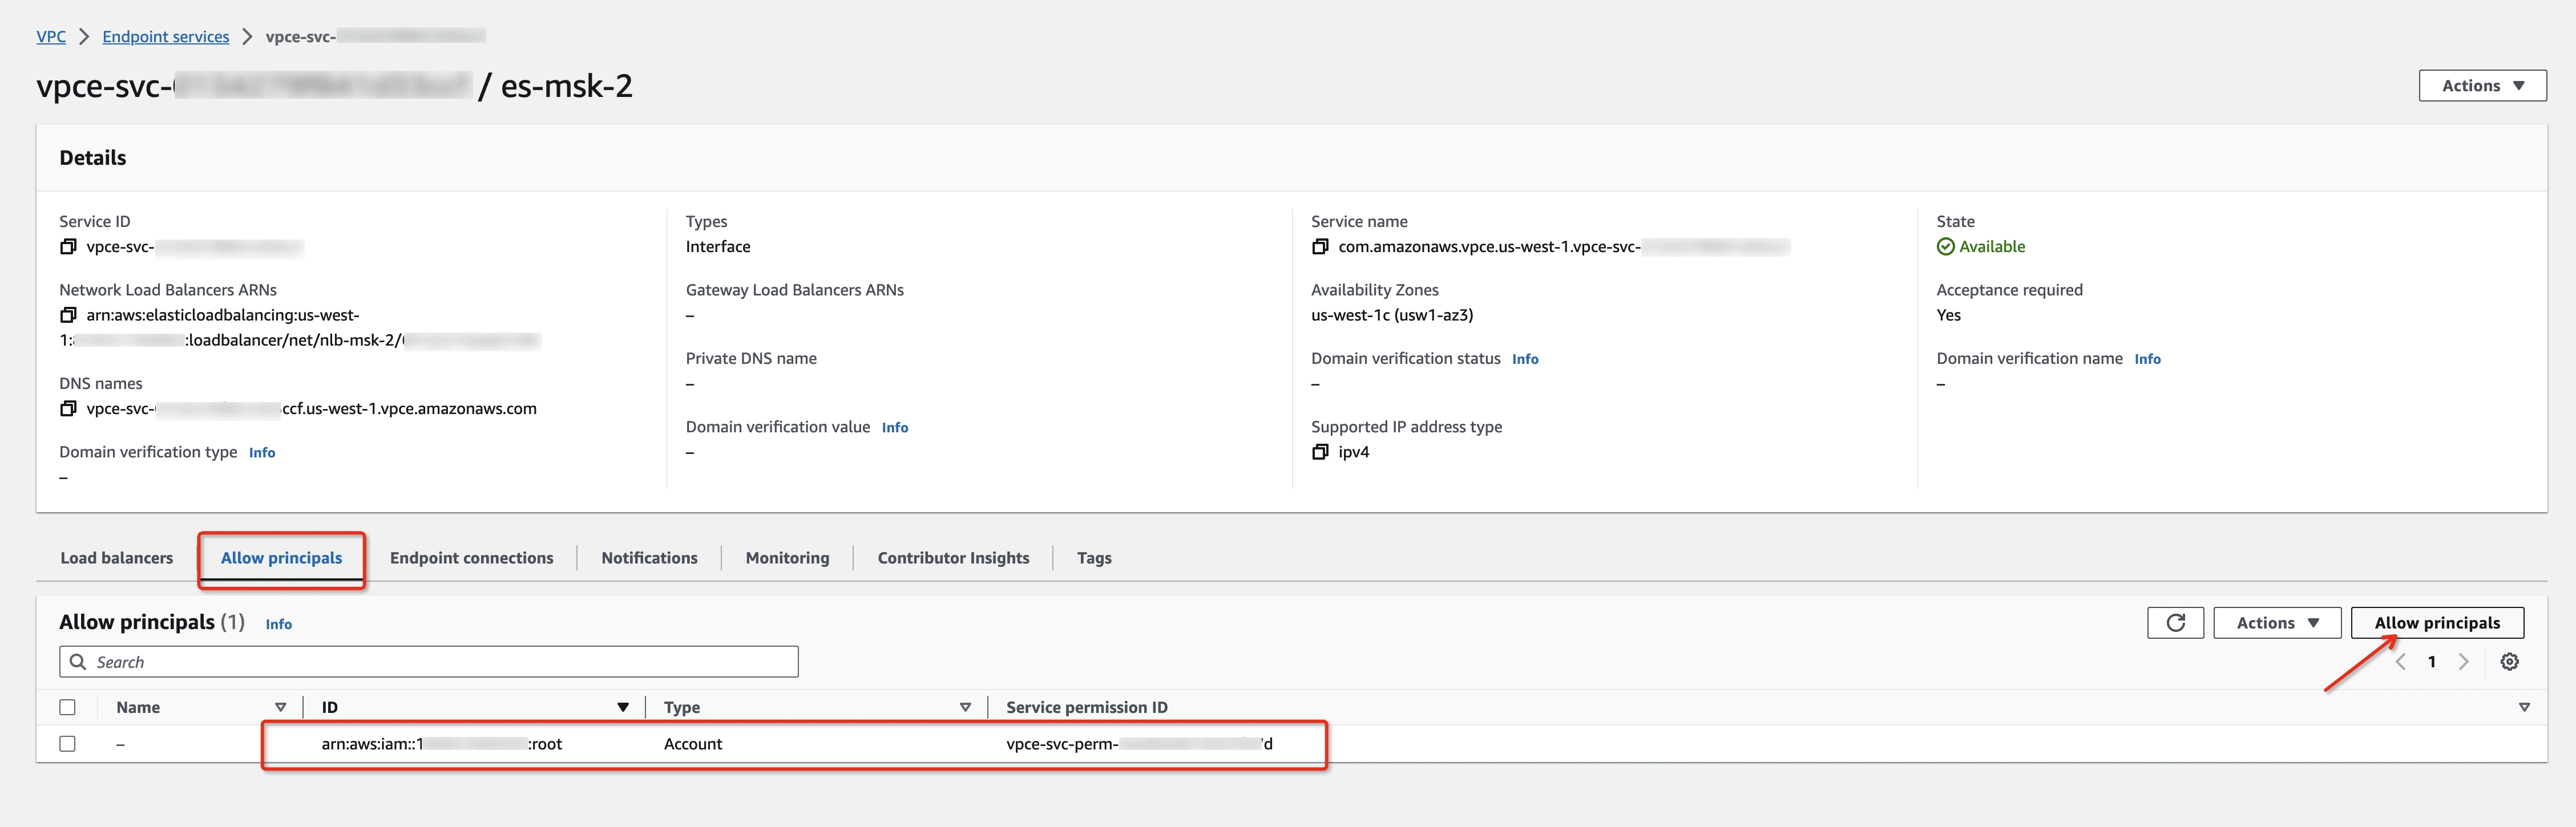
After the endpoint service creation, go to the Allow principals tab, click Allow principals, and add
arn:aws:iam::<Ververica_AWS_Account_ID>:root principal.noteVerverica_AWS_Account_IDis listed below -
Get the endpoint service name and the corresponding broker endpoint (from the MSK Dashboard broker details). For example:
| Endpoint Service Name | Broker Endpoint |
|---|---|
| com.amazonaws.vpce.us-west-1.vpce-svc-xxxxxxxxxxxxxxxxx | b-1.vvcconnectortesting.xxxxxx.c4.kafka.us-west-1.amazonaws.com |
| com.amazonaws.vpce.us-west-1.vpce-svc-xxxxxxxxxxxxxxxxx | b-2.vvcconnectortesting.xxxxxx.c4.kafka.us-west-1.amazonaws.com |
Step 6: Create a Private Connection in the Ververica Cloud portal
Configure the AWS IAM Role
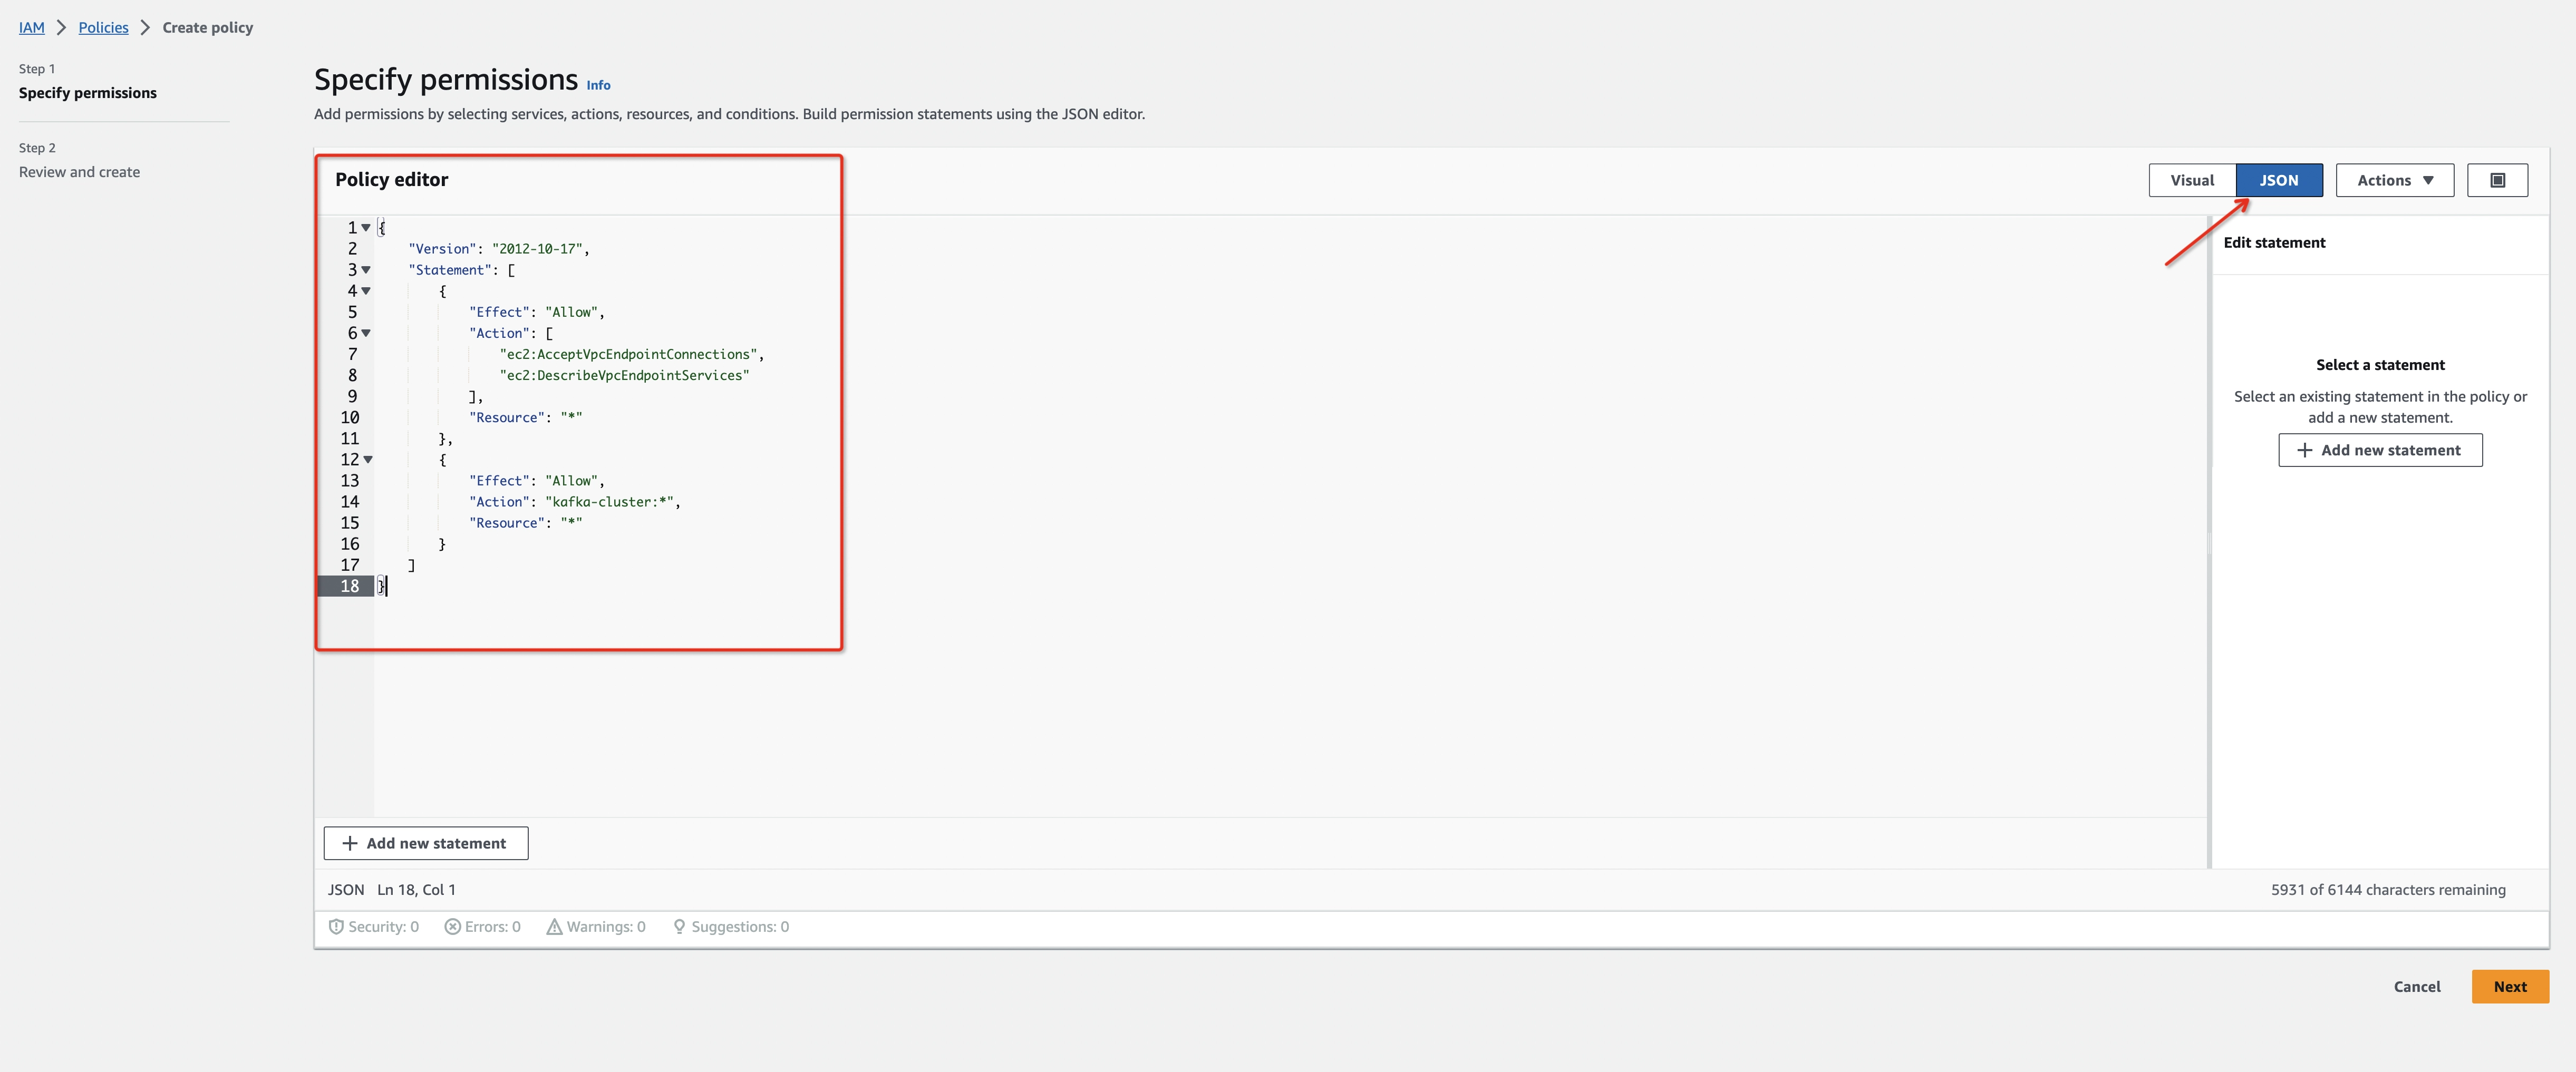
- Create an IAM Permissions Policy with the needed permissions that Ververica Cloud will assume for this role and then accept the endpoint connection request. Refer to aws doc to learn more information about the policies.
{
    "Version": "2012-10-17",
    "Statement": [
        {
            "Effect": "Allow",
            "Action": [
                "ec2:AcceptVpcEndpointConnections",
                "ec2:DescribeVpcEndpointServices"
            ],
            "Resource": "*"
        }
    ]
}
-
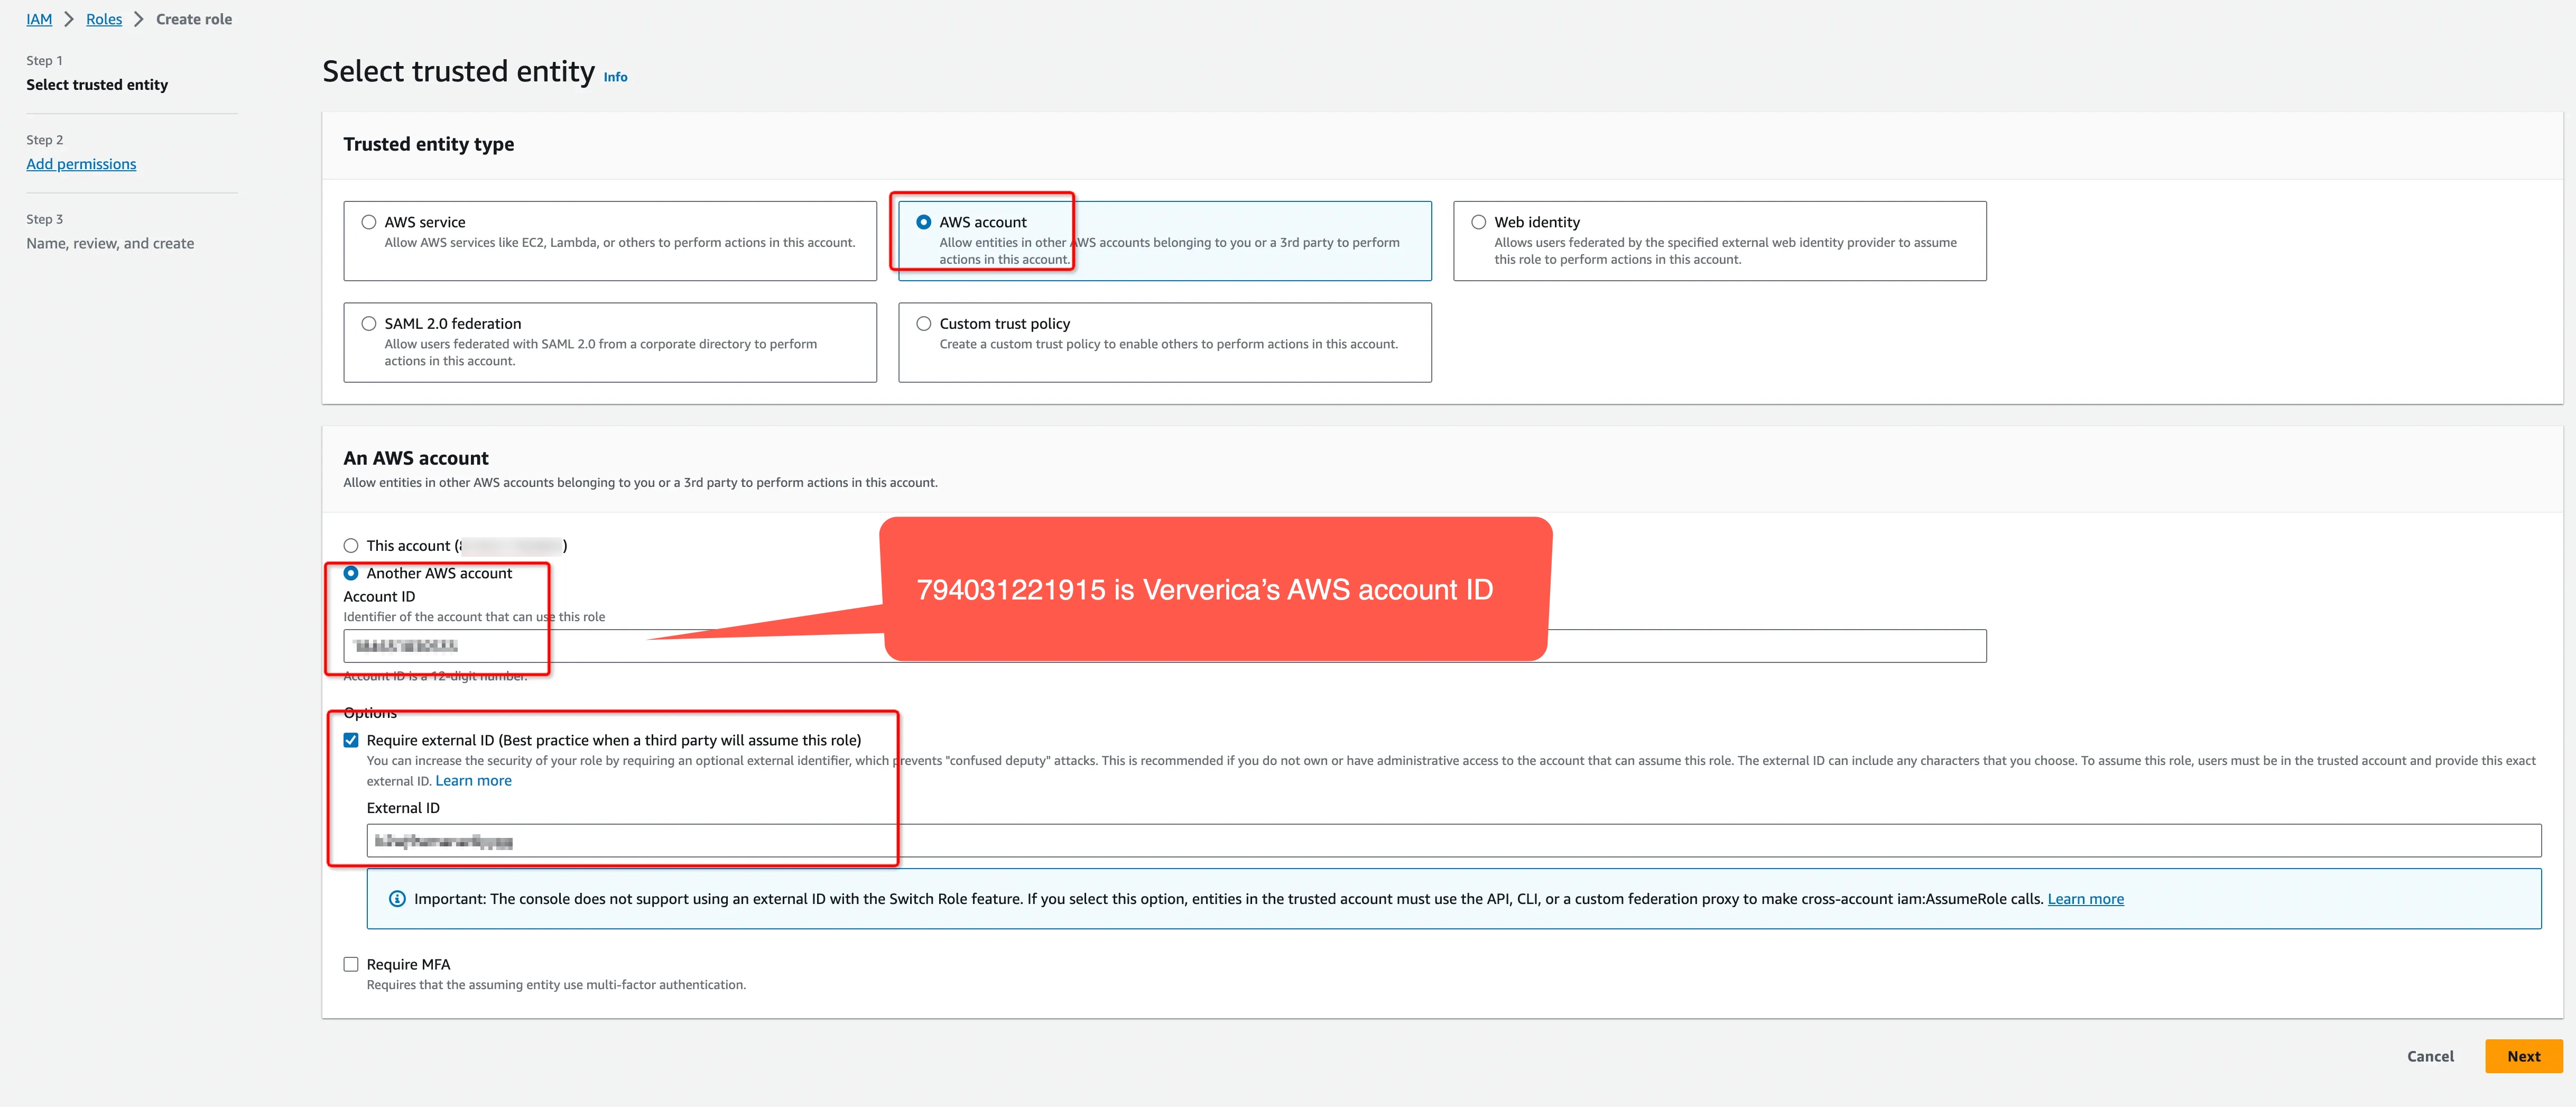
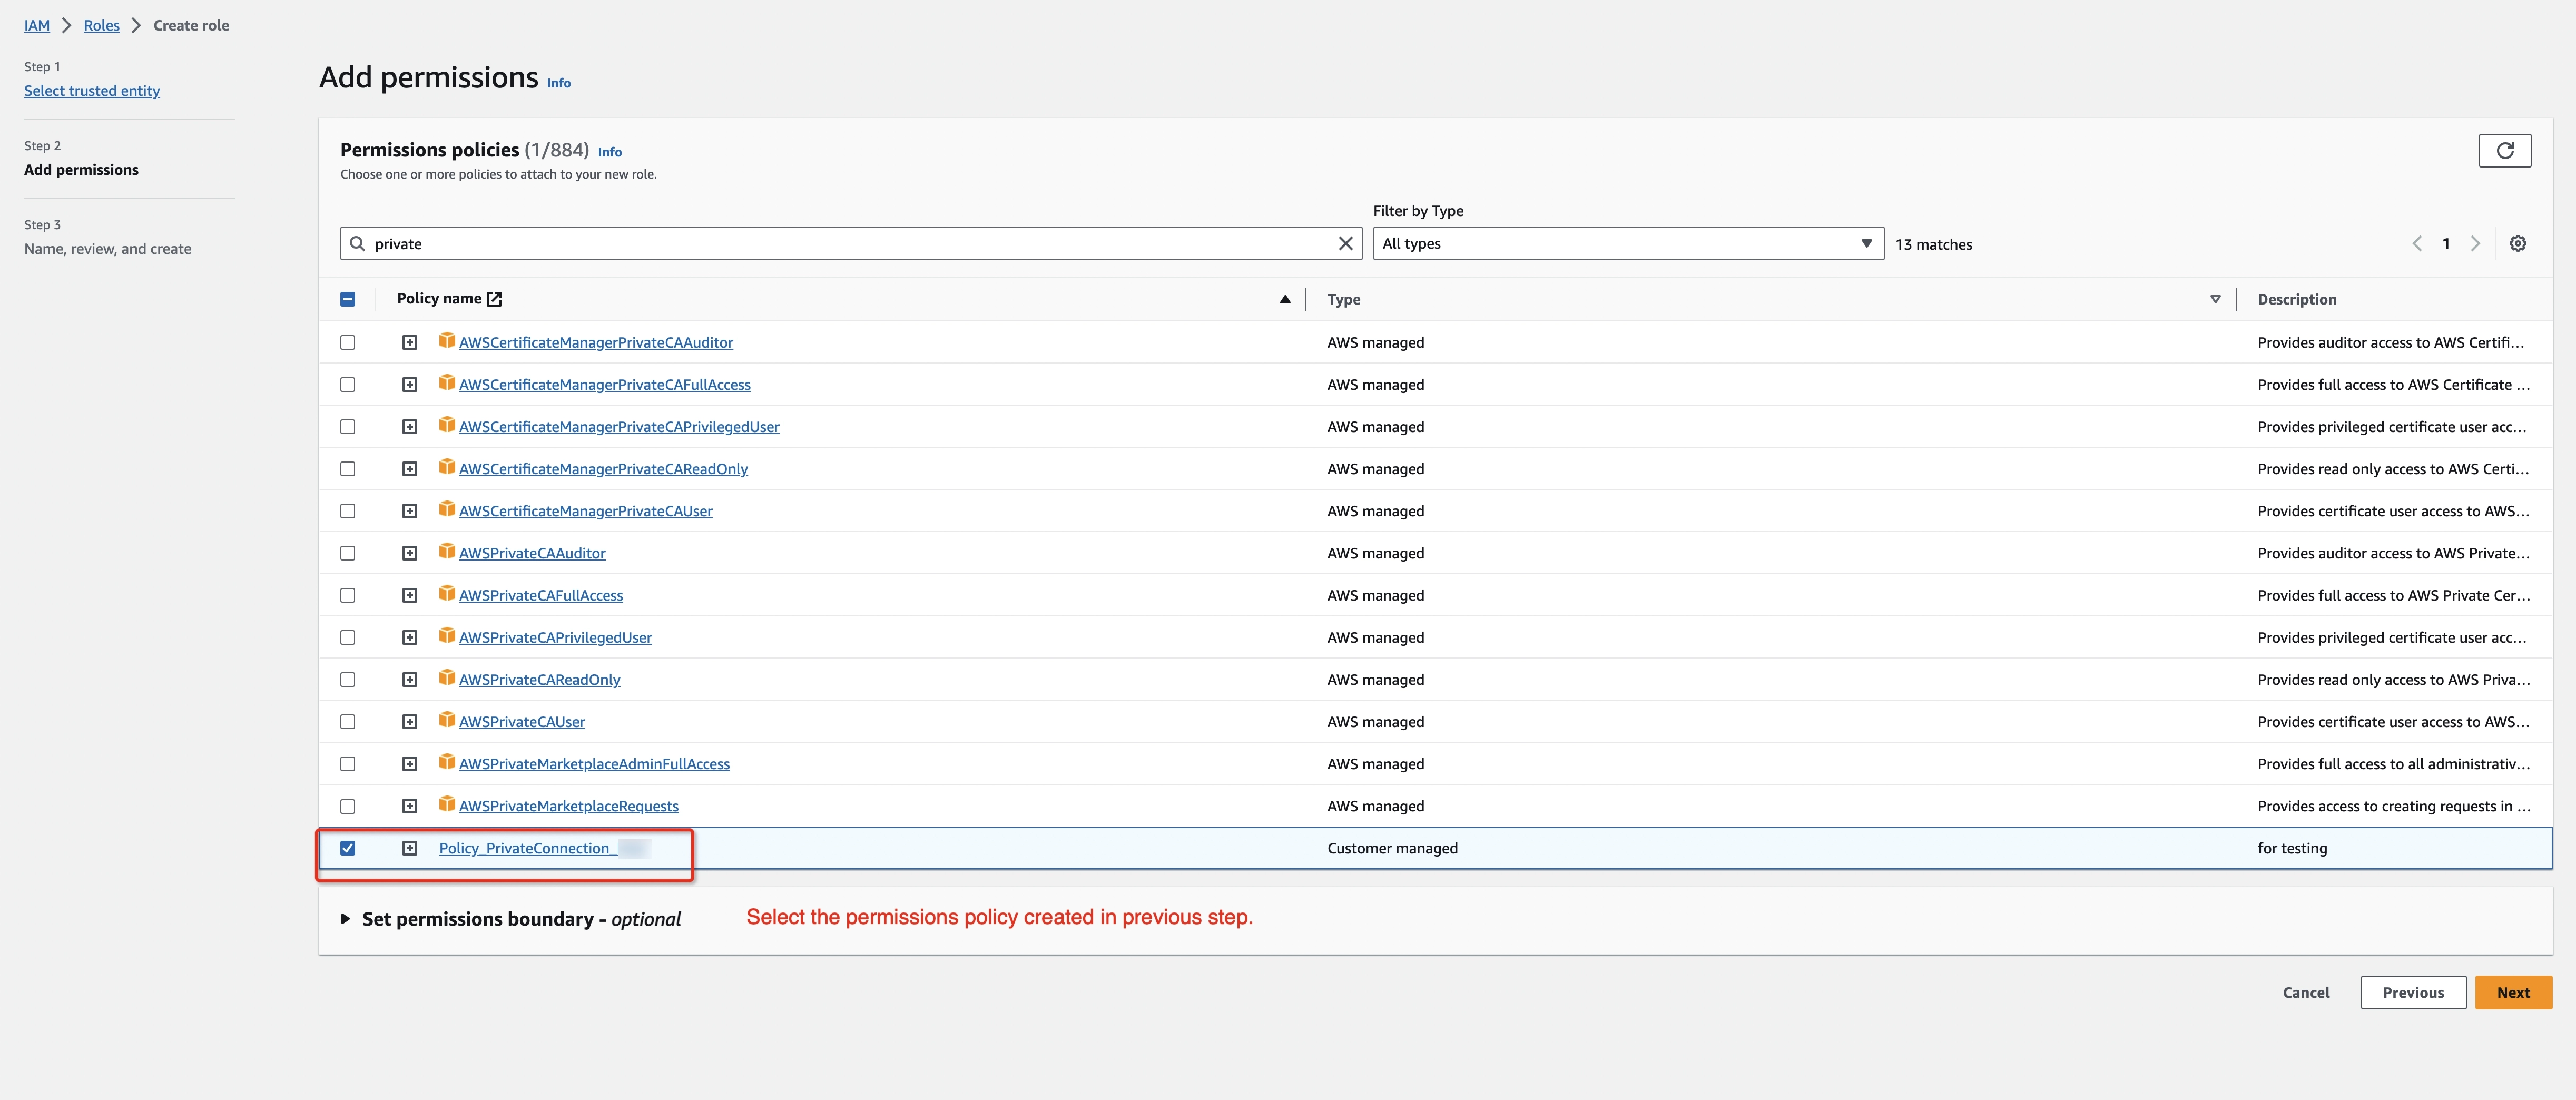
Create an IAM Role to grant third parties like Ververica Cloud to access your AWS resources with the previous permission policy.
noteThe ‘External ID’ is actually the Workspace ID where you will configure this private connection. You can copy it from the top-right corner of the Private Connection page of that workspace. You can also find it in the URL when you enter the Ververica Console.
794031221915 is Ververica's AWS account ID.
Please create a dedicated IAM Role for each Ververica Cloud workspace. If the workspace is already bound with an IAM role, please update the policy instead of creating a new one. Refer to the AWS docs for how to create/update the IAM Role.
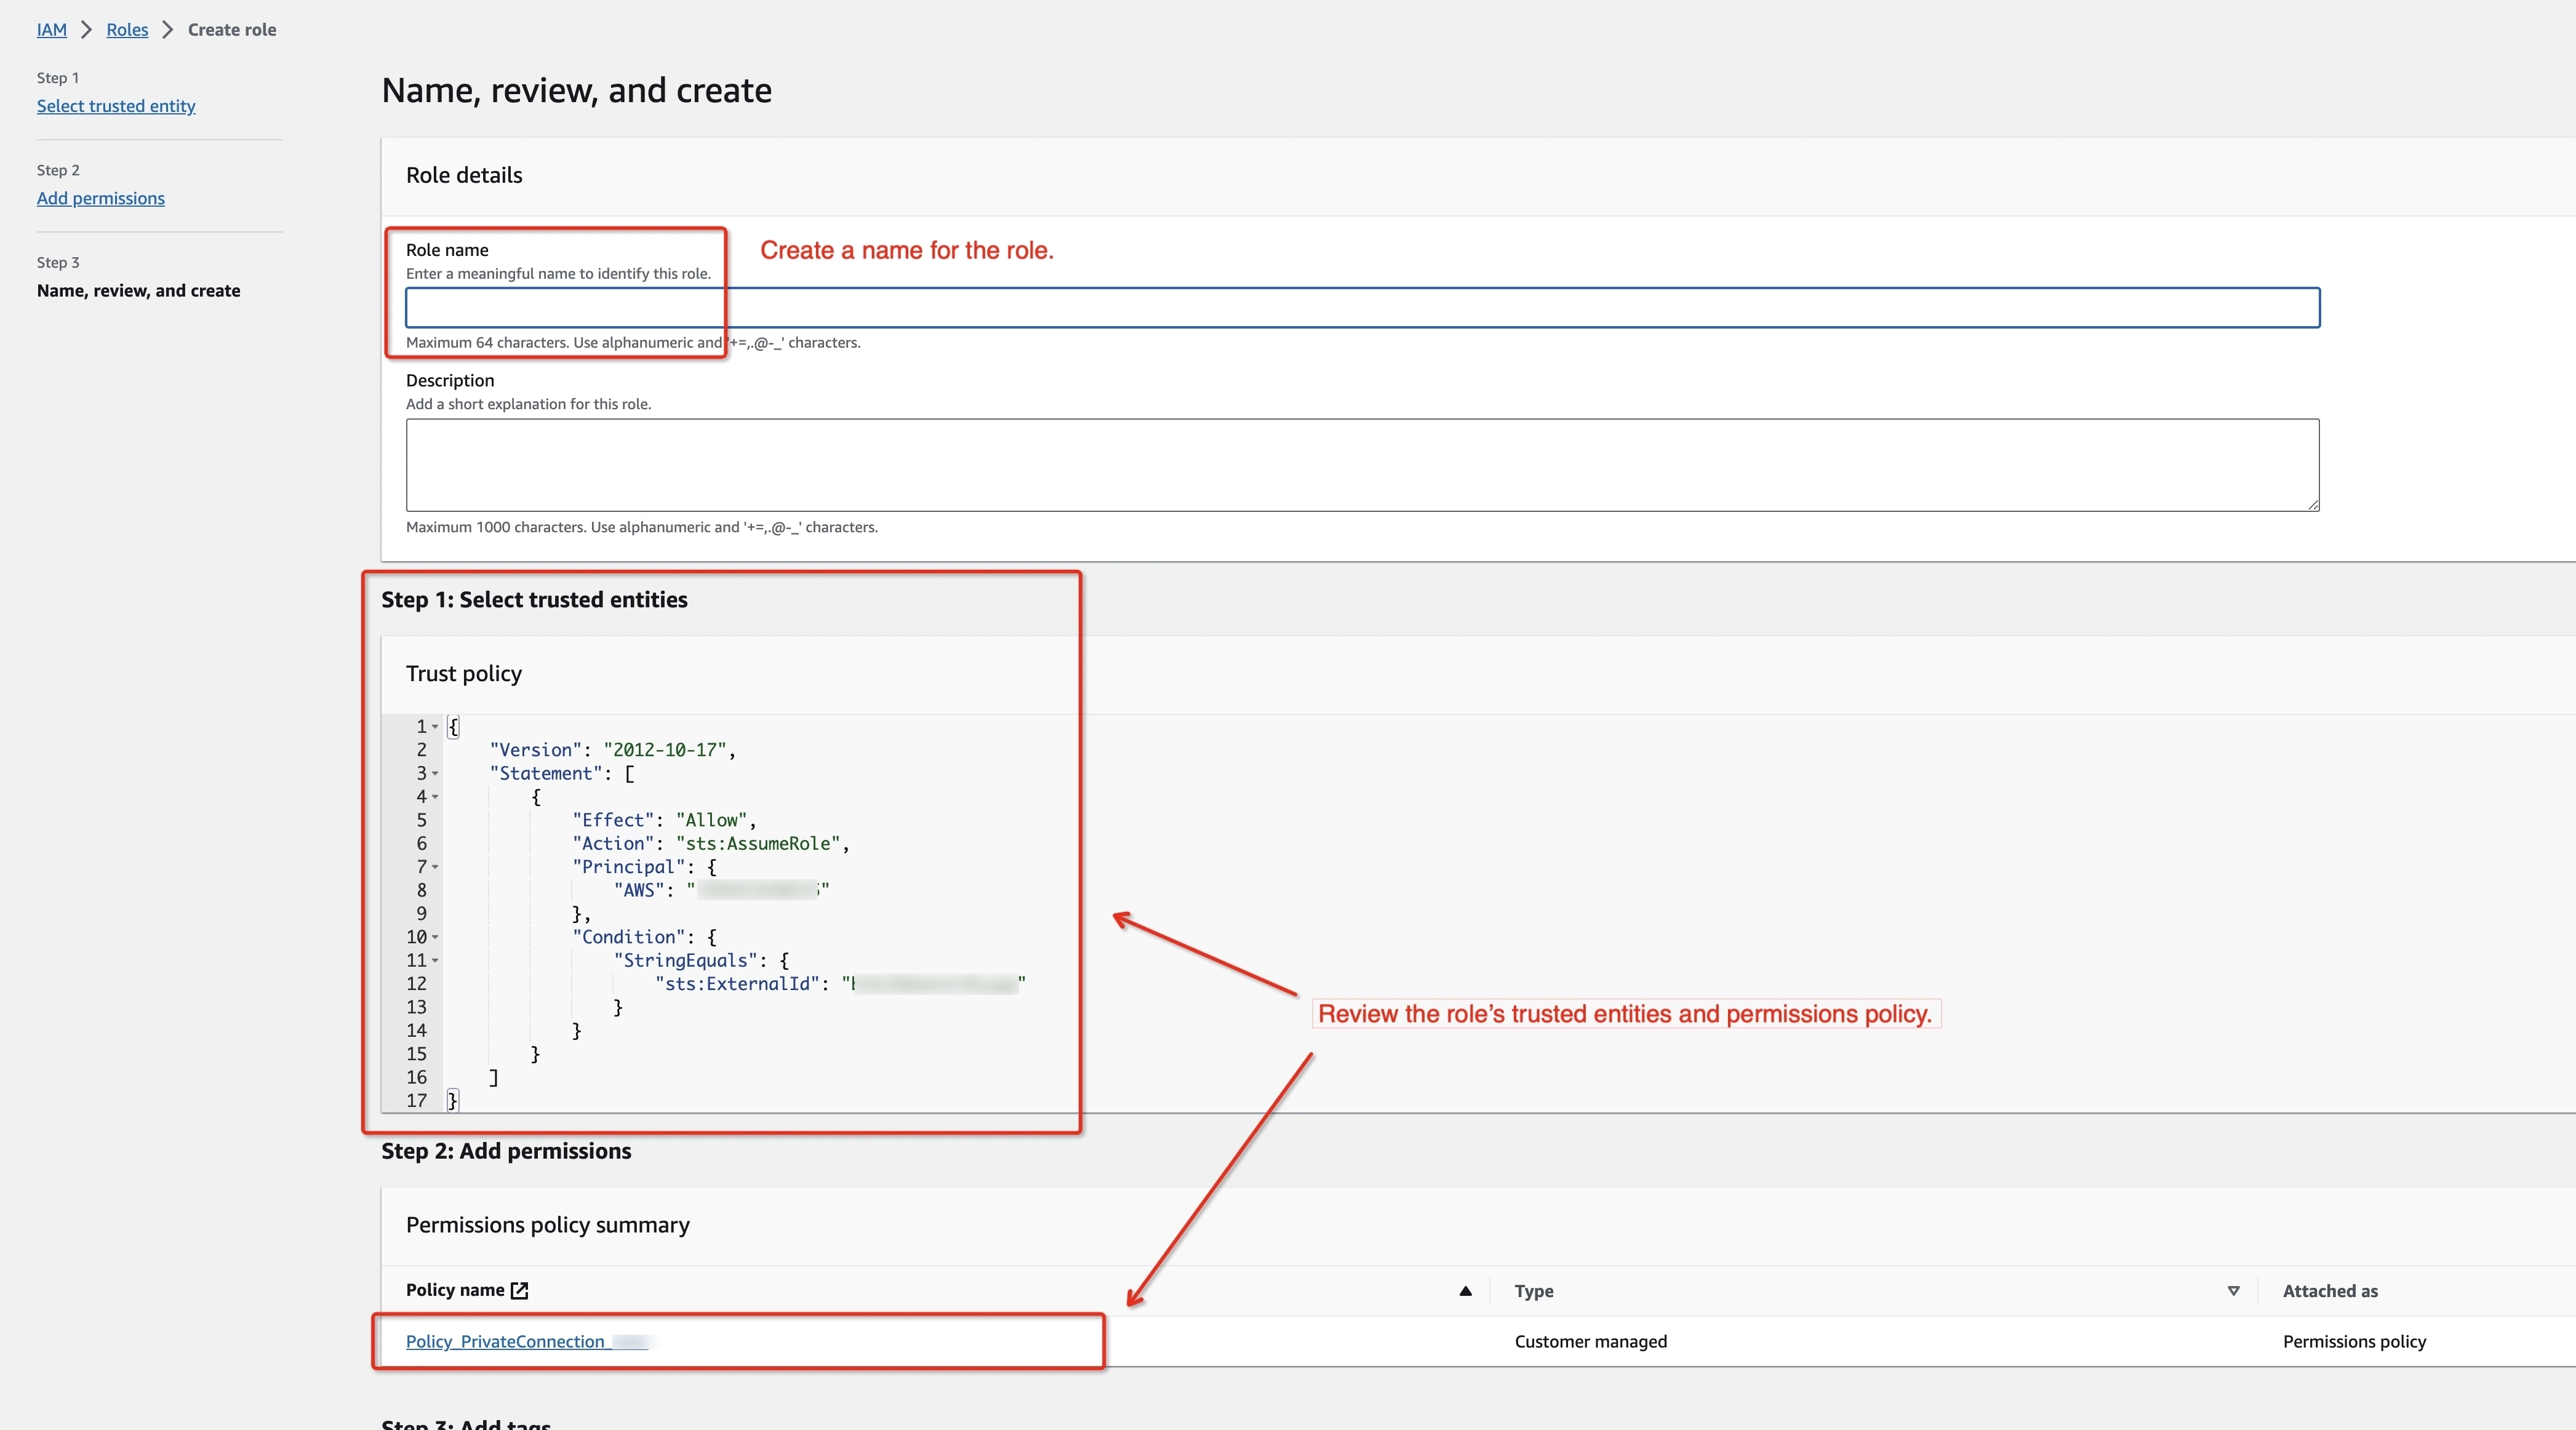
-
Get the ARN of this IAM Role for the next step.
Add the Private Connection
-
Log in to Ververica Cloud and display your Dashboard.
-
Click on the menu button (triple dots) at the end of the workspace entry and choose Private Connection.
-
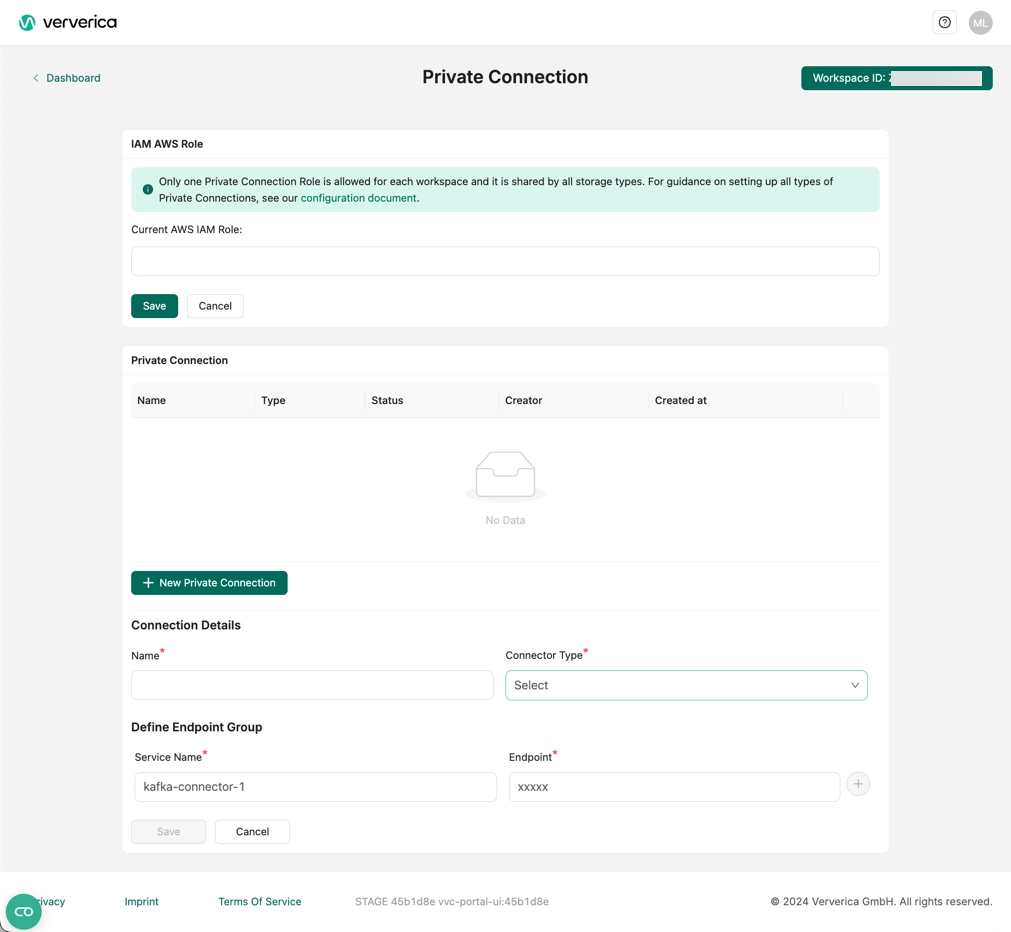
In the Private Connection page, click Edit Role.
-
In the Current AWS IAM Role field, bind the IAM AWS Role and click Save.
-
Click New Private Connection.
-
Fill the Connection Details (enter a name, and select the Apache Kafka connection type).
-
Fill in Endpoint Group section with the information from Step 5: Create the Endpoint Services and click Save.
After the private connection turns to Created, and the IAM Role turns to Ready, you can start your Flink jobs and read/write data to MSK. Refer to the Flink documentation for how to use Kafka connector in Flink SQL.
Using MSK IAM Authenticator to connect to MSK
In order to connect using IAM authentication to your kafka cluster you must configure the security protocol configurations to use SASL_SSL with AWS MSK IAM authenticator as call back handler. This can be configured as follows
    CREATE TABLE KafkaTable (
      ...
    ) WITH (
      'connector' = 'kafka',
      ...
      'properties.security.protocol' = 'SASL_SSL',
      'properties.sasl.mechanism' = 'AWS_MSK_IAM',
      'properties.sasl.jaas.config' = 'software.amazon.msk.auth.iam.IAMLoginModule required;',
      'properties.sasl.client.callback.handler.class' = 'software.amazon.msk.auth.iam.IAMClientCallbackHandler',
    )
In order for Flink to find the callback handler you must include aws-msk-iam-authenticator as a dependency.