StreamNative Cloud (Apache Pulsar)
StreamNative Cloud is a cloud-native service based on Apache Pulsar, offering a managed platform for users to deploy, operate, and scale Apache Pulsar clusters effortlessly. It aims to provide a straightforward and swift solution for businesses keen on adopting or testing Apache Pulsar, ensuring a seamless transition by maintaining the same APIs and open-source clients for message transmission.
Below is an example of configuring the StreamNative Cloud to connect to VVC via a private connection.
Prerequisites
- You must have an IAM user with the necessary permissions for creating/updating the IAM role.
- Please be aware that only the BYOC Pulsar cluster of StreamNative Cloud can be supported.
Step 1: Create StreamNative BYOC Cloud cluster
Please refer to this document to set up your StreamNative BYOC Cloud cluster: https://docs.streamnative.io/docs/byoc-overview
Step 2: Configure the endpoint service
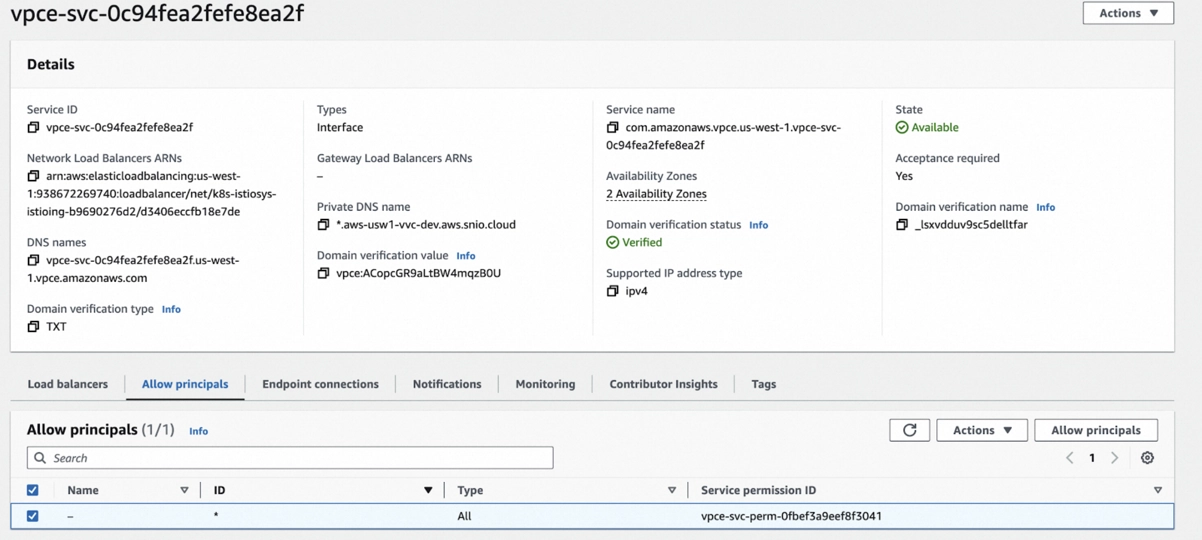
The BYOC Pulsar cluster will create a managed VPC endpoint service in your account. You can find it in the VPC > Endpoint Services at https://us-west-1.console.aws.amazon.com/vpcconsole/home?region=us-west-1#EndpointServices.
By default, the BYOC Pulsar cluster allows all the principals to connect to the endpoint. If you do not find this rule:
- Display the Allow principals tab.
- Select Allow principals, and add
arn:aws:iam::794031221915:rootprincipals.
Step 3: Obtain the Pulsar cluster endpoint
- Locate the BYOC Pulsar cluster endpoint in the StreamNative cloud console. The endpoint is pc-ae9a8ed6.aws-usw1-vvc-dev.aws.snio.cloud in the following diagram:
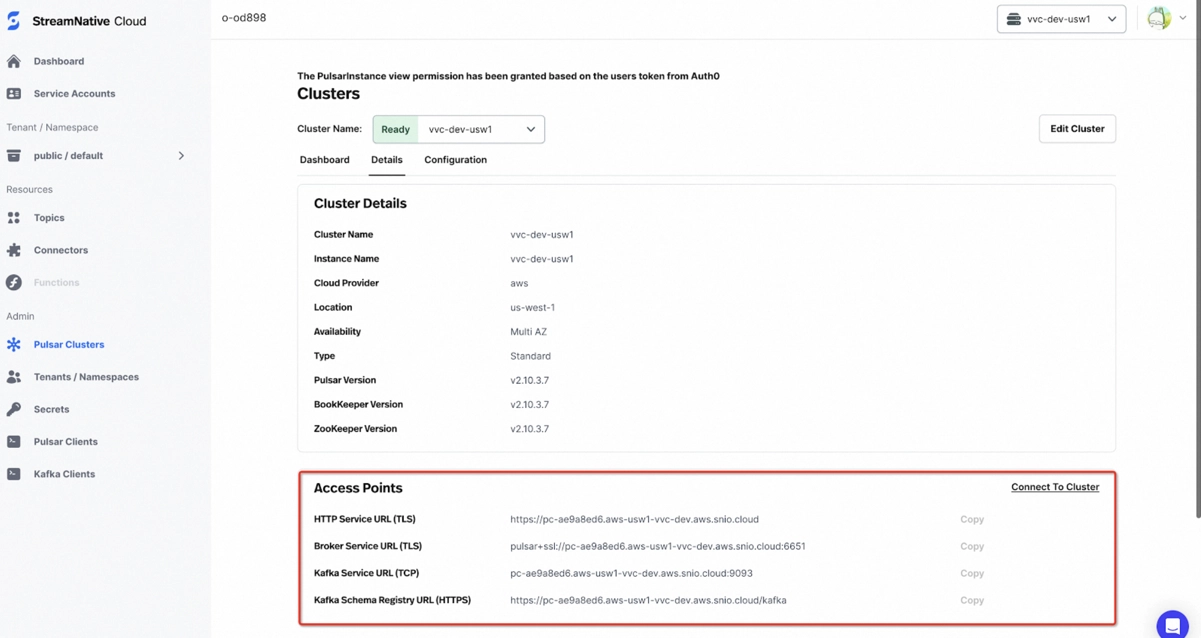
With the Endpoint Service Name from Step 2 and the Pulsar cluster endpoint in the current step, you will get the following:
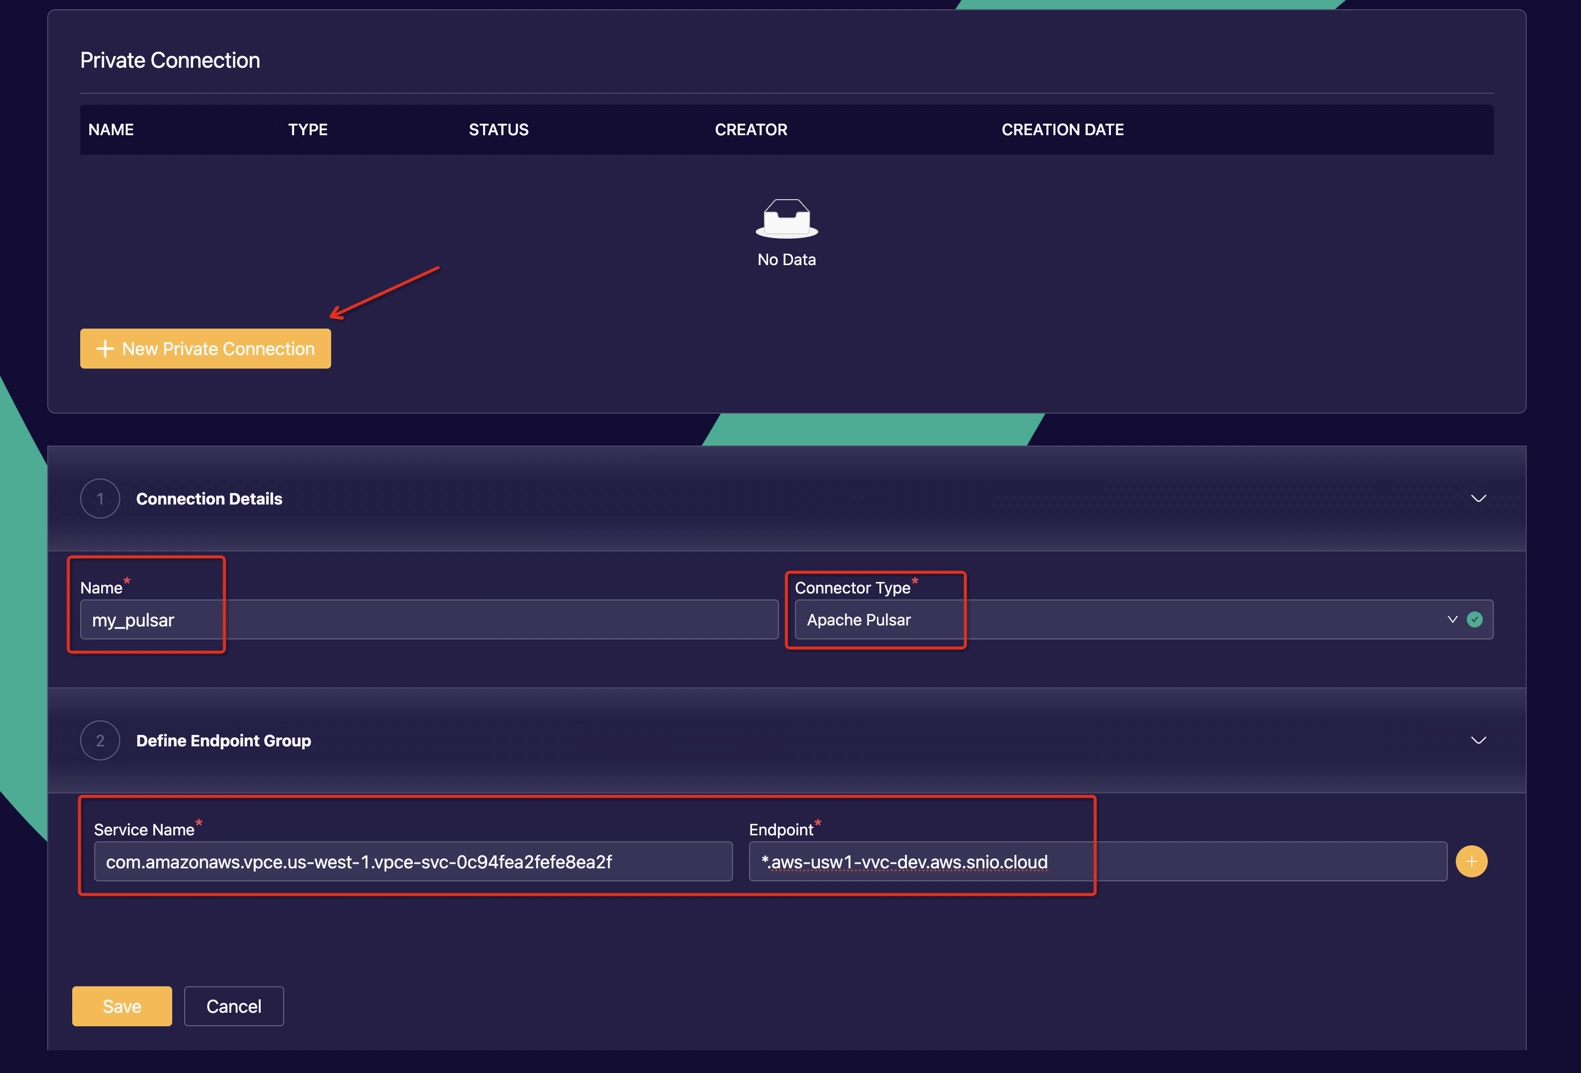
- Endpoint Service Name: com.amazonaws.vpce.us-west-1.vpce-svc-0c94fea2fefe8ea2f
- Pulsar Cluster Endpoint: *.aws-usw1-vvc-dev.aws.snio.cloud
Since pulsar broker addresses also need to be resolved, we use a * in the Pulsar cluster endpoint. It should be the same as the Private DNS Name in Step 2.
Step 4: Create the Private Connection in the Ververica Cloud portal
Configure the AWS IAM Role
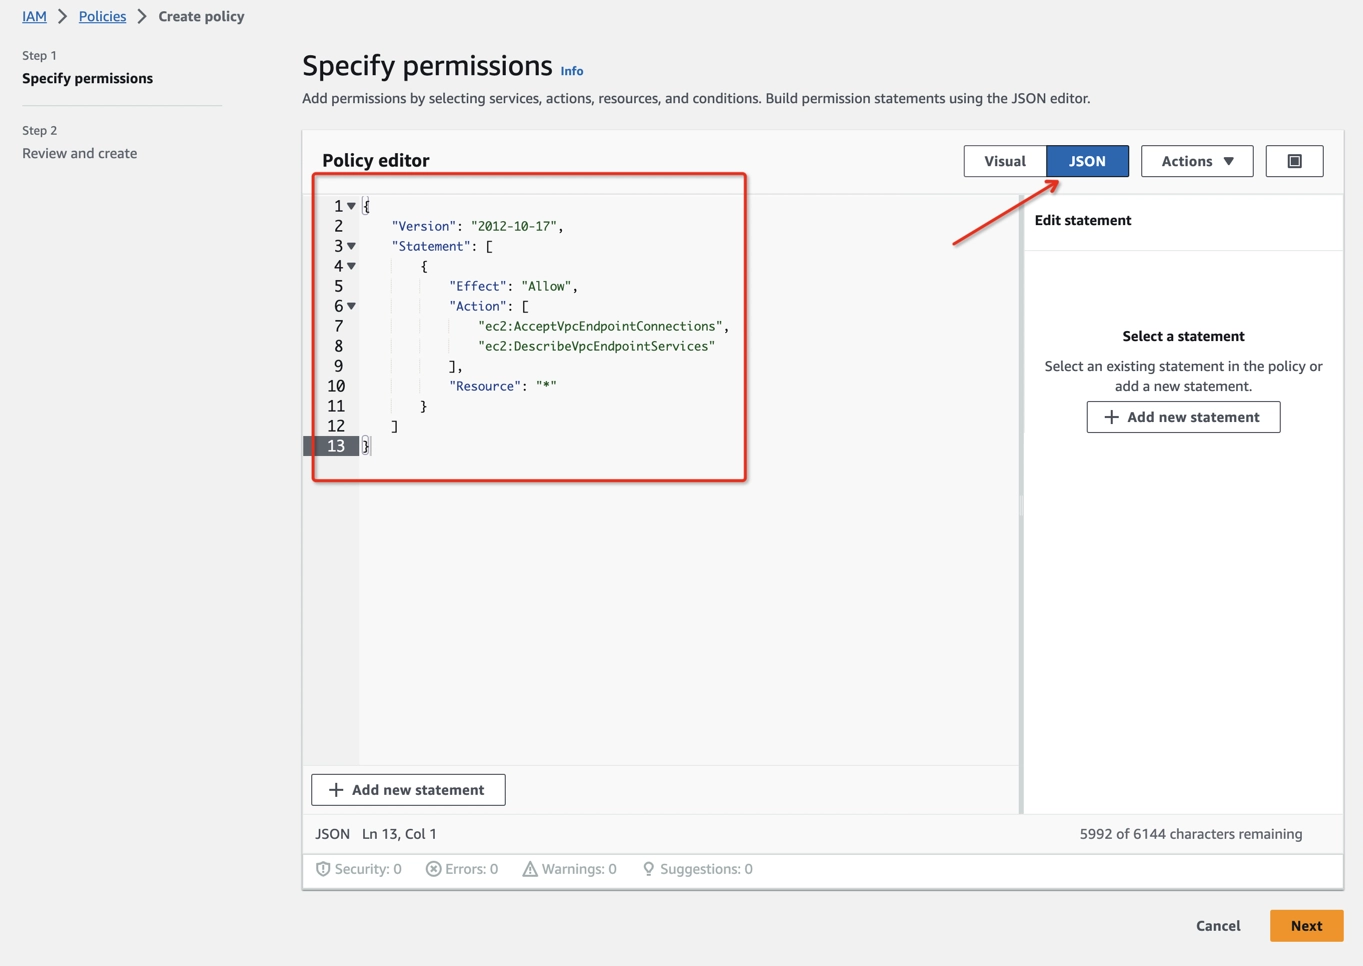
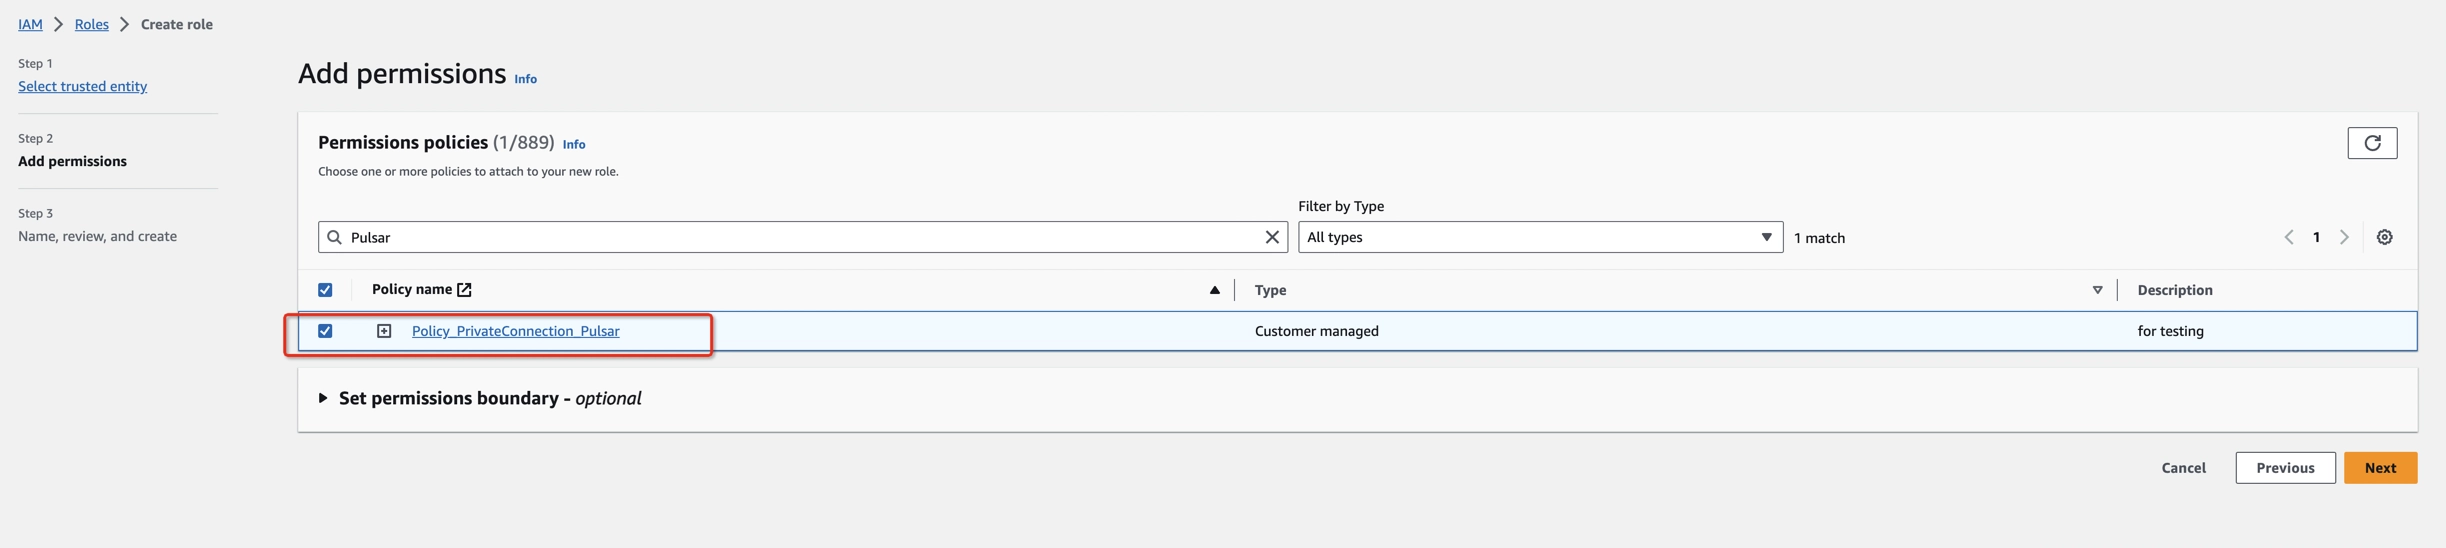
- Create an IAM Permissions Policy with the needed permissions that Ververica Cloud will assume for this role and then accept the endpoint connection request. Refer to this aws doc to learn more information about the policies.
{
    "Version": "2012-10-17",
    "Statement": [
        {
            "Effect": "Allow",
            "Action": [
                "ec2:AcceptVpcEndpointConnections",
                "ec2:DescribeVpcEndpointServices"
            ],
            "Resource": "*"
        }
    ]
}
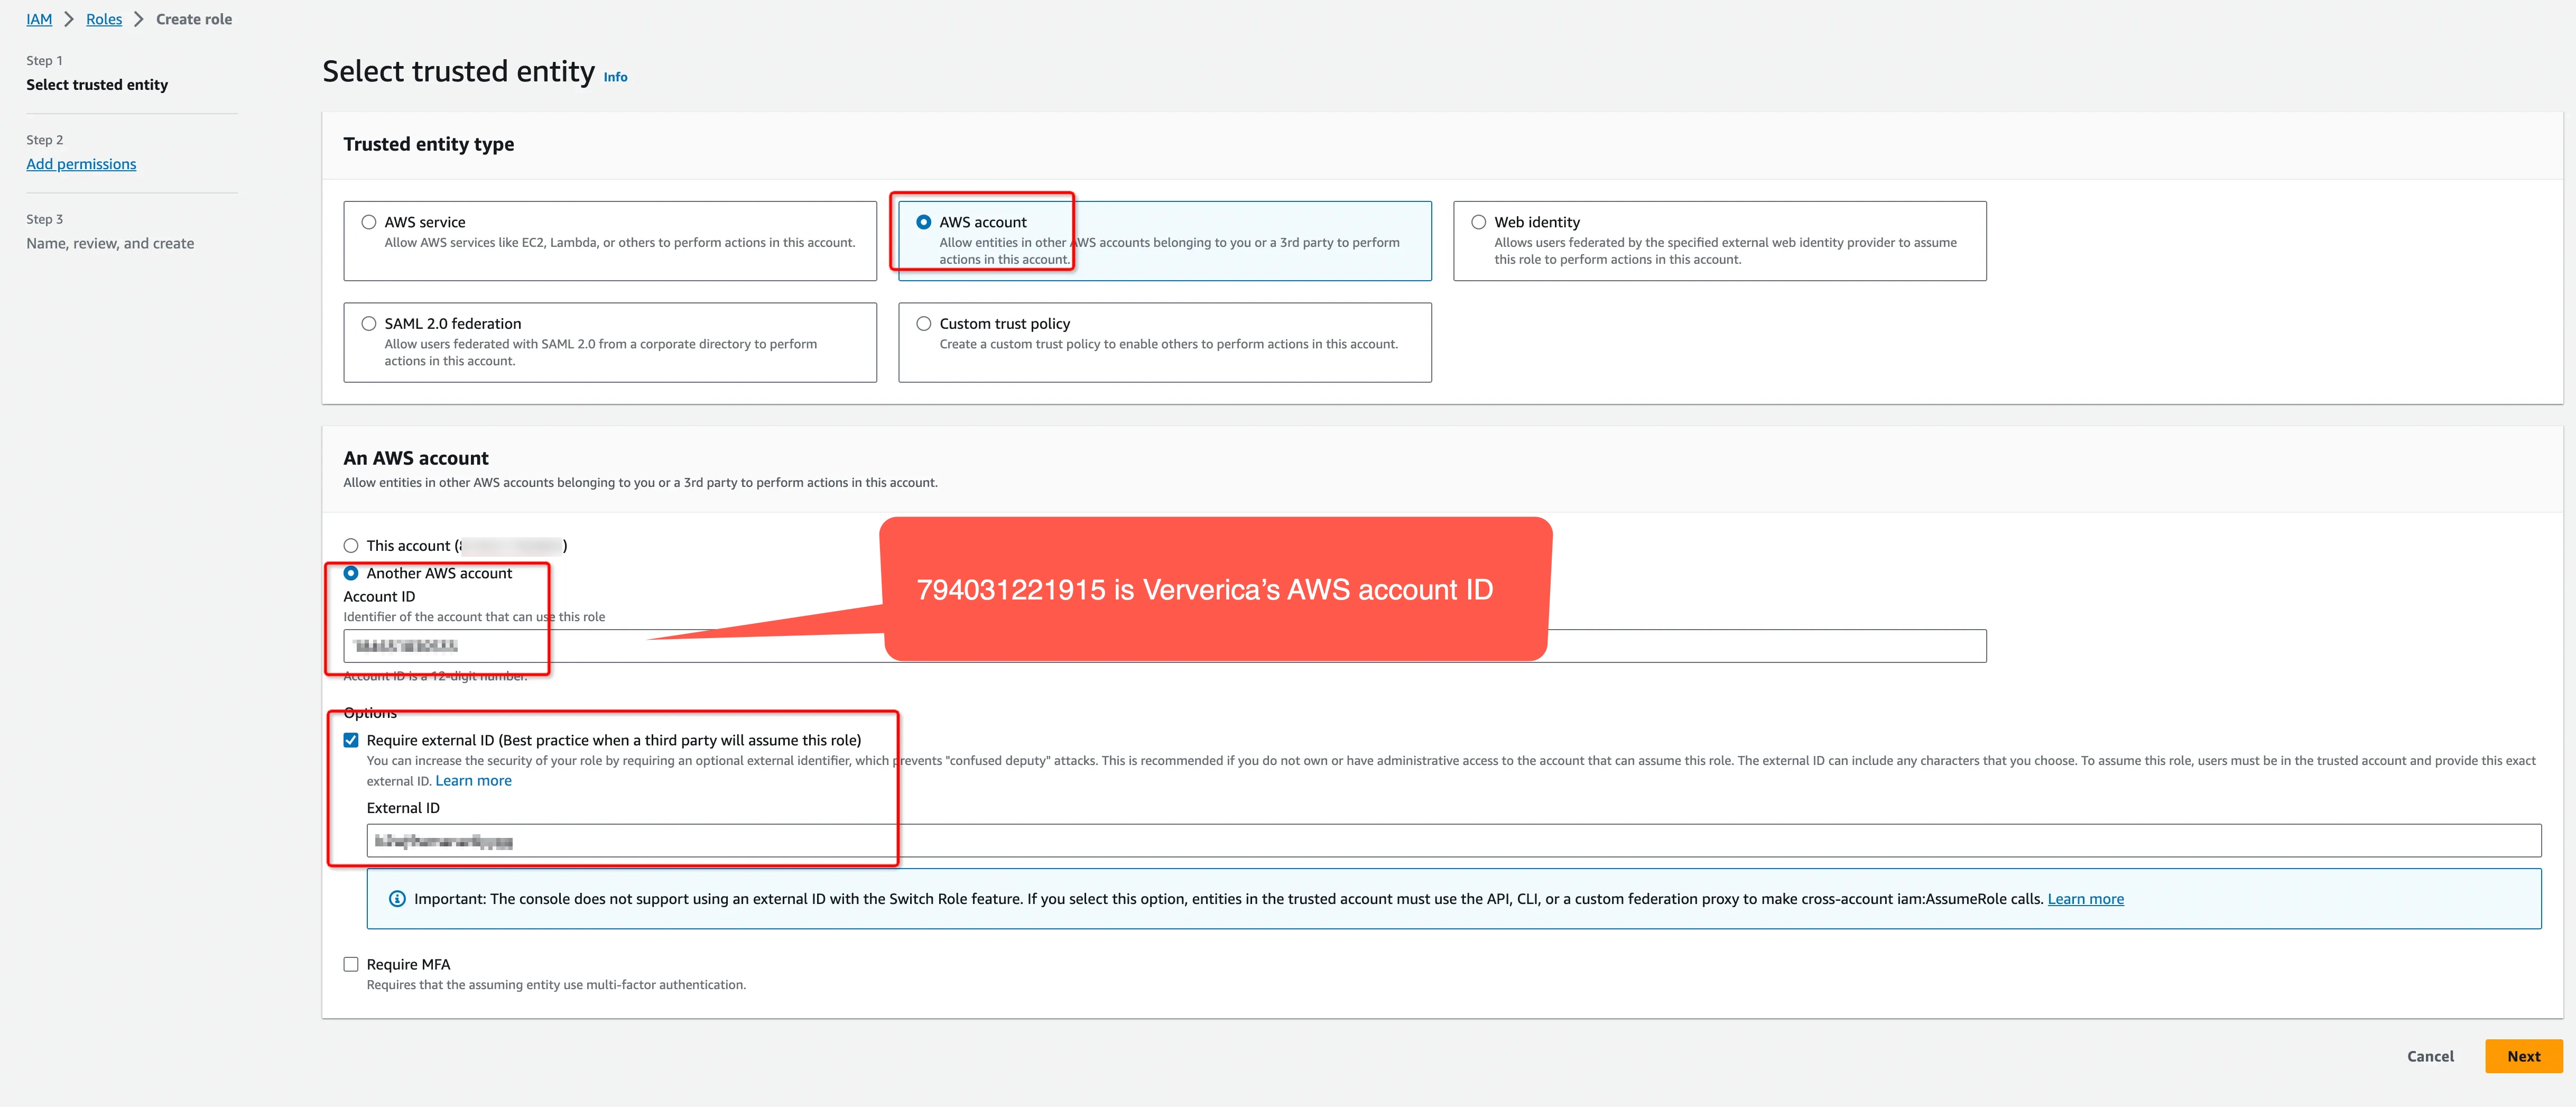
- Create an IAM Role to grant third parties like Ververica Cloud to access your AWS resources with the previous permission policy.
The ‘External ID’ is actually the Workspace ID where you will configure this private connection. You can copy it from the top-right corner of the Private Connection page of that workspace. You can also find it in the URL when you enter the Ververica Console.
794031221915 is Ververica's AWS account ID.
Create a dedicated IAM Role for each Ververica Cloud workspace. If the workspace is already bound with an IAM role, please update the policy instead of creating a new one. Refer to the AWS docs for how to create/update the IAM Role.
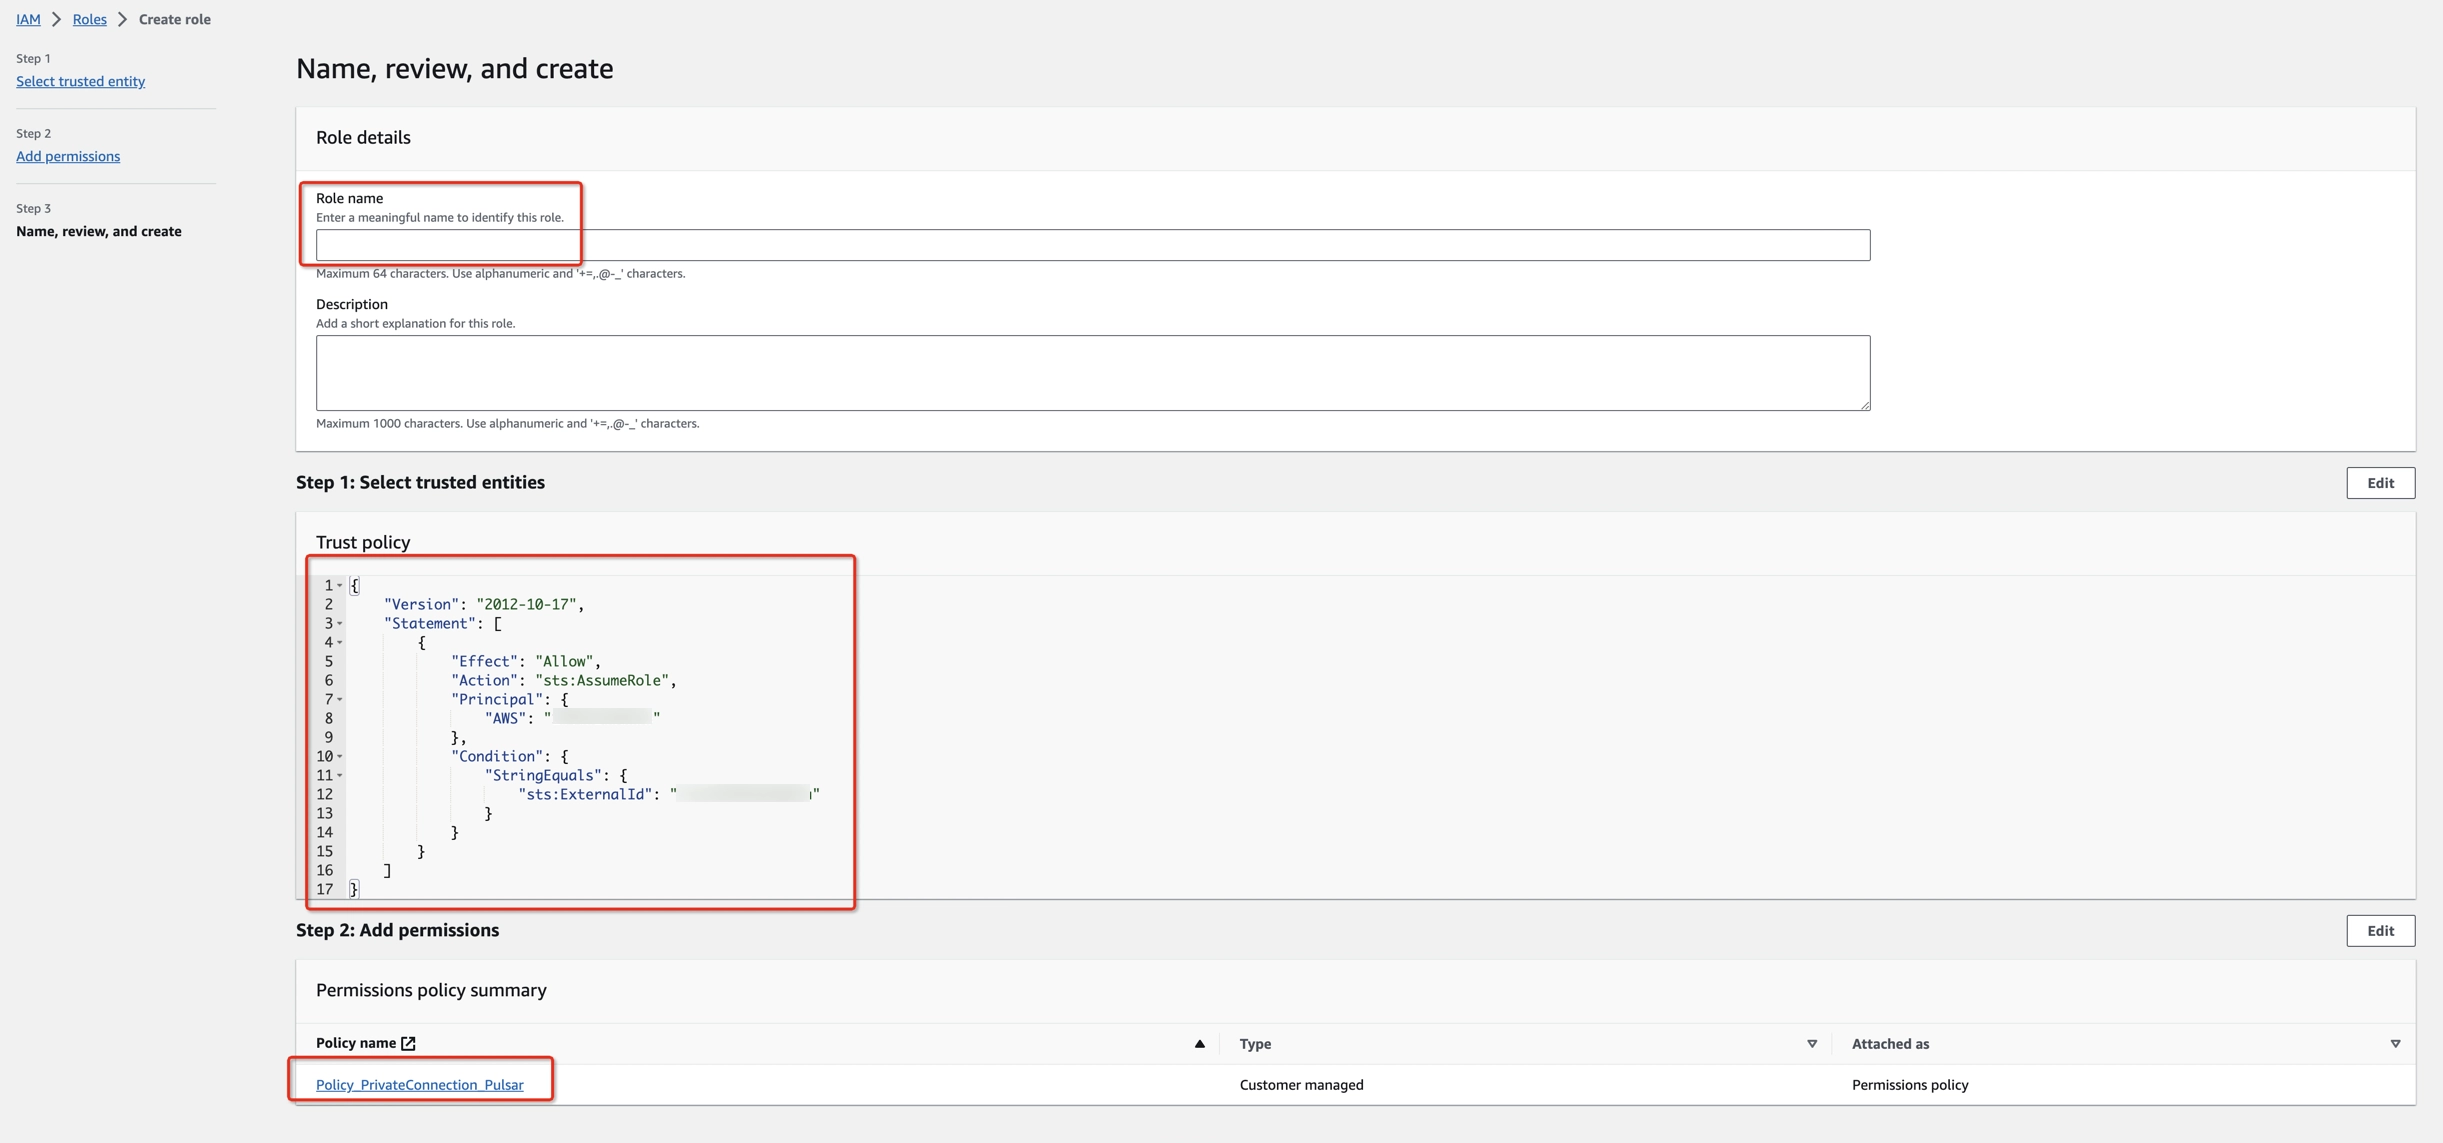
- Get the ARN of this IAM Role for the next step.
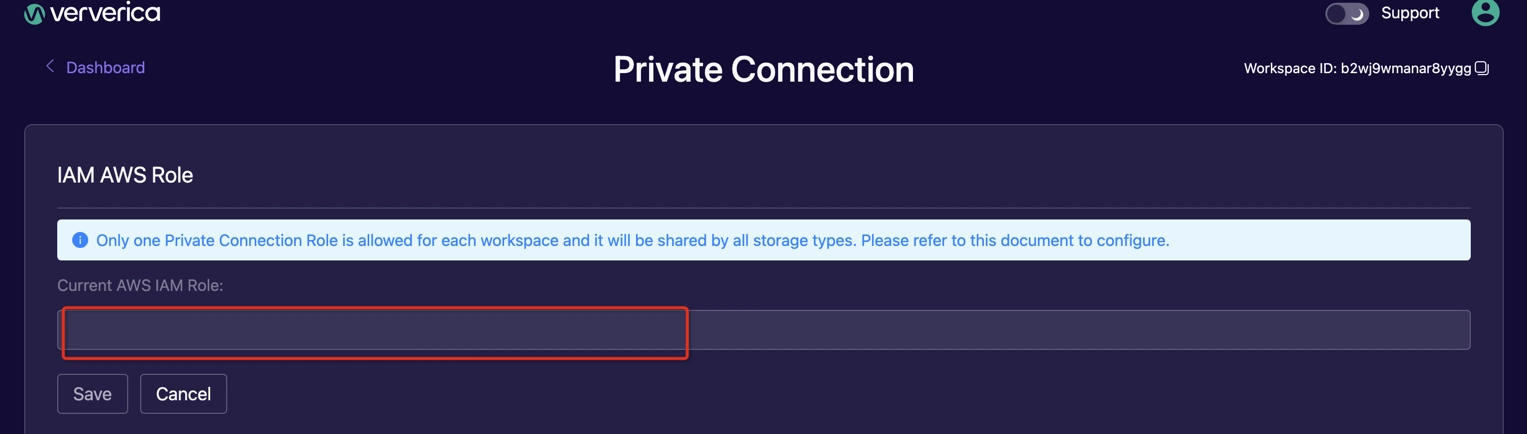
Bind the IAM Role to Ververica Cloud
- Log in to Ververica Cloud and display your Dashboard.
- Click on the menu button (triple dots) at the end of the workspace entry and choose Private Connection.
- Bind the IAM Role at the first section of the page and click Save.
- Click New Private Connection, fill in the Name, set the Connector Type to Apache Pulsar and click Save.
After the private connection turns to Created and the IAM Role turns to Ready, you can start your Flink jobs and communicate with StreamNative BOYC Cloud.