Amazon RDS
Amazon Relational Database Service (RDS) is a fully-managed database service designed to simplify the setup, operation, and scaling of relational databases in the cloud. It provides cost-efficient and resizable capacity, while automating time-consuming administration tasks such as hardware provisioning, database setup, patching, and backups. Amazon RDS supports several database engines, including MySQL, PostgreSQL, MariaDB, Oracle, and SQL Server, allowing developers to use the same application code, tools, and queries they would use with a standalone database. This service ensures high availability and reliability by offering automatic failover, backup and recovery, and maintenance.
Prerequisites
- If you intend to use the RDS as a sink, ensure that you select endpoints with Writer type instead of Reader type.
- If you intend to use the MySQL catalog or read from MySQL/PostgreSQL via CDC, enable the ‘binlog_format' on AWS. (Head to the Enable Binary Log section to learn how to do this.)
- Download the AWS official template sample file CrossAccountRDSAccess.yml, which supports cross-account RDS access.
- Follow the instructions in this document to ensure the Lambda Function is properly set up.
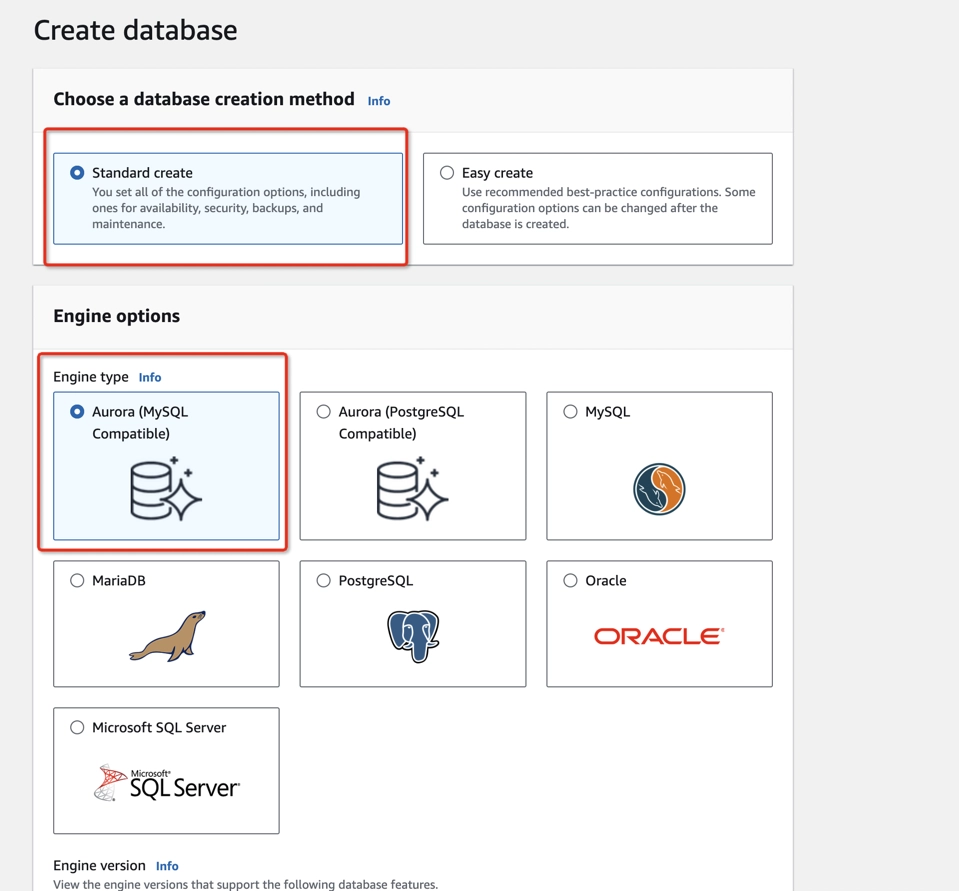
Step 1: Create an RDS cluster
- Sign in to the AWS Management Console and navigate to the Amazon RDS console at https://console.aws.amazon.com/rds/.
- Click Databases on the side panel.
- Click Create database on the right-hand side.
- Select Aurora (MySQL compatible) as the Engine Type.
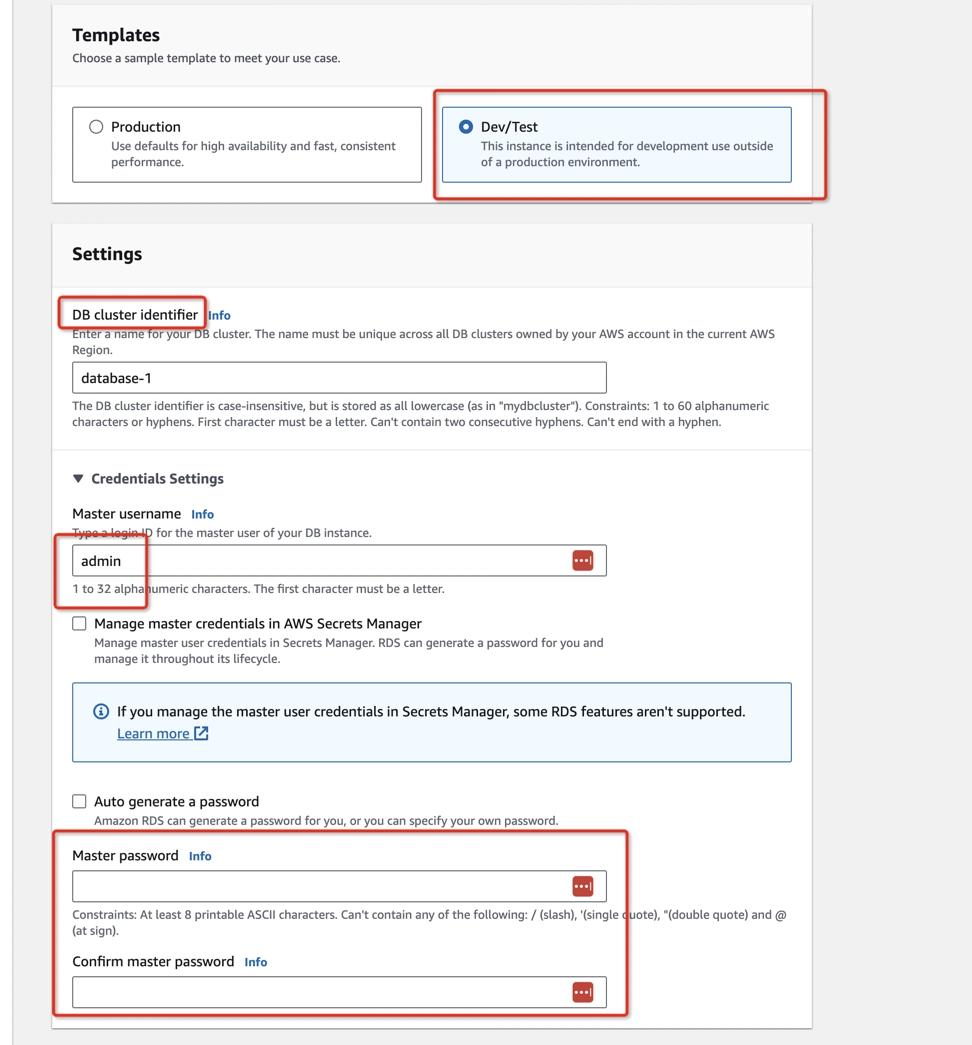
- Choose Dev/Test in the Templates section.
- Name the DB cluster identifier and create the credentials.
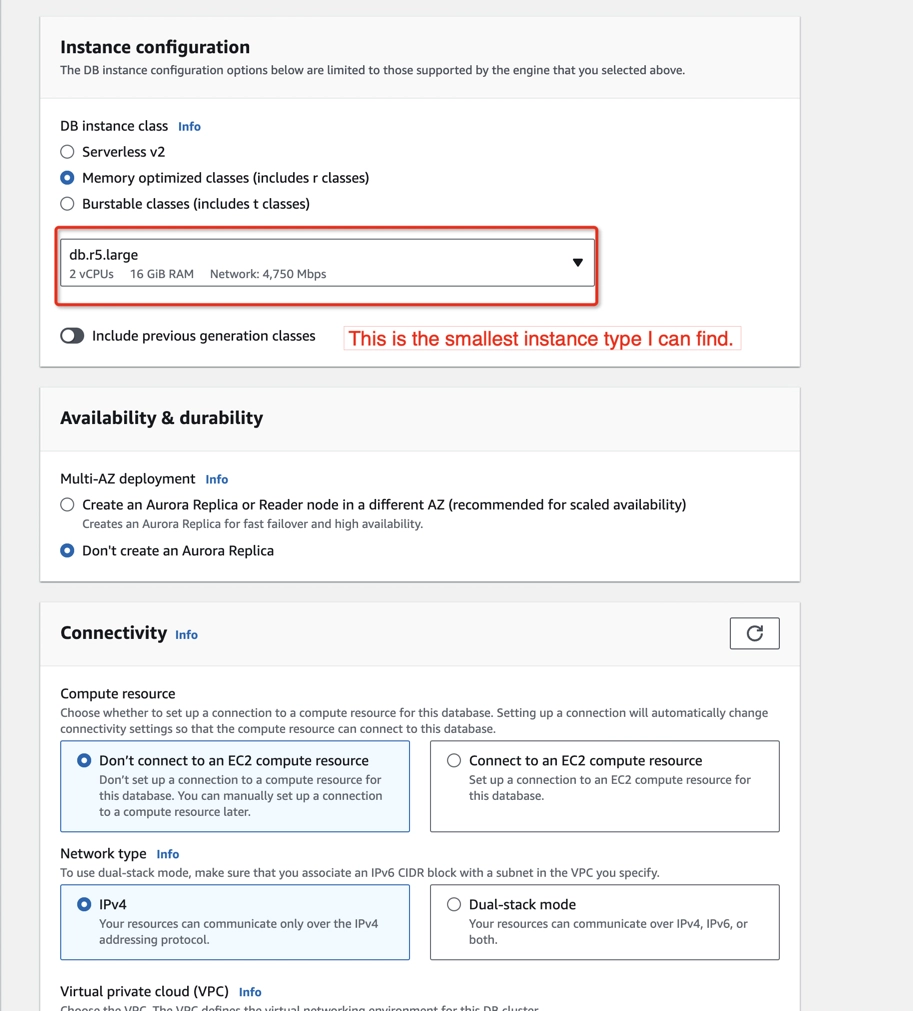
- Select the smallest instance type.
- Click Create database.
Step 2: Create a stack
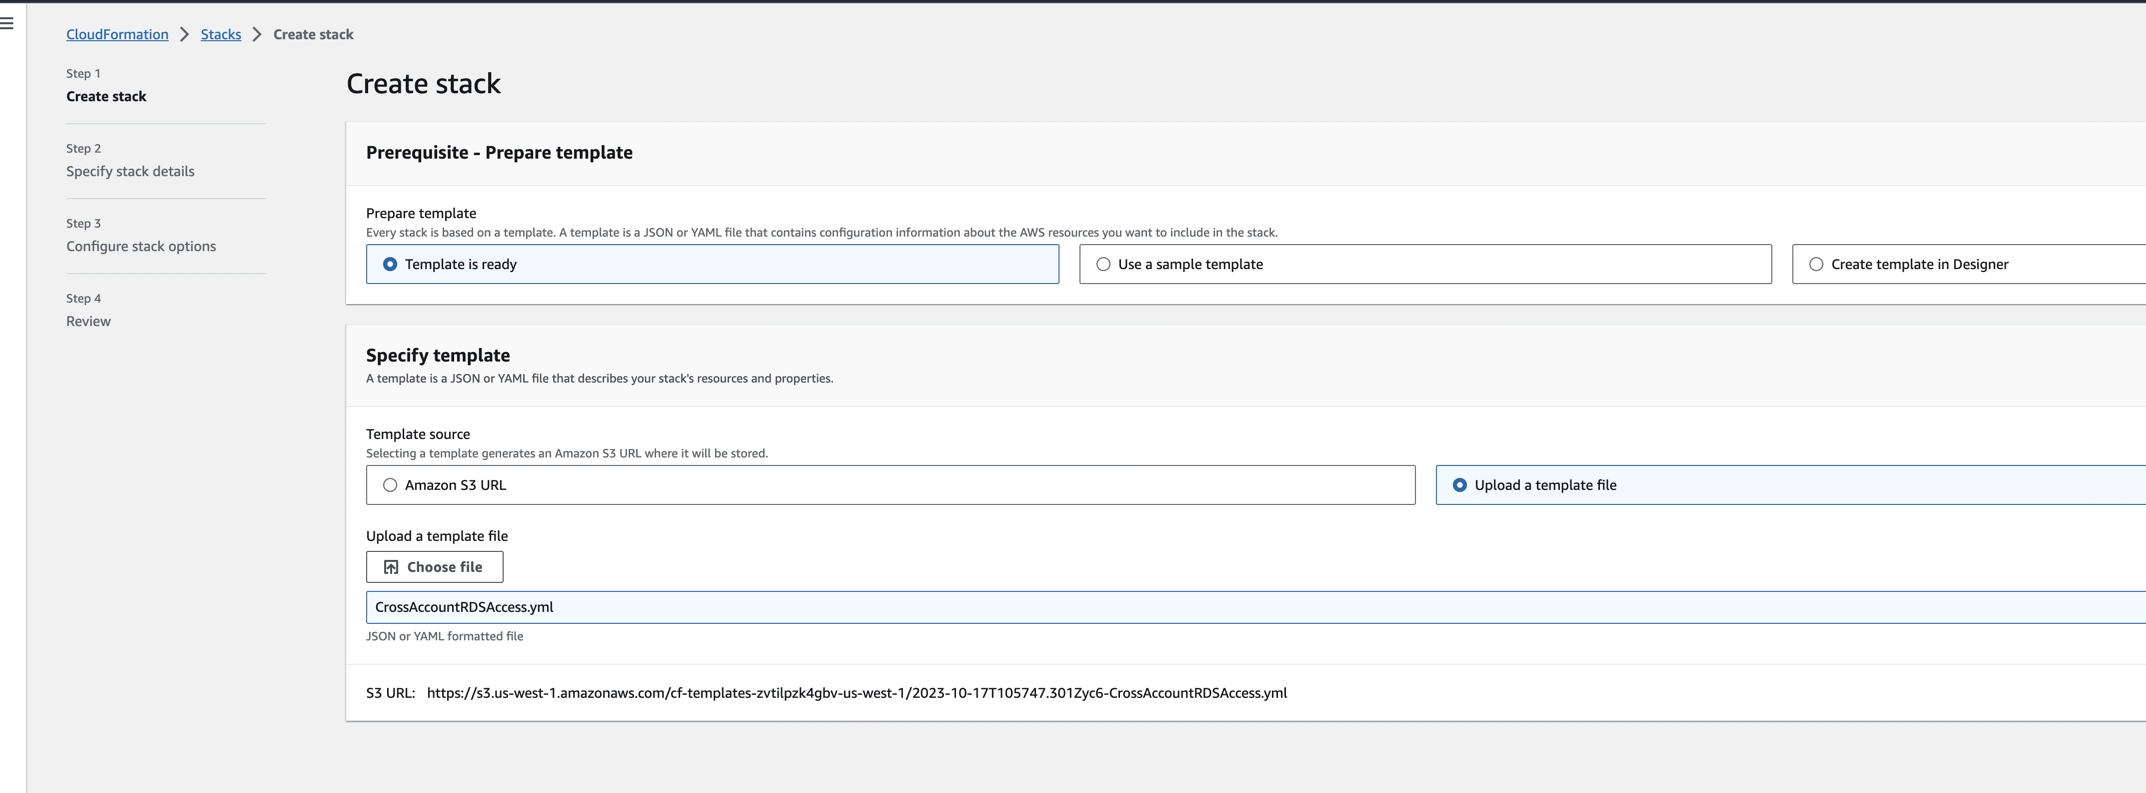
- Open the CloudFormation console at https://console.aws.amazon.com/cloudformation/
- Click Stacks on the side panel.
- Click Create stack > with new resources (standard) on the top-right corner.
- In the Prepare template field, choose Template is ready.
- In the Template source field, choose Upload a template file, then upload
CrossAccountRDSAccess.ymlfile. - Click Next.
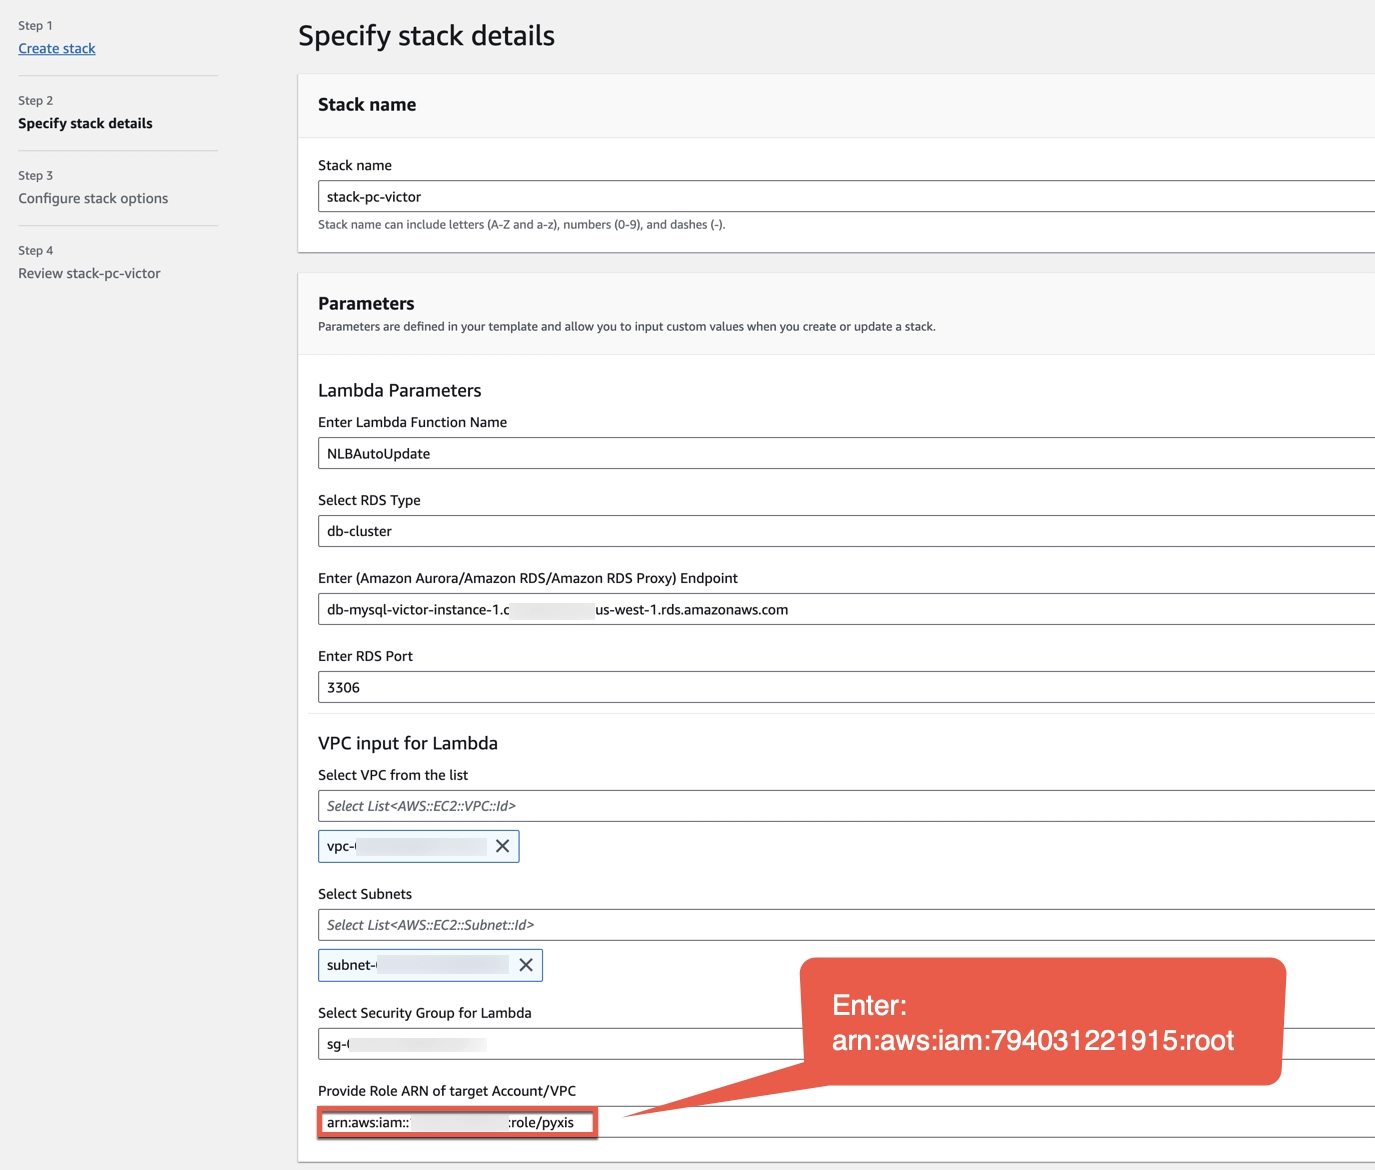
Step 3: Specify stack details
- In the Stack name field, provide a name for your stack.
- In the Enter Lambda Function Name field, use the default Lambda function name or create a new one.
- In the RDS Type drop-down menu, choose db-cluster.
- In the Enter (Amazon Aurora/Amazon RDS/Amazon RDS Proxy) Endpoint field, type the endpoint name of a database.
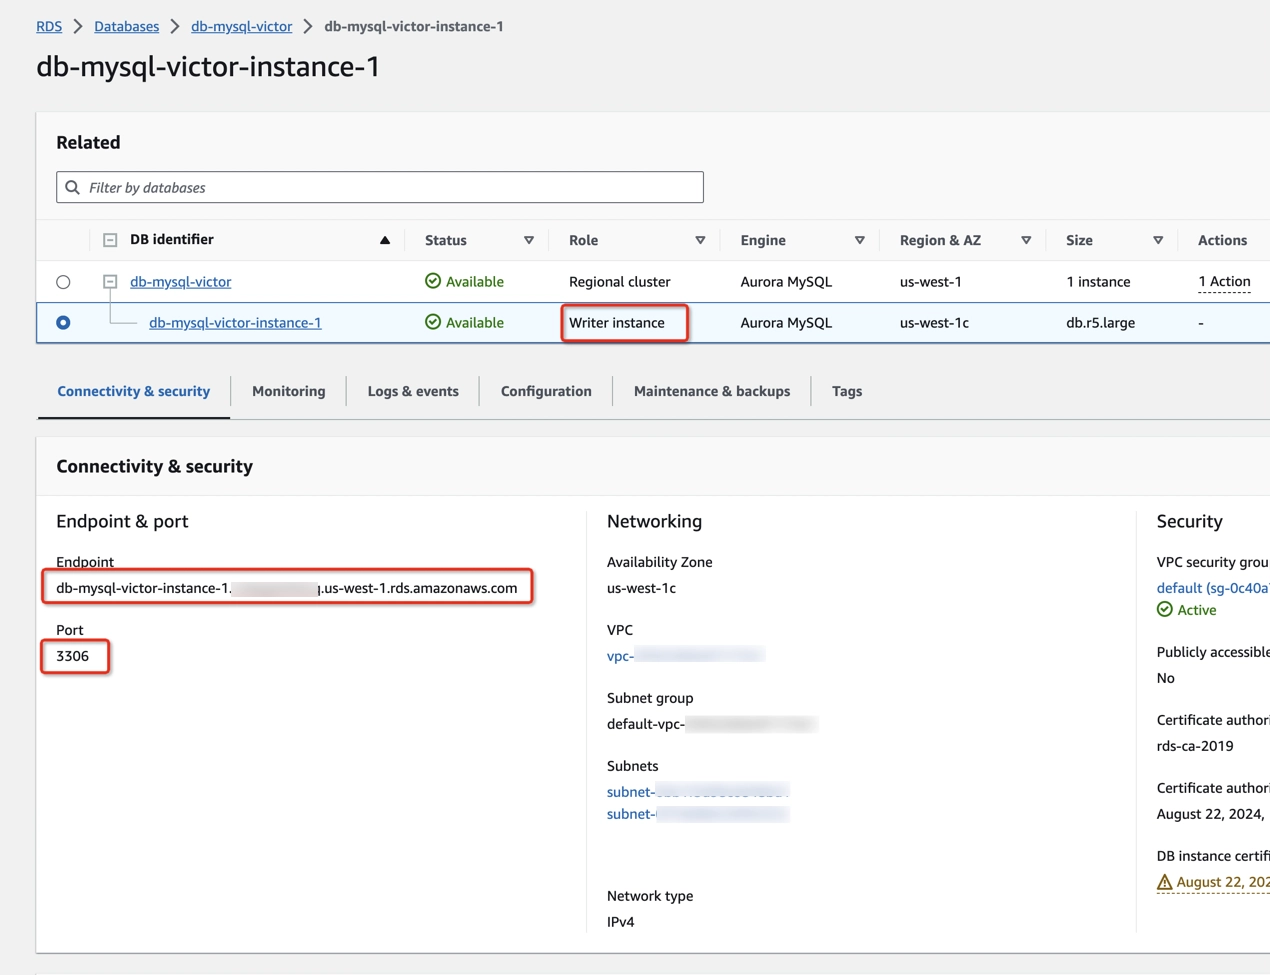
- To check the endpoint of your database, type RDS in the search bar at the top of the AWS Console page and click on RDS in the drop-down menu.
- In the side navigation pane, click Databases.
- Click on your DB identifier.
- Copy the endpoint name and port of the Write instance type from the Connectivity & security tab.
- Paste/type the endpoint name and port of the Write instance type in the Enter (Amazon Aurora/Amazon RDS/Amazon RDS Proxy) Endpoint and Enter RDS Port fields.
- In the Select VPC from the list field, choose your VPC from the drop-down menu. Make sure that you follow the Lambda Functions setup instructions before selecting your VPC.
- In the Select Subnets field, choose your subnet with a private setting from the drop-down menu. Make sure that you follow the Lambda Functions setup instructions before selecting your subnet.
- In the Select Security Group for Lambda field, choose your security group that can communicate with RDS and Lambda between each other from the drop-down menu.
- In the Provide Role ARN of the target Account/VPC field, type
arn:aws:iam::794031221915:root.
Step 4: Configure stack options
- Use the default stack configuration or update it as you wish.
- Click Next.
Step 5: Review stack
- Verify the information that you have provided.
- Check the box “I acknowledge that AWS CloudFormation might create IAM resources with custom names”.
- When you are done, click Submit.
- Wait until the stack is created. It should take a few minutes.
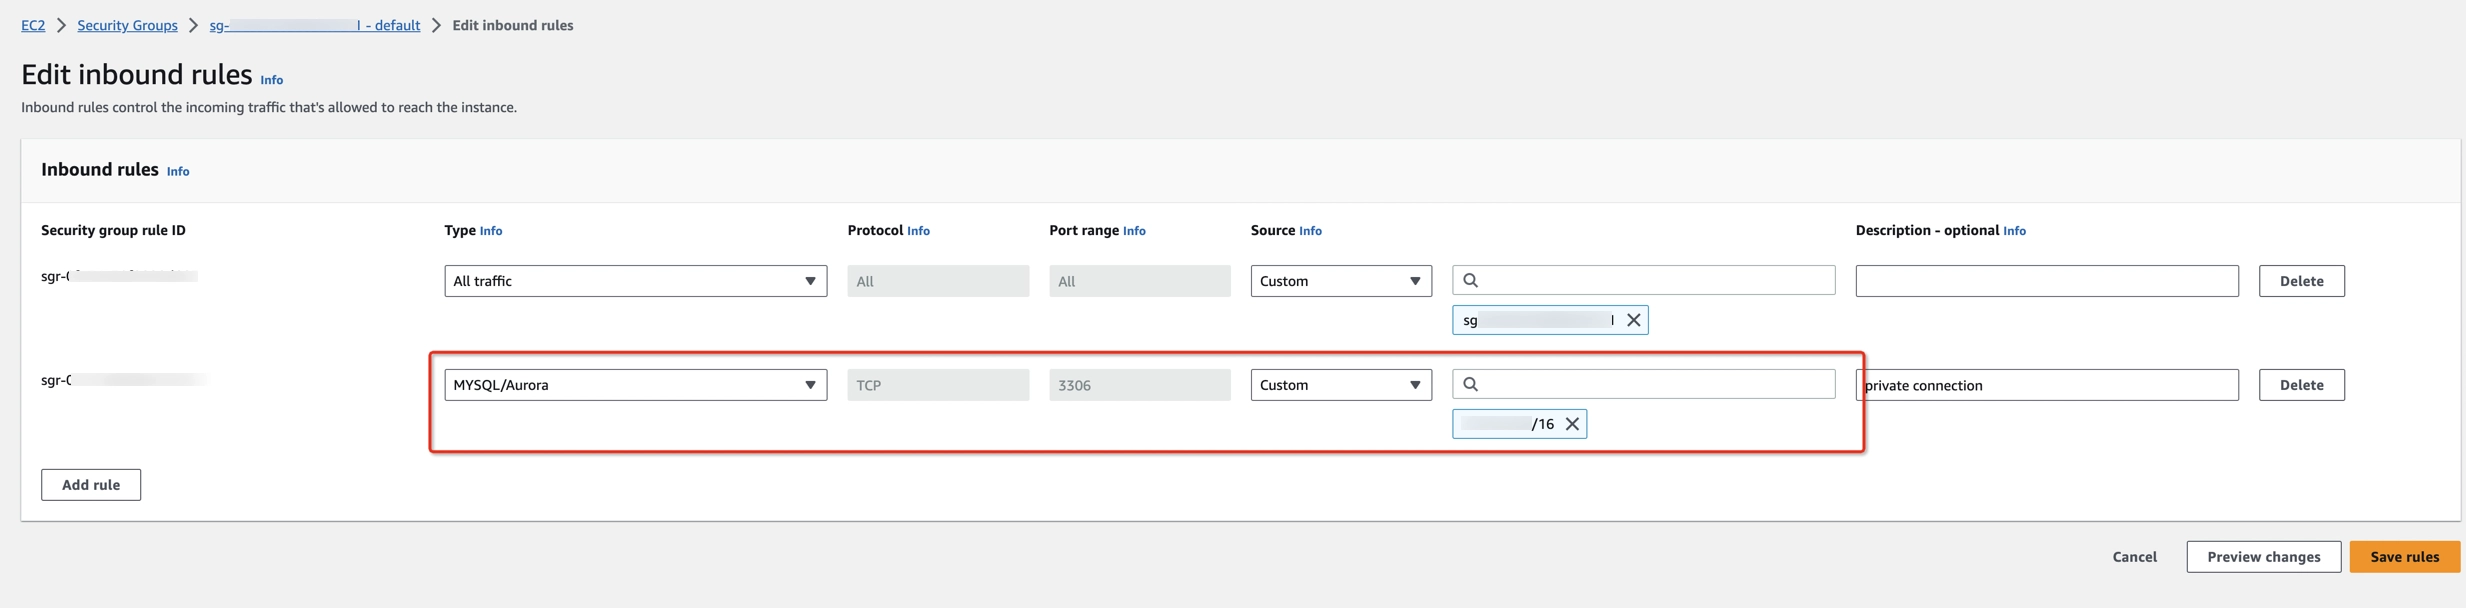
Step 6: Configure the Security Group
To ensure proper connectivity between your application and the RDS instance, you need to configure the security group associated with the RDS instance to allow incoming traffic to the RDS port.
- Sign in to the AWS Management Console and navigate to the Amazon EC2 console at https://console.aws.amazon.com/ec2/.
- In the side navigation pane, click Security groups.
- Select your security group ID for the RDS VPC
- Click Edit Inbound rules > Add rule.
- In the Type column, make sure you set a Custom TCP value, double-check if the port range is correct (i.e. 3306 for MySQL, 5432 for PostgreSQL), and add the Ververica Cloud VPC CIDR address (192.168.0.0/16, 10.0.0.0/24) in the Source column.
- Click on Save rules to apply the changes.
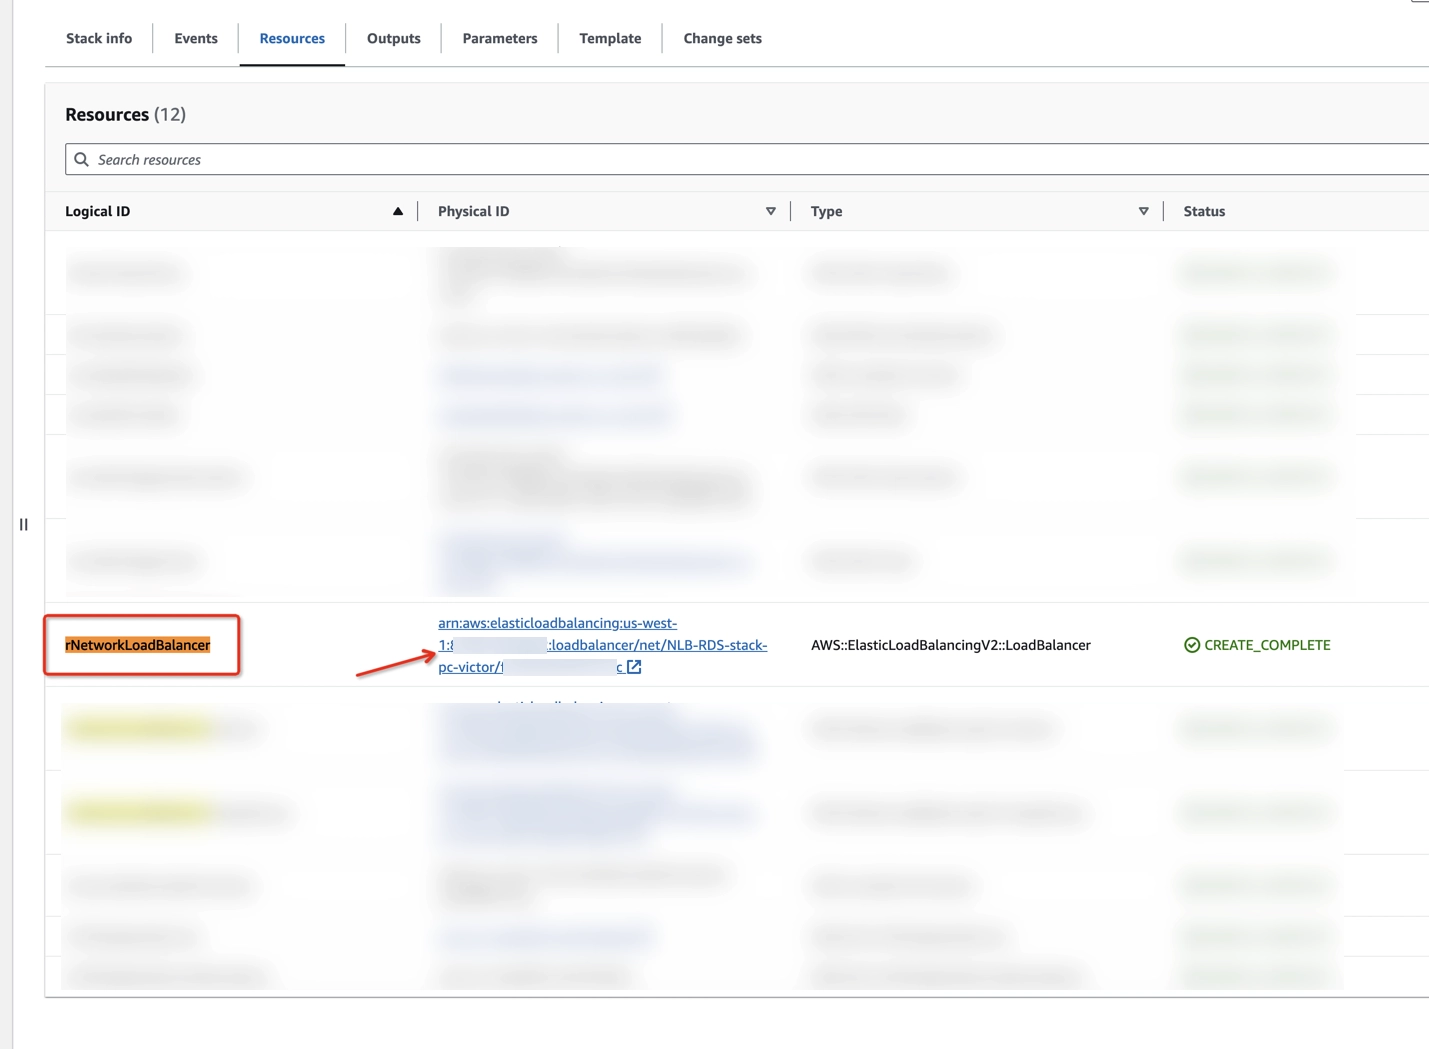
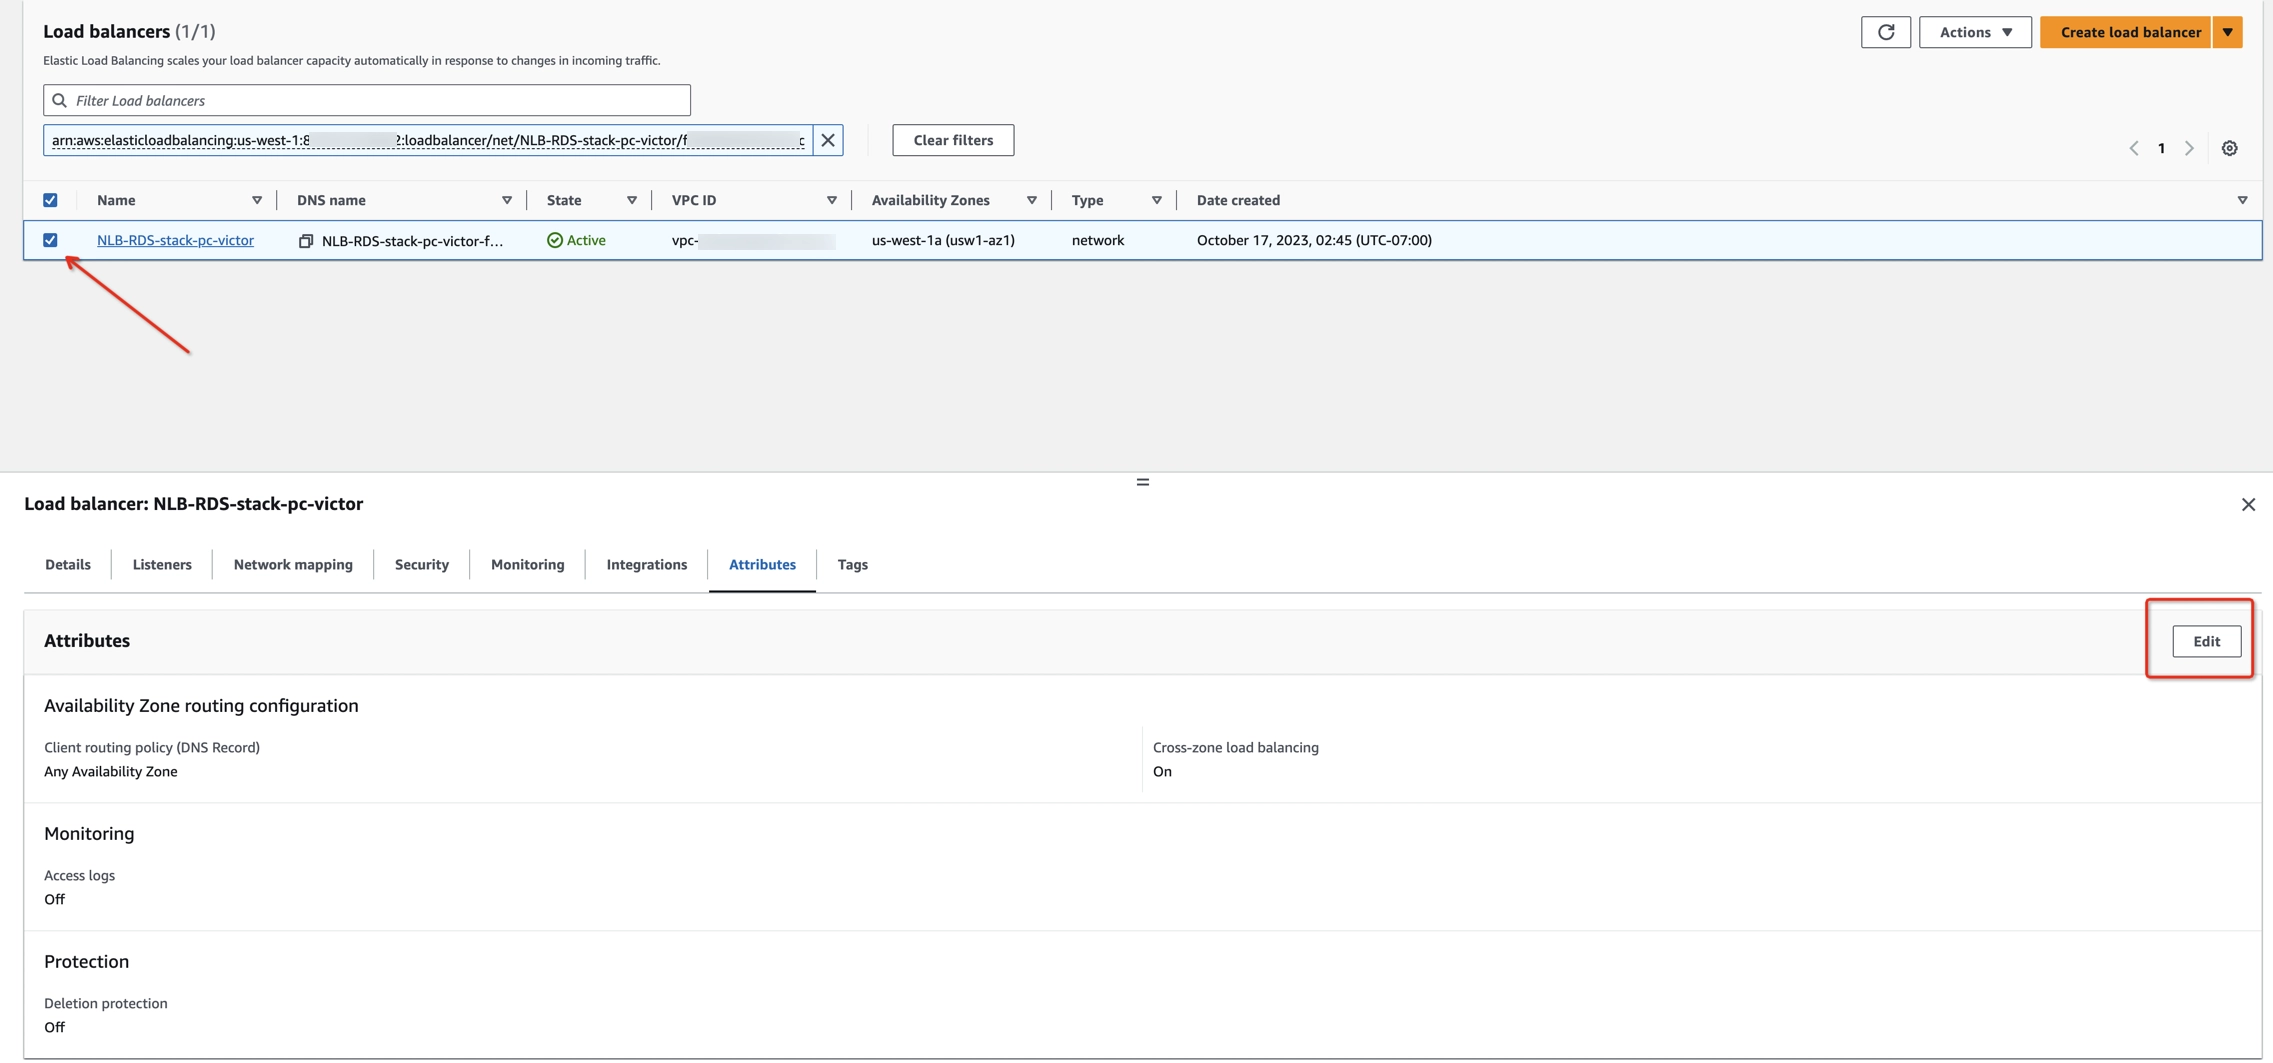
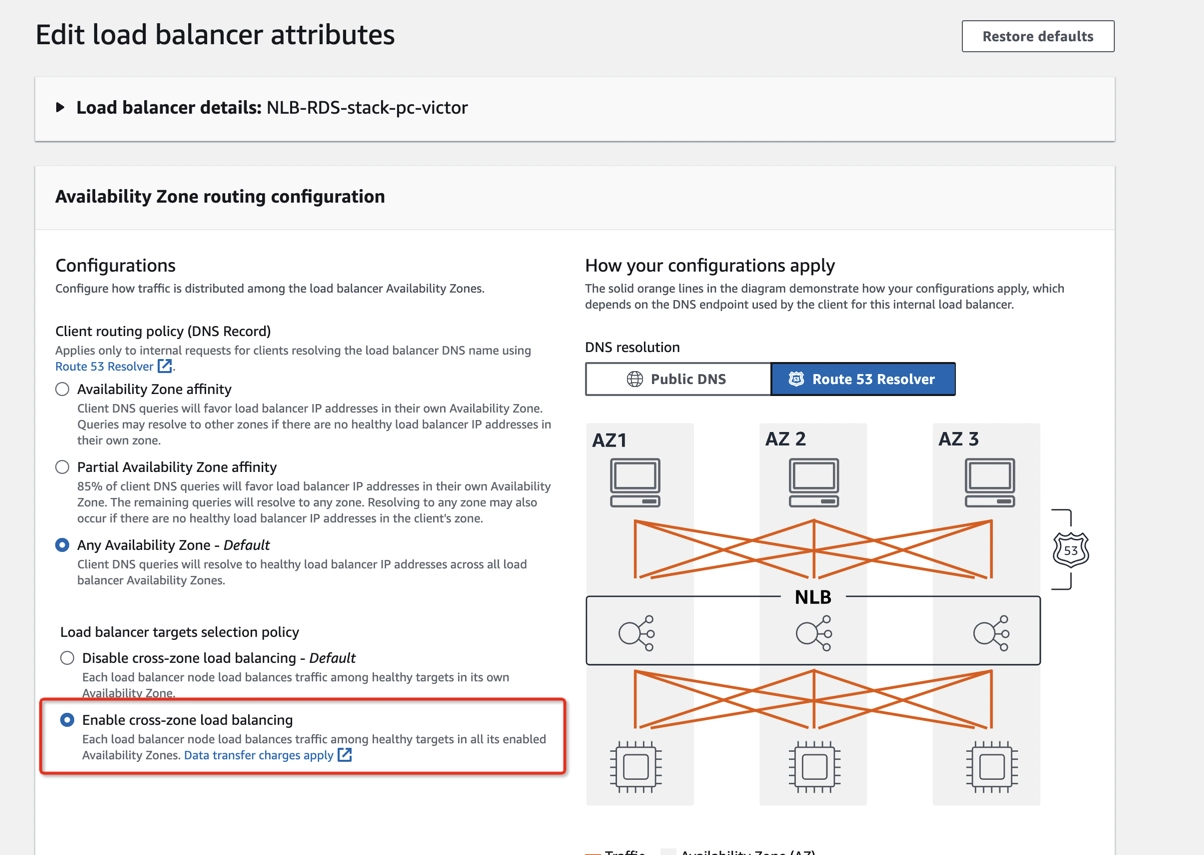
Step 7: Enable cross-zone load balancing for the NLB
- On your Stacks page, click the Resources tab.
- Find rNetworkLoadBalancer in the Logical ID column and click on its physical ID in the Physical ID column.
- Select your network balancer and click on the Attributes tab.
- To enable cross-zone load balancing, click Edit, and toggle Enable cross-zone load balancing.
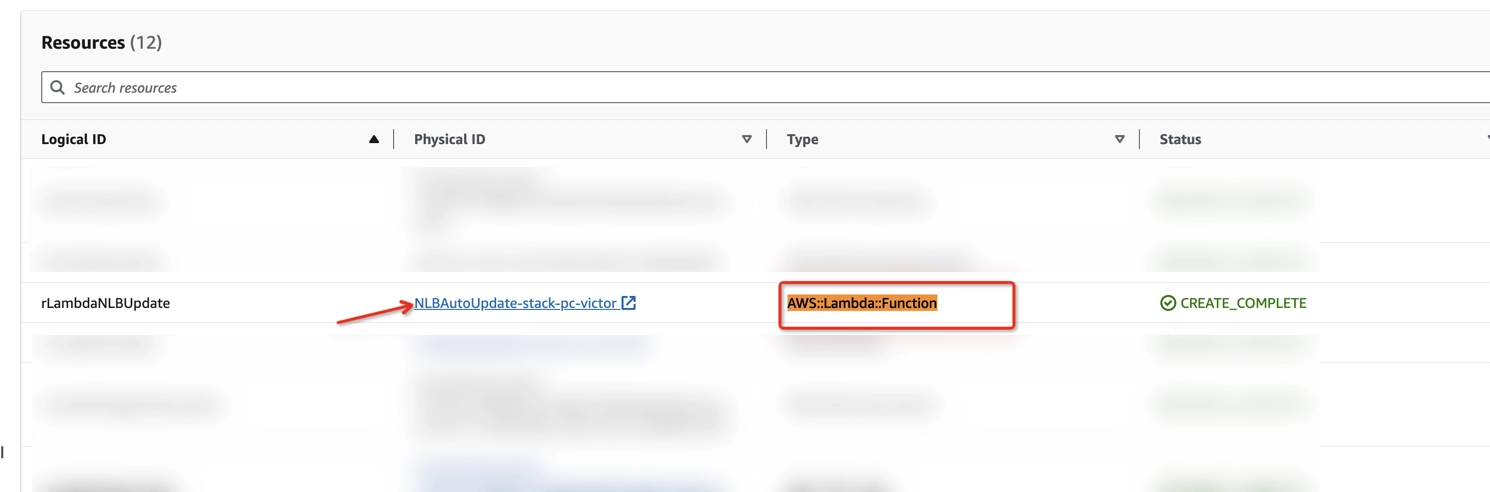
Step 8: Set up a Target Group IP address in the NLB
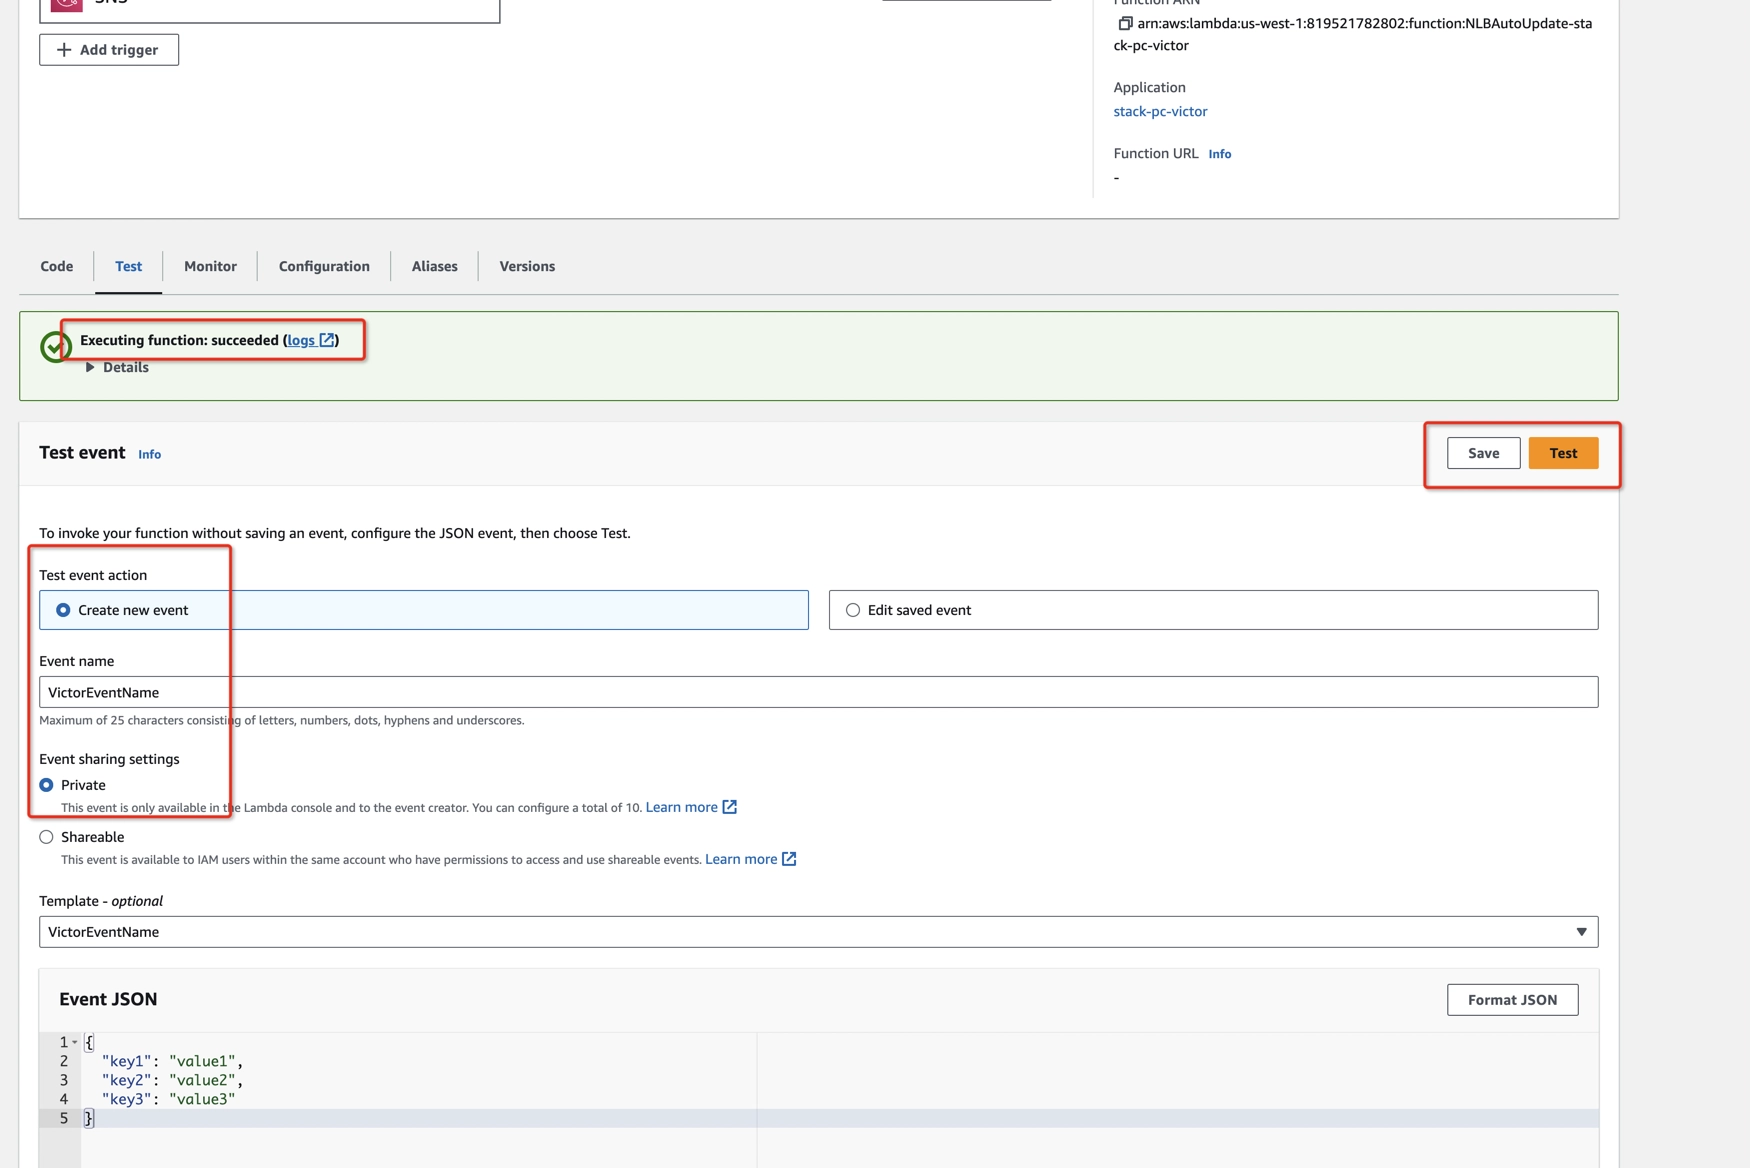
You must call the Lambda function to register a target IP for a Target Group, and you can do this by performing a test run for the Lambda function.
- On the Resources page of your Stack in CloudFormation, find AWS::Lambda::Function type in the Type column, and click on its physical ID in the Physical ID column.
- Scroll down and click Test.
- In the form, in the Event name provide a name for your test, and click Save.
- Click Test again to run the test.
Performing a test run for the Lambda function in this stack updates the IP address of RDS primary instance in the NLB. The Lambda function in this stack is responsible for recovering the target group of NLB, otherwise this connection may be broken after database cluster failover. So it’s important to make sure the Lambda function works fine. From now on, the target will be automatically recovered after database cluster failover.
Step 9: Check health status
Check the target group’s health status. Don’t go to the next step until the target groups are healthy.
Step 10: Collect the endpoint service name and the RDS endpoint name
Check the endpoint service Name
- To check the service name, type
CloudFormationin the search bar at the top of the AWS Console page and click on CloudFormation in the drop-down menu. You can also go directly to CloudFormation. - In the side navigation pane, click Stacks.
- Click on your stack name.
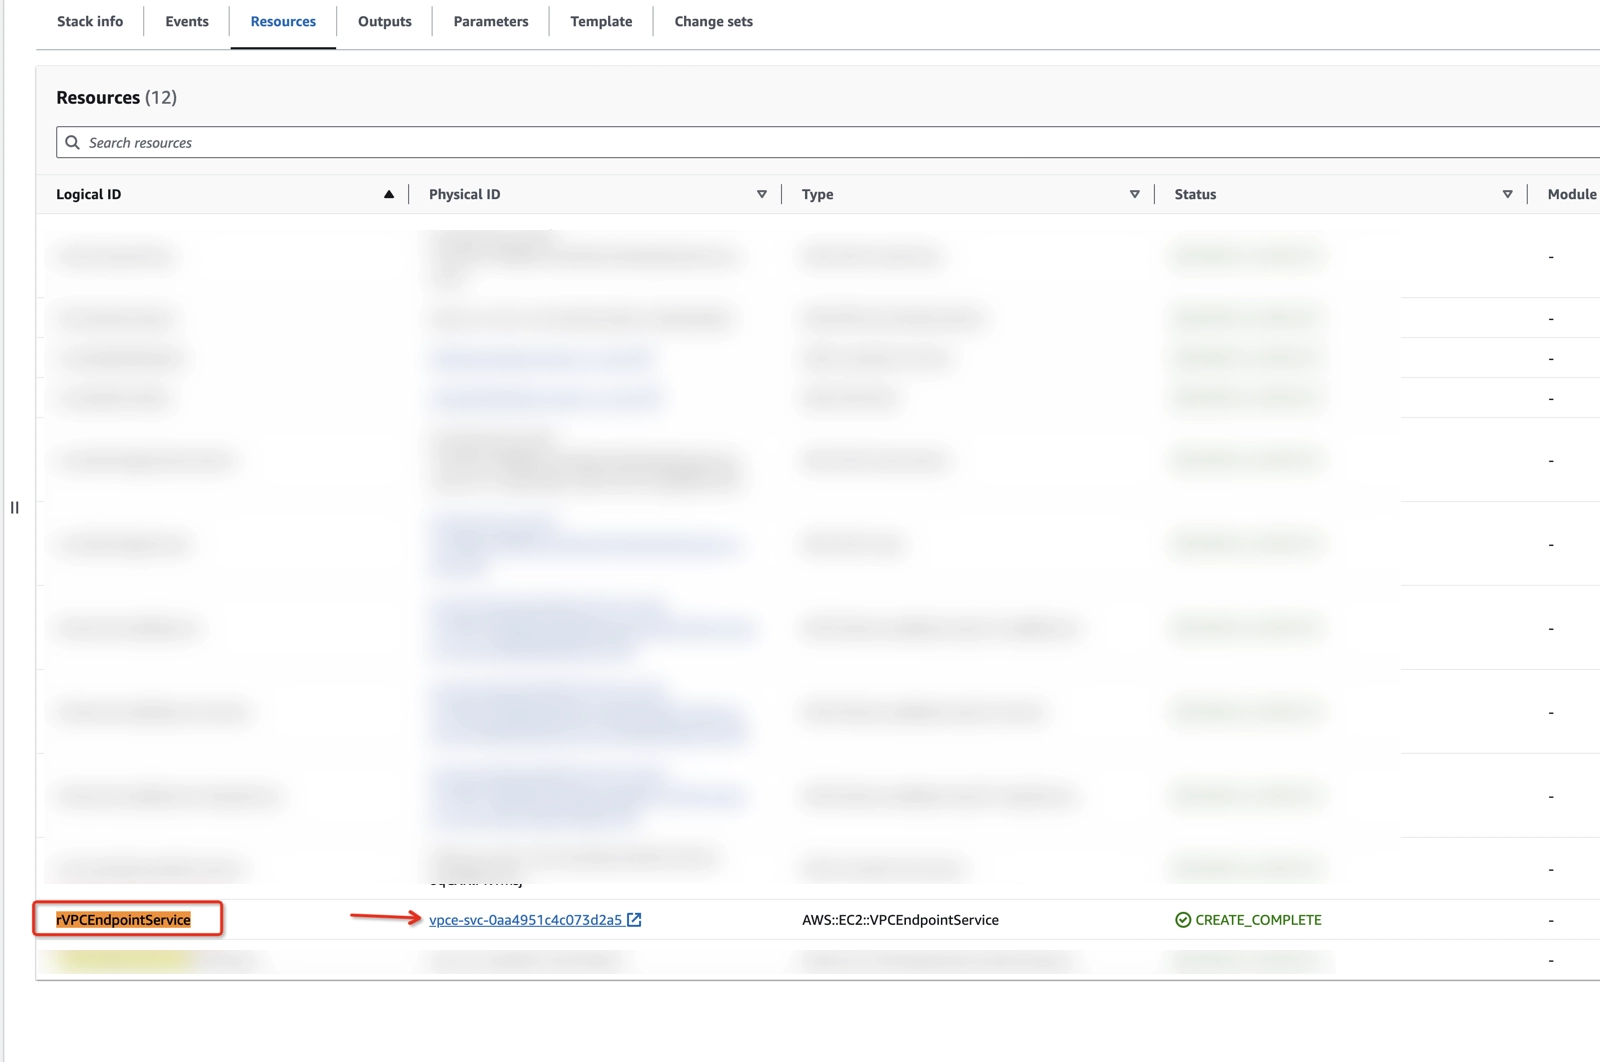
- Click on the Resources tab.
- Find rVPCEndpointService in the Logical ID column, remember its physical ID, and click on its physical ID.
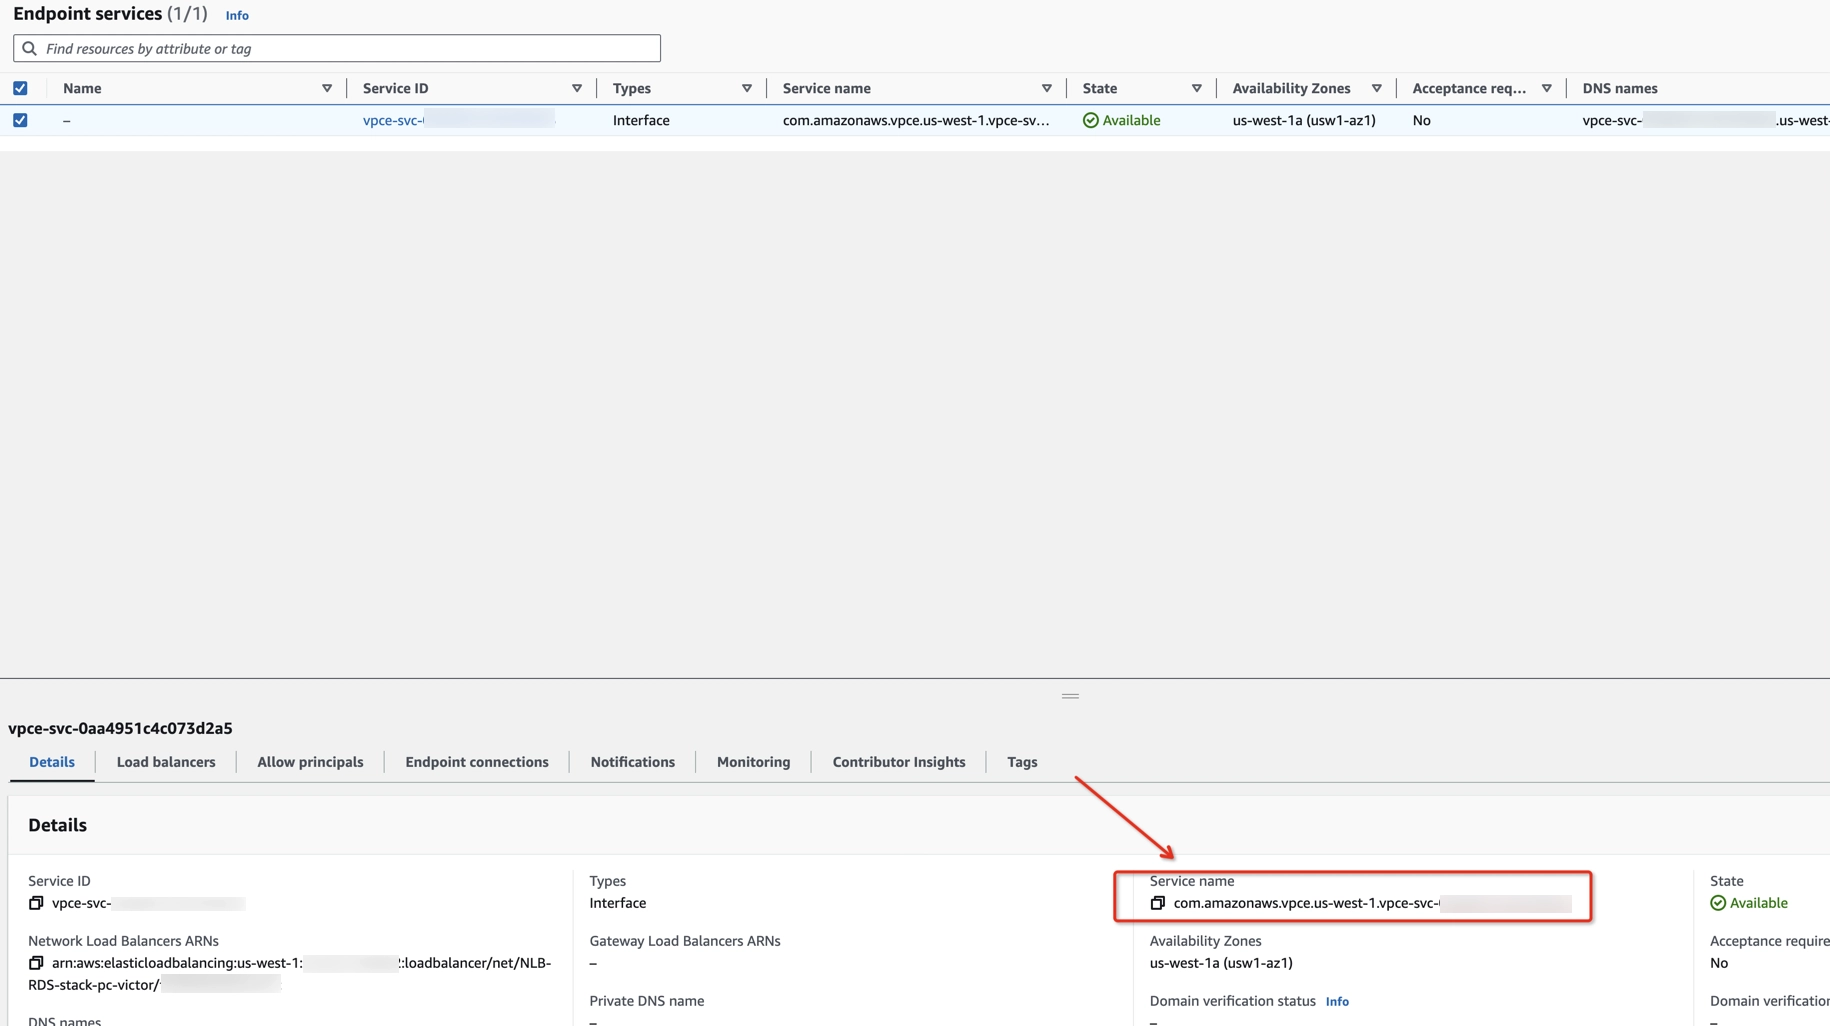
- Find that physical ID in the list of Endpoint services.
- In the Details tab, find Service name, and copy its value.
Check the RDS endpoint name
- To check the endpoint of your database, type RDS in the search bar at the top of the AWS Console page and click RDS in the drop-down menu. You can also go directly to RDS.
- In the side navigation pane, click Databases.
- Click on your DB identifier.4. Copy the endpoint name and port of the Write instance type.

Step 11: Configure Private Connection in Ververica Cloud
Configure the AWS IAM Role
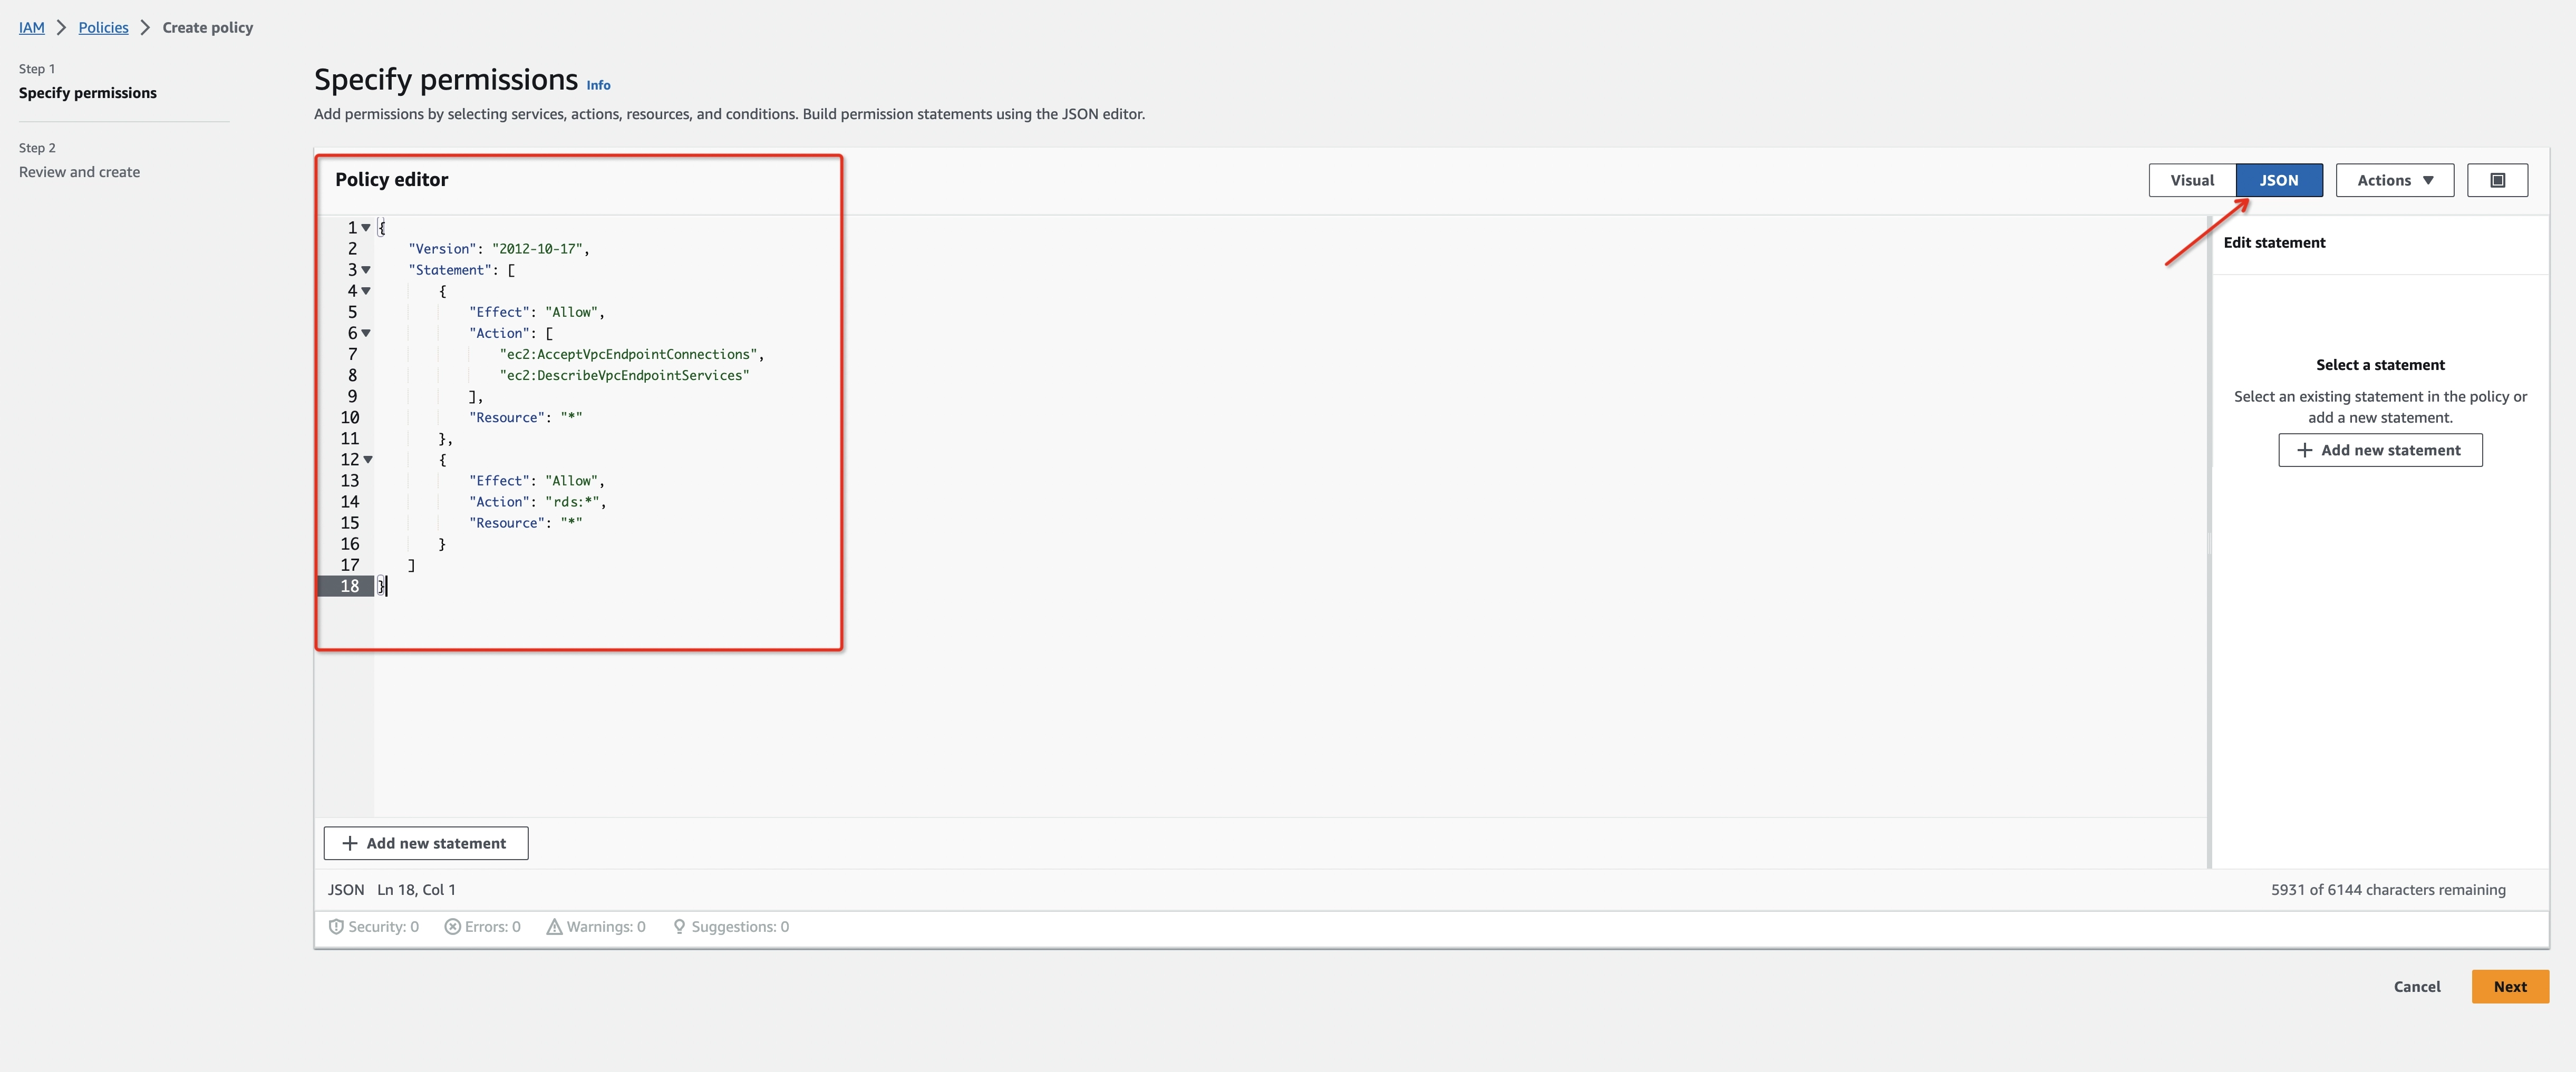
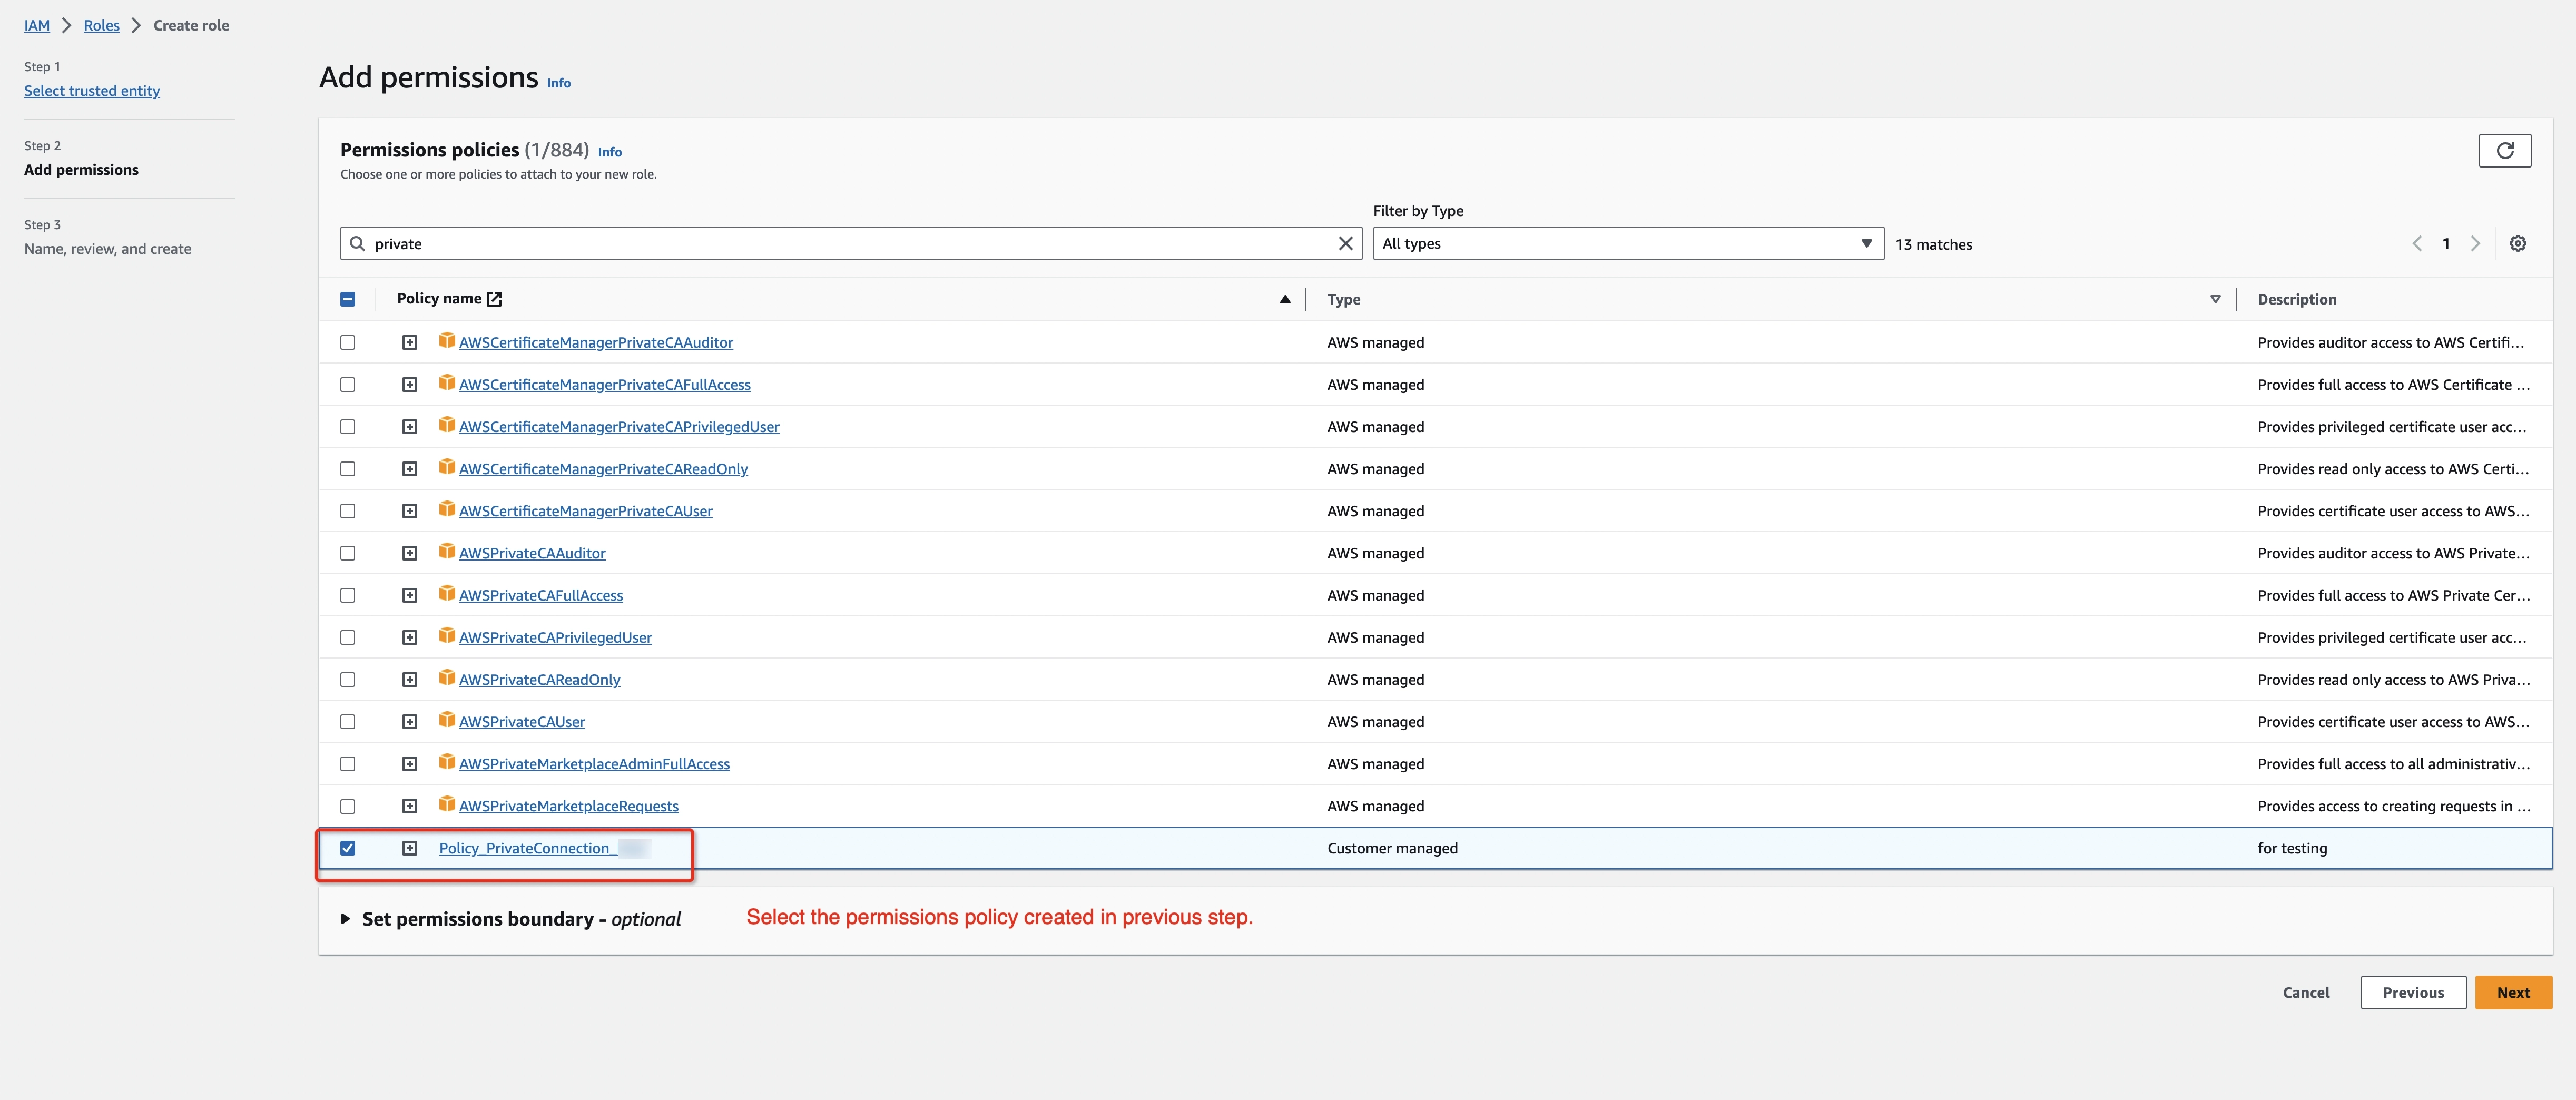
- Create an IAM Permissions Policy with the needed permissions that Ververica Cloud will assume for this role and then accept the endpoint connection request. Refer to aws doc to learn more information about the policies.
{
    "Version": "2012-10-17",
    "Statement": [
        {
            "Effect": "Allow",
            "Action": [
                "ec2:AcceptVpcEndpointConnections",
                "ec2:DescribeVpcEndpointServices"
            ],
            "Resource": "*"
        },
        {
            "Effect": "Allow",
            "Action": "rds:*",
            "Resource": "*"
        }
    ]
}
-
Create an IAM Role to grant third parties like Ververica Cloud to access your AWS resources with the previous permission policy.
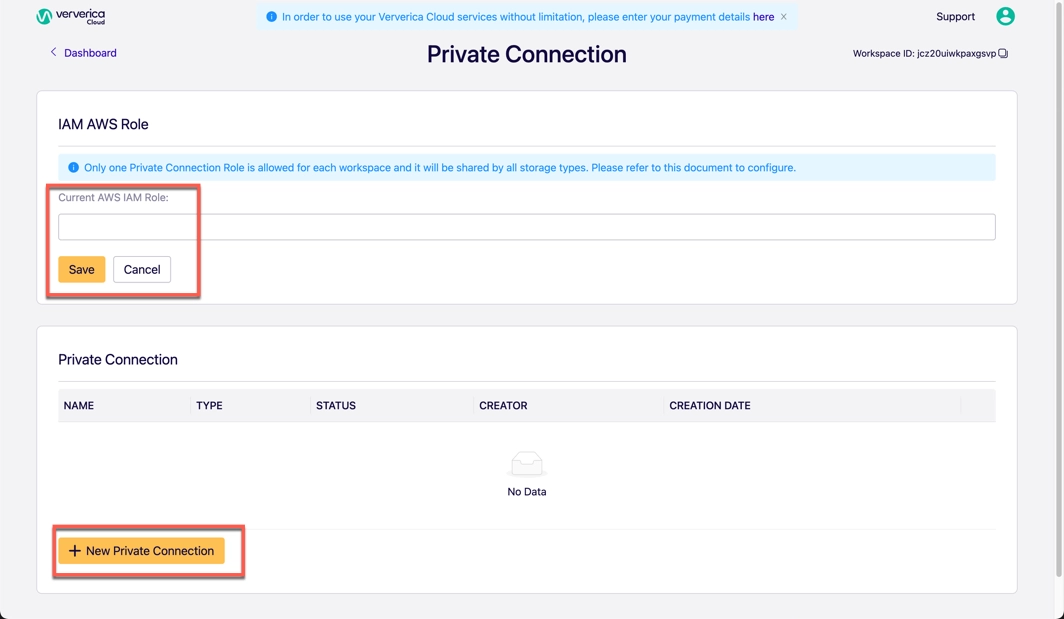
infoThe ‘External ID’ is actually the Workspace ID where you will configure this private connection. You can copy it from the top-right corner of the Private Connection page of that workspace. You can also find it in the URL when you enter the Ververica Console.
794031221915 is Ververica's AWS account ID.
Please create a dedicated IAM Role for each Ververica Cloud workspace. If the workspace is already bound with an IAM role, please update the policy instead of creating a new one. Refer to the AWS docs for how to create/update the IAM Role.
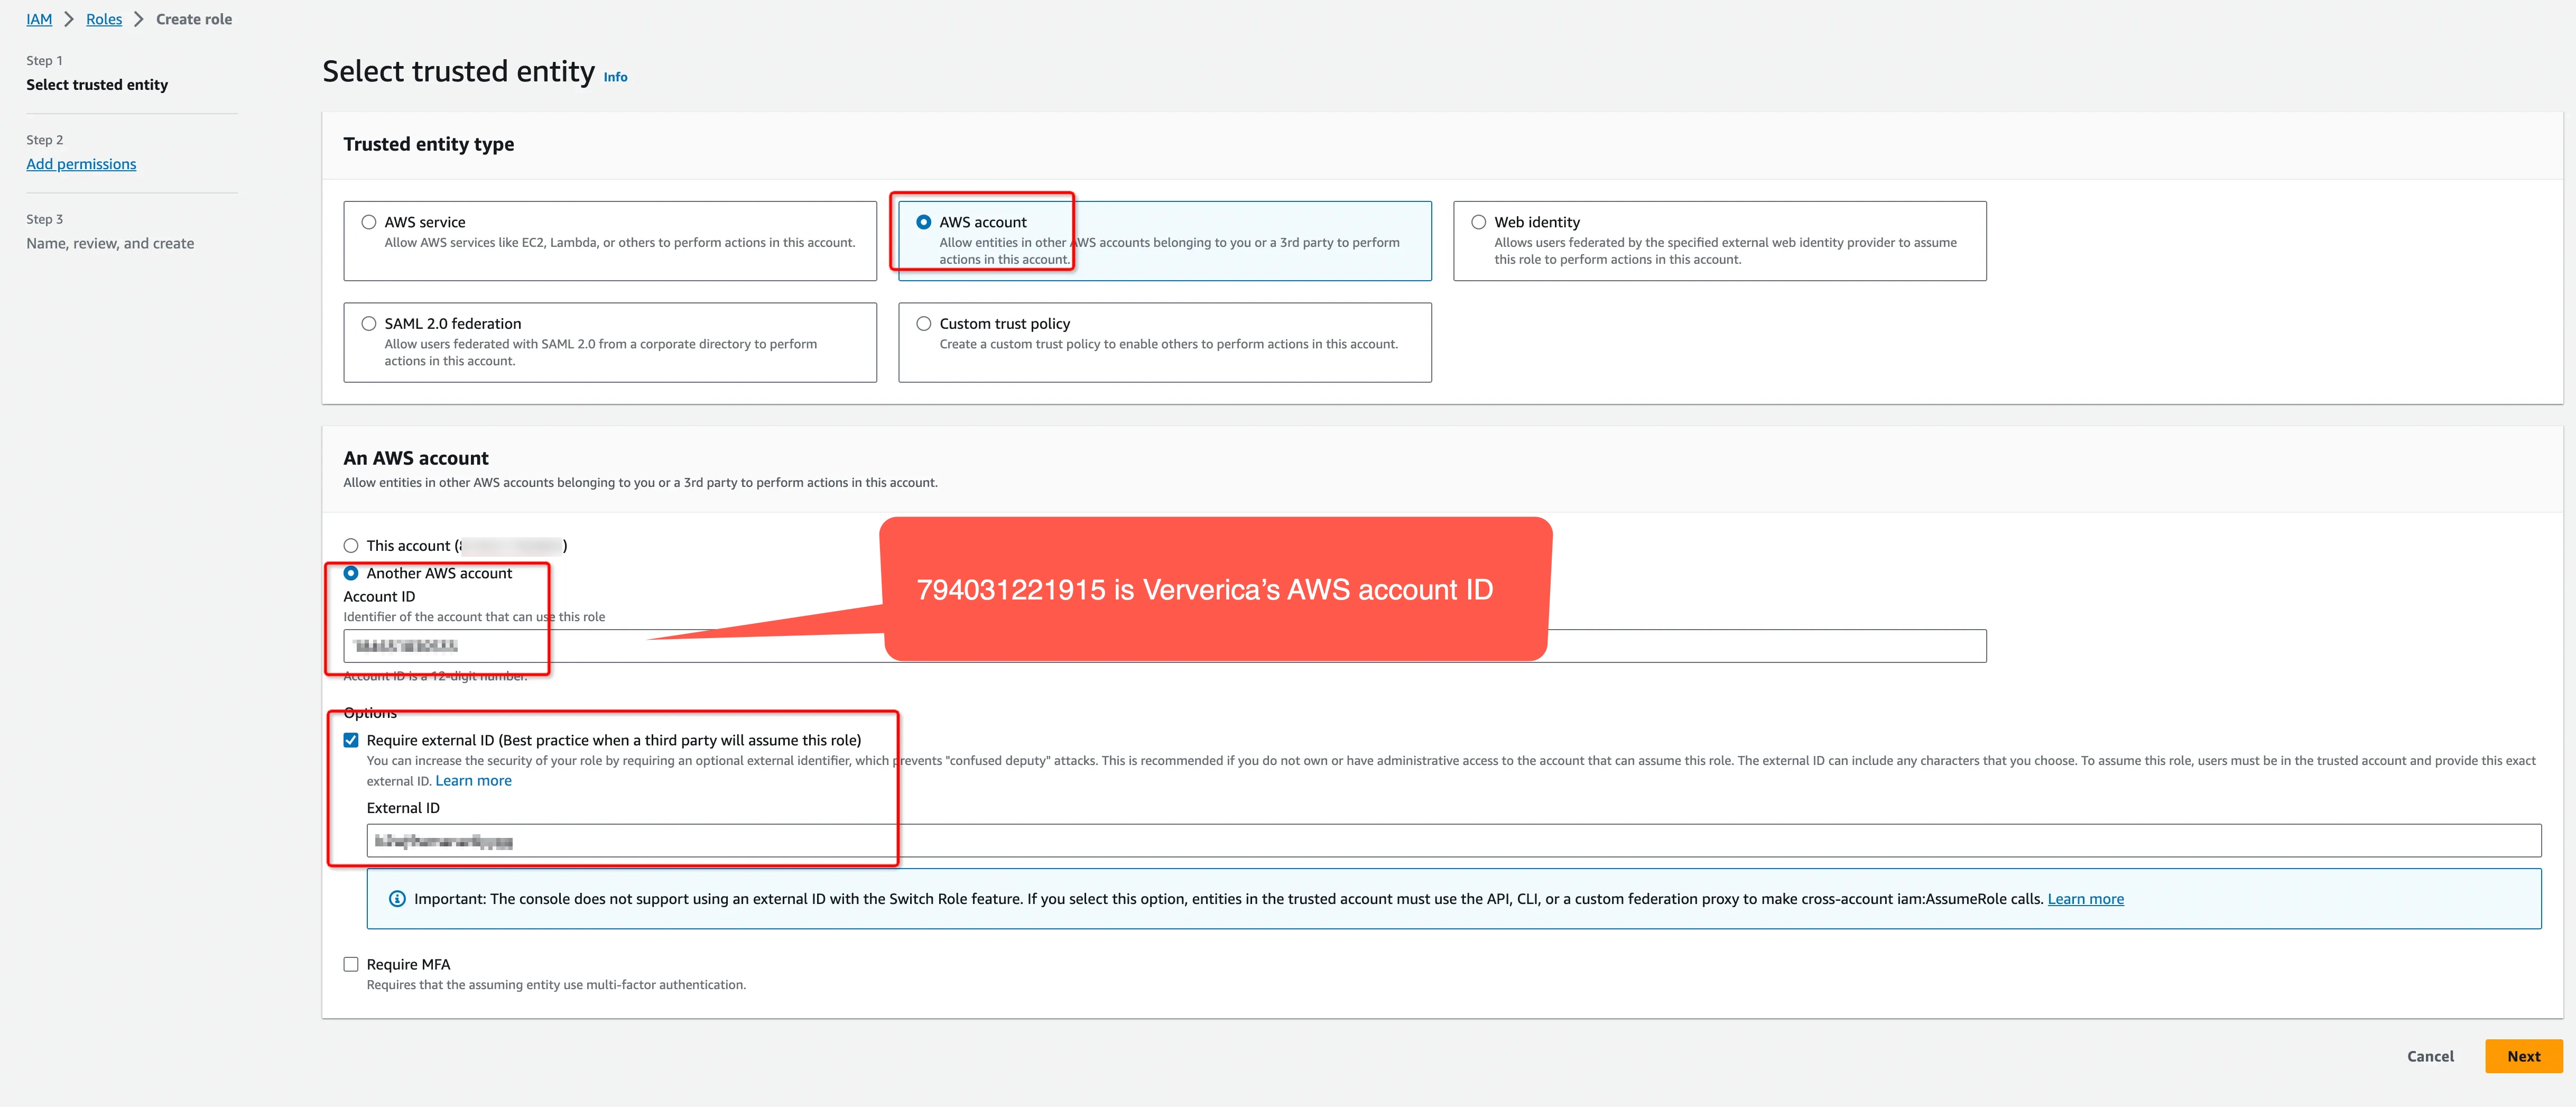
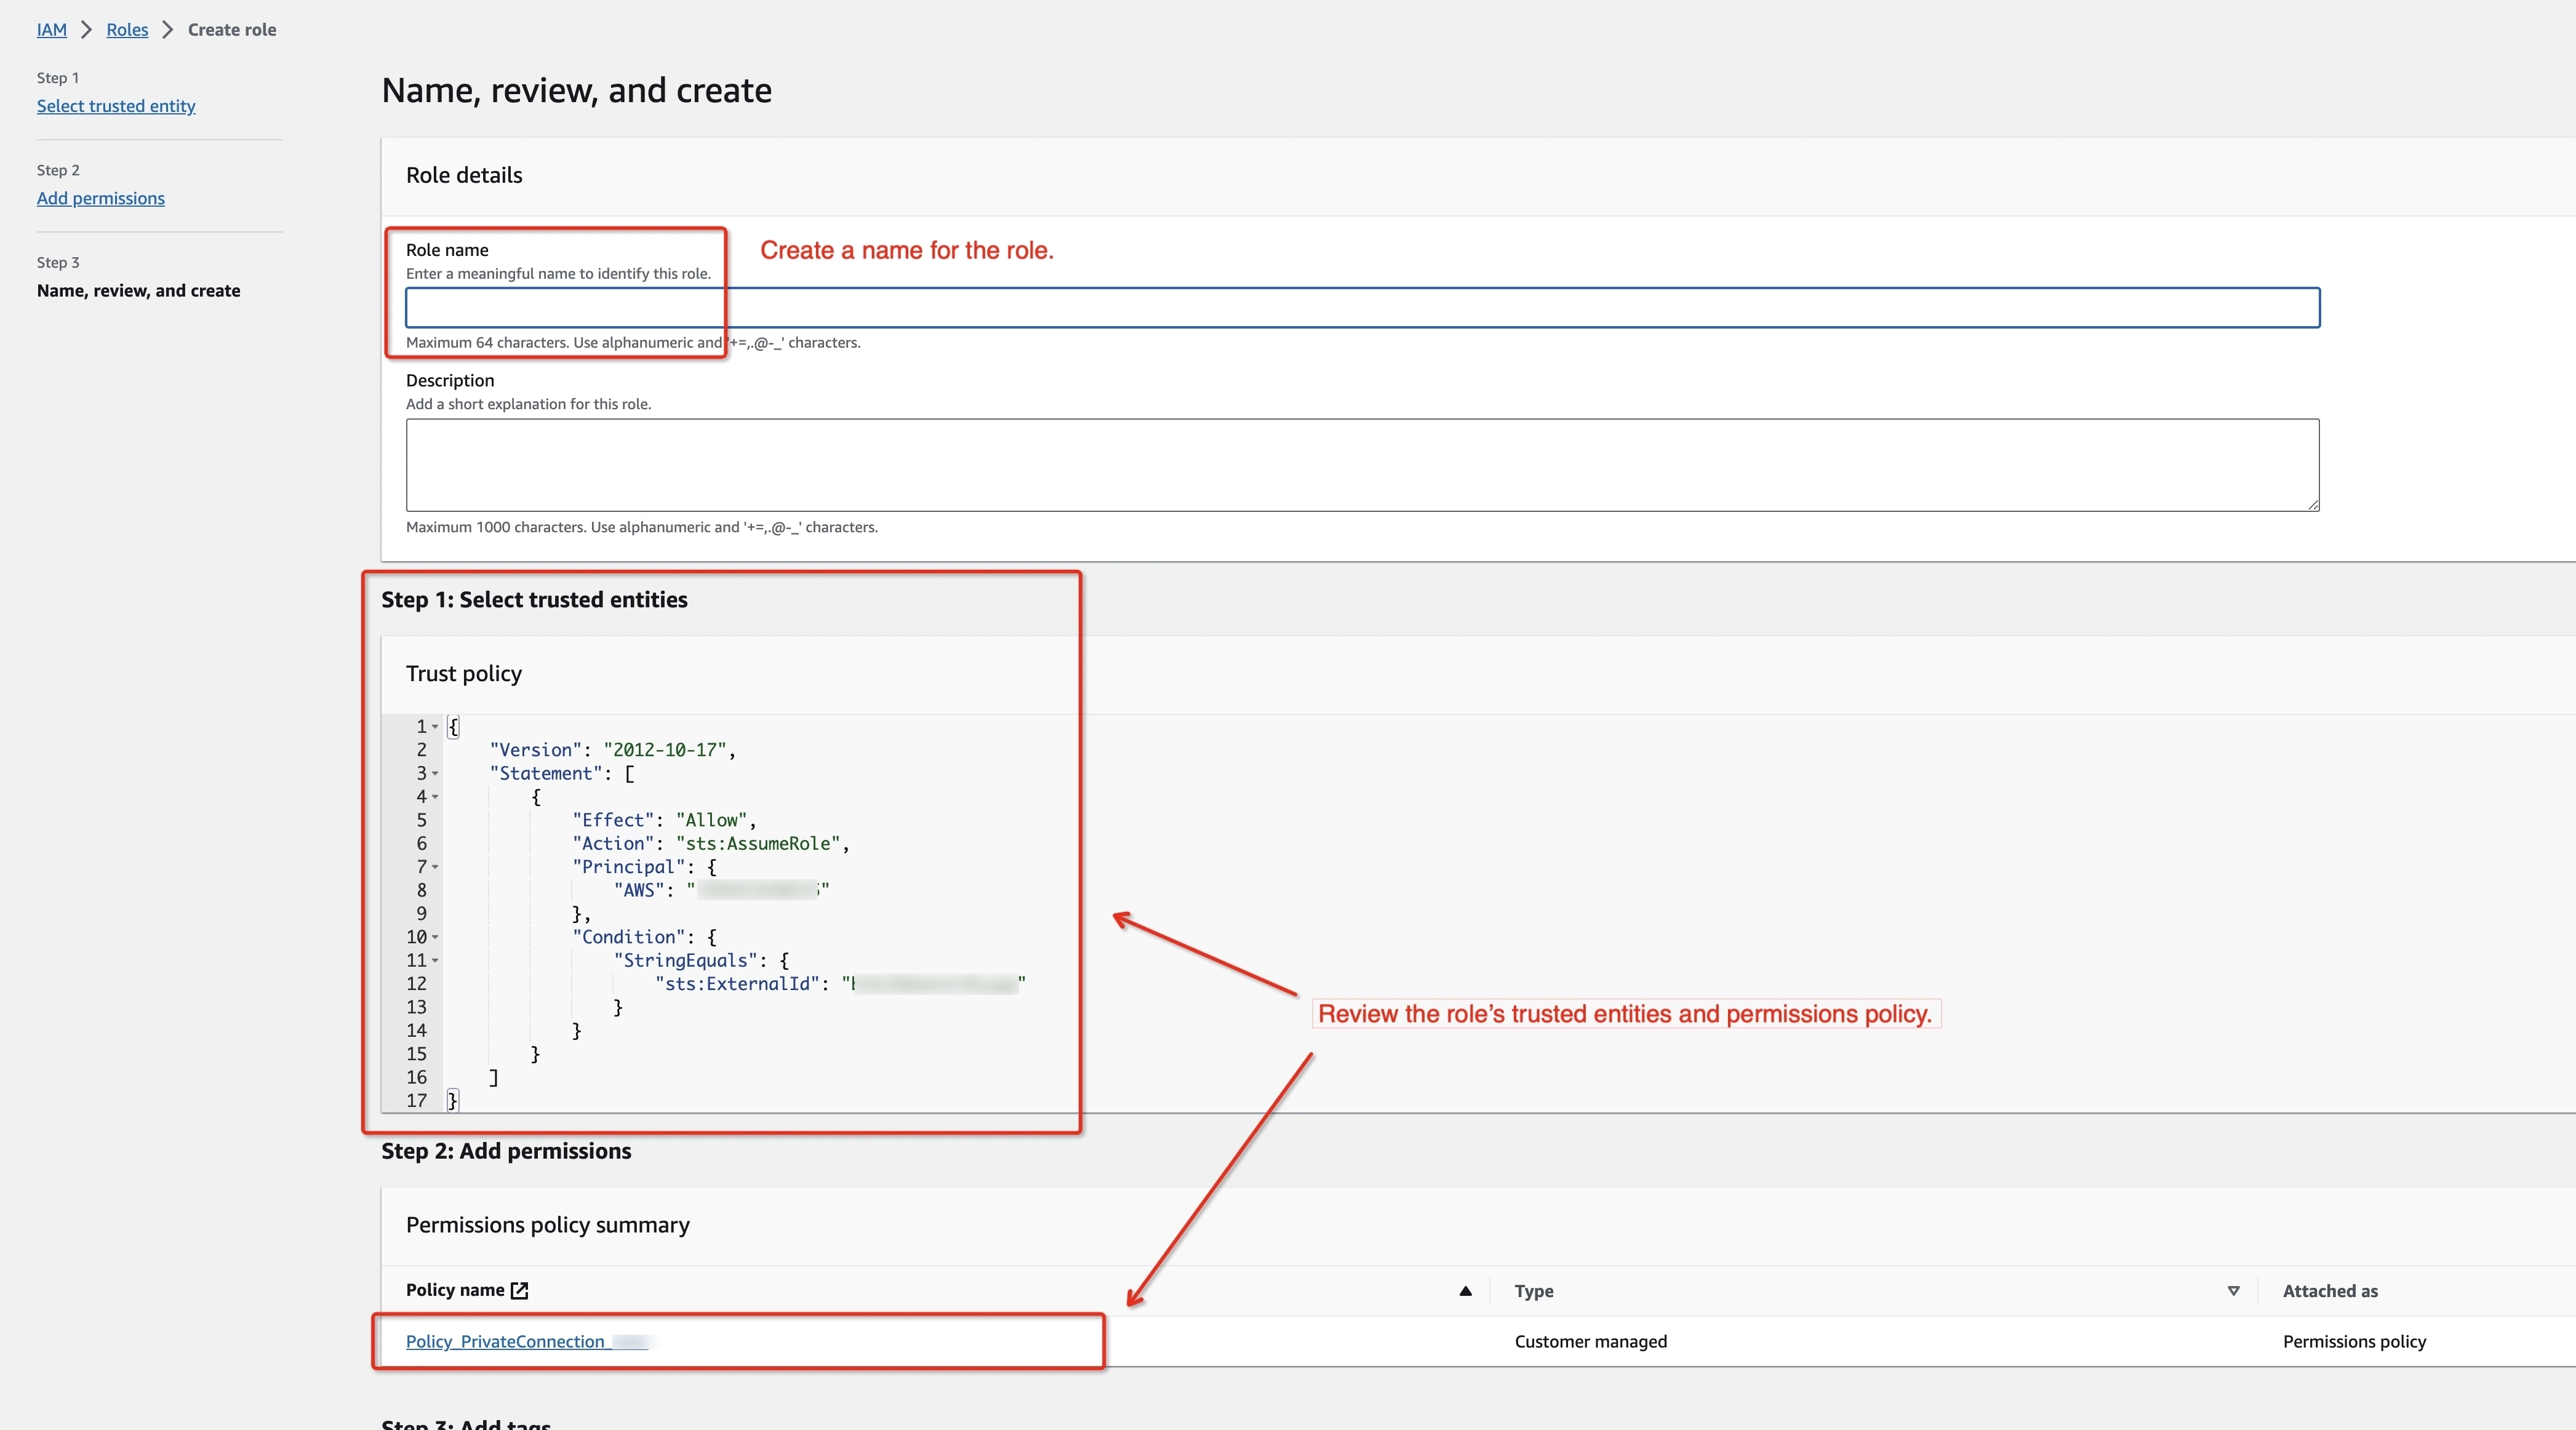
Please create a dedicated IAM Role for each Ververica Cloud workspace. If the workspace is already bound with an IAM role, please update the policy instead of creating a new one. Refer to the AWS doc for how to create/update the IAM Role.
- Get the ARN of this IAM Role for the next step.
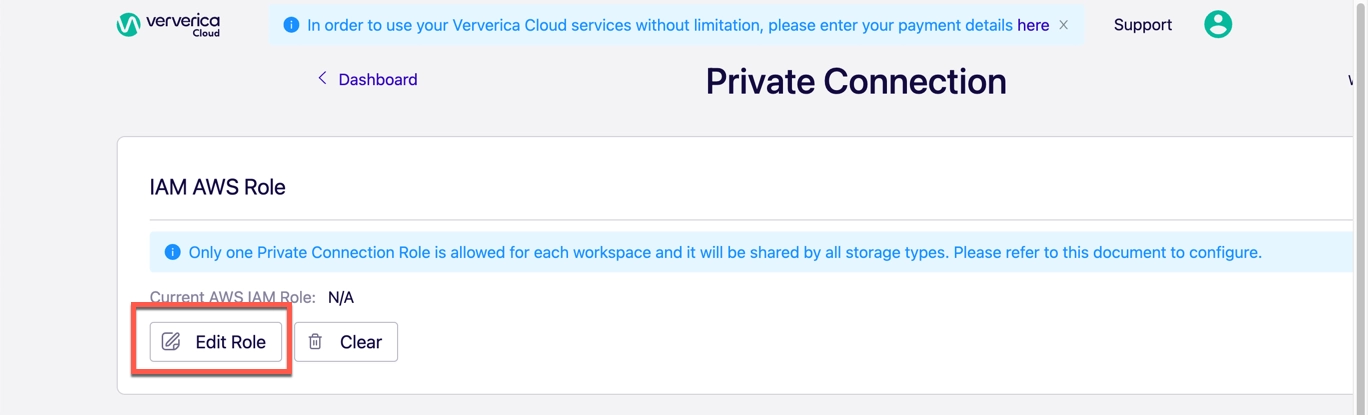
Add the Private Connection
- Log in to Ververica Cloud and display your Dashboard.
- Click on the menu button (triple dots) at the end of the workspace entry and choose Private Connection.
- In the Private Connection page, click Edit Role.
- In the Current AWS IAM Role field, bind the IAM AWS Role and click Save.
- Click New Private Connection, fill the input box with the information in the previous step and click Save.
After the private connection turns to Created, and the IAM Role turns to Ready, you can start your Flink jobs and read/write data to MSK. Refer to the Flink documentation for how to use Kafka connector in Flink SQL.