Configure Autopilot and Scheduled tuning
This topic describes how to configure the two tuning modes supported by Ververica Cloud: Autopilot and Scheduled tuning. This topic also describes the precautions that you must take when you configure the tuning mode.
There are two ways of working with Autopilot and Scheduled tuning:
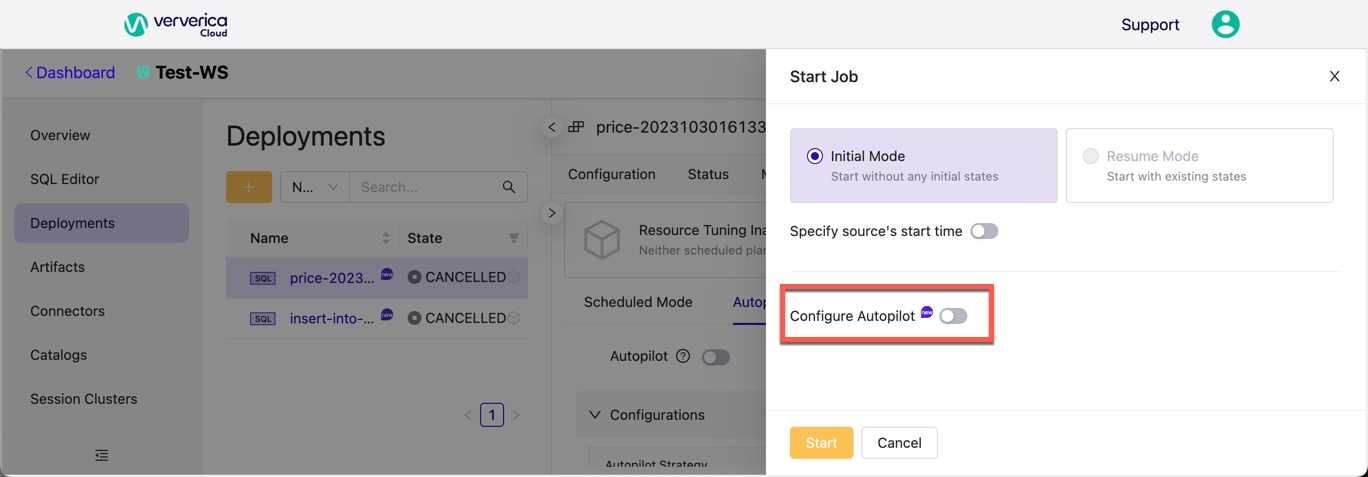
When starting a job from the Deployments tab, enable the Configure Autopilot option and make configuration changes:
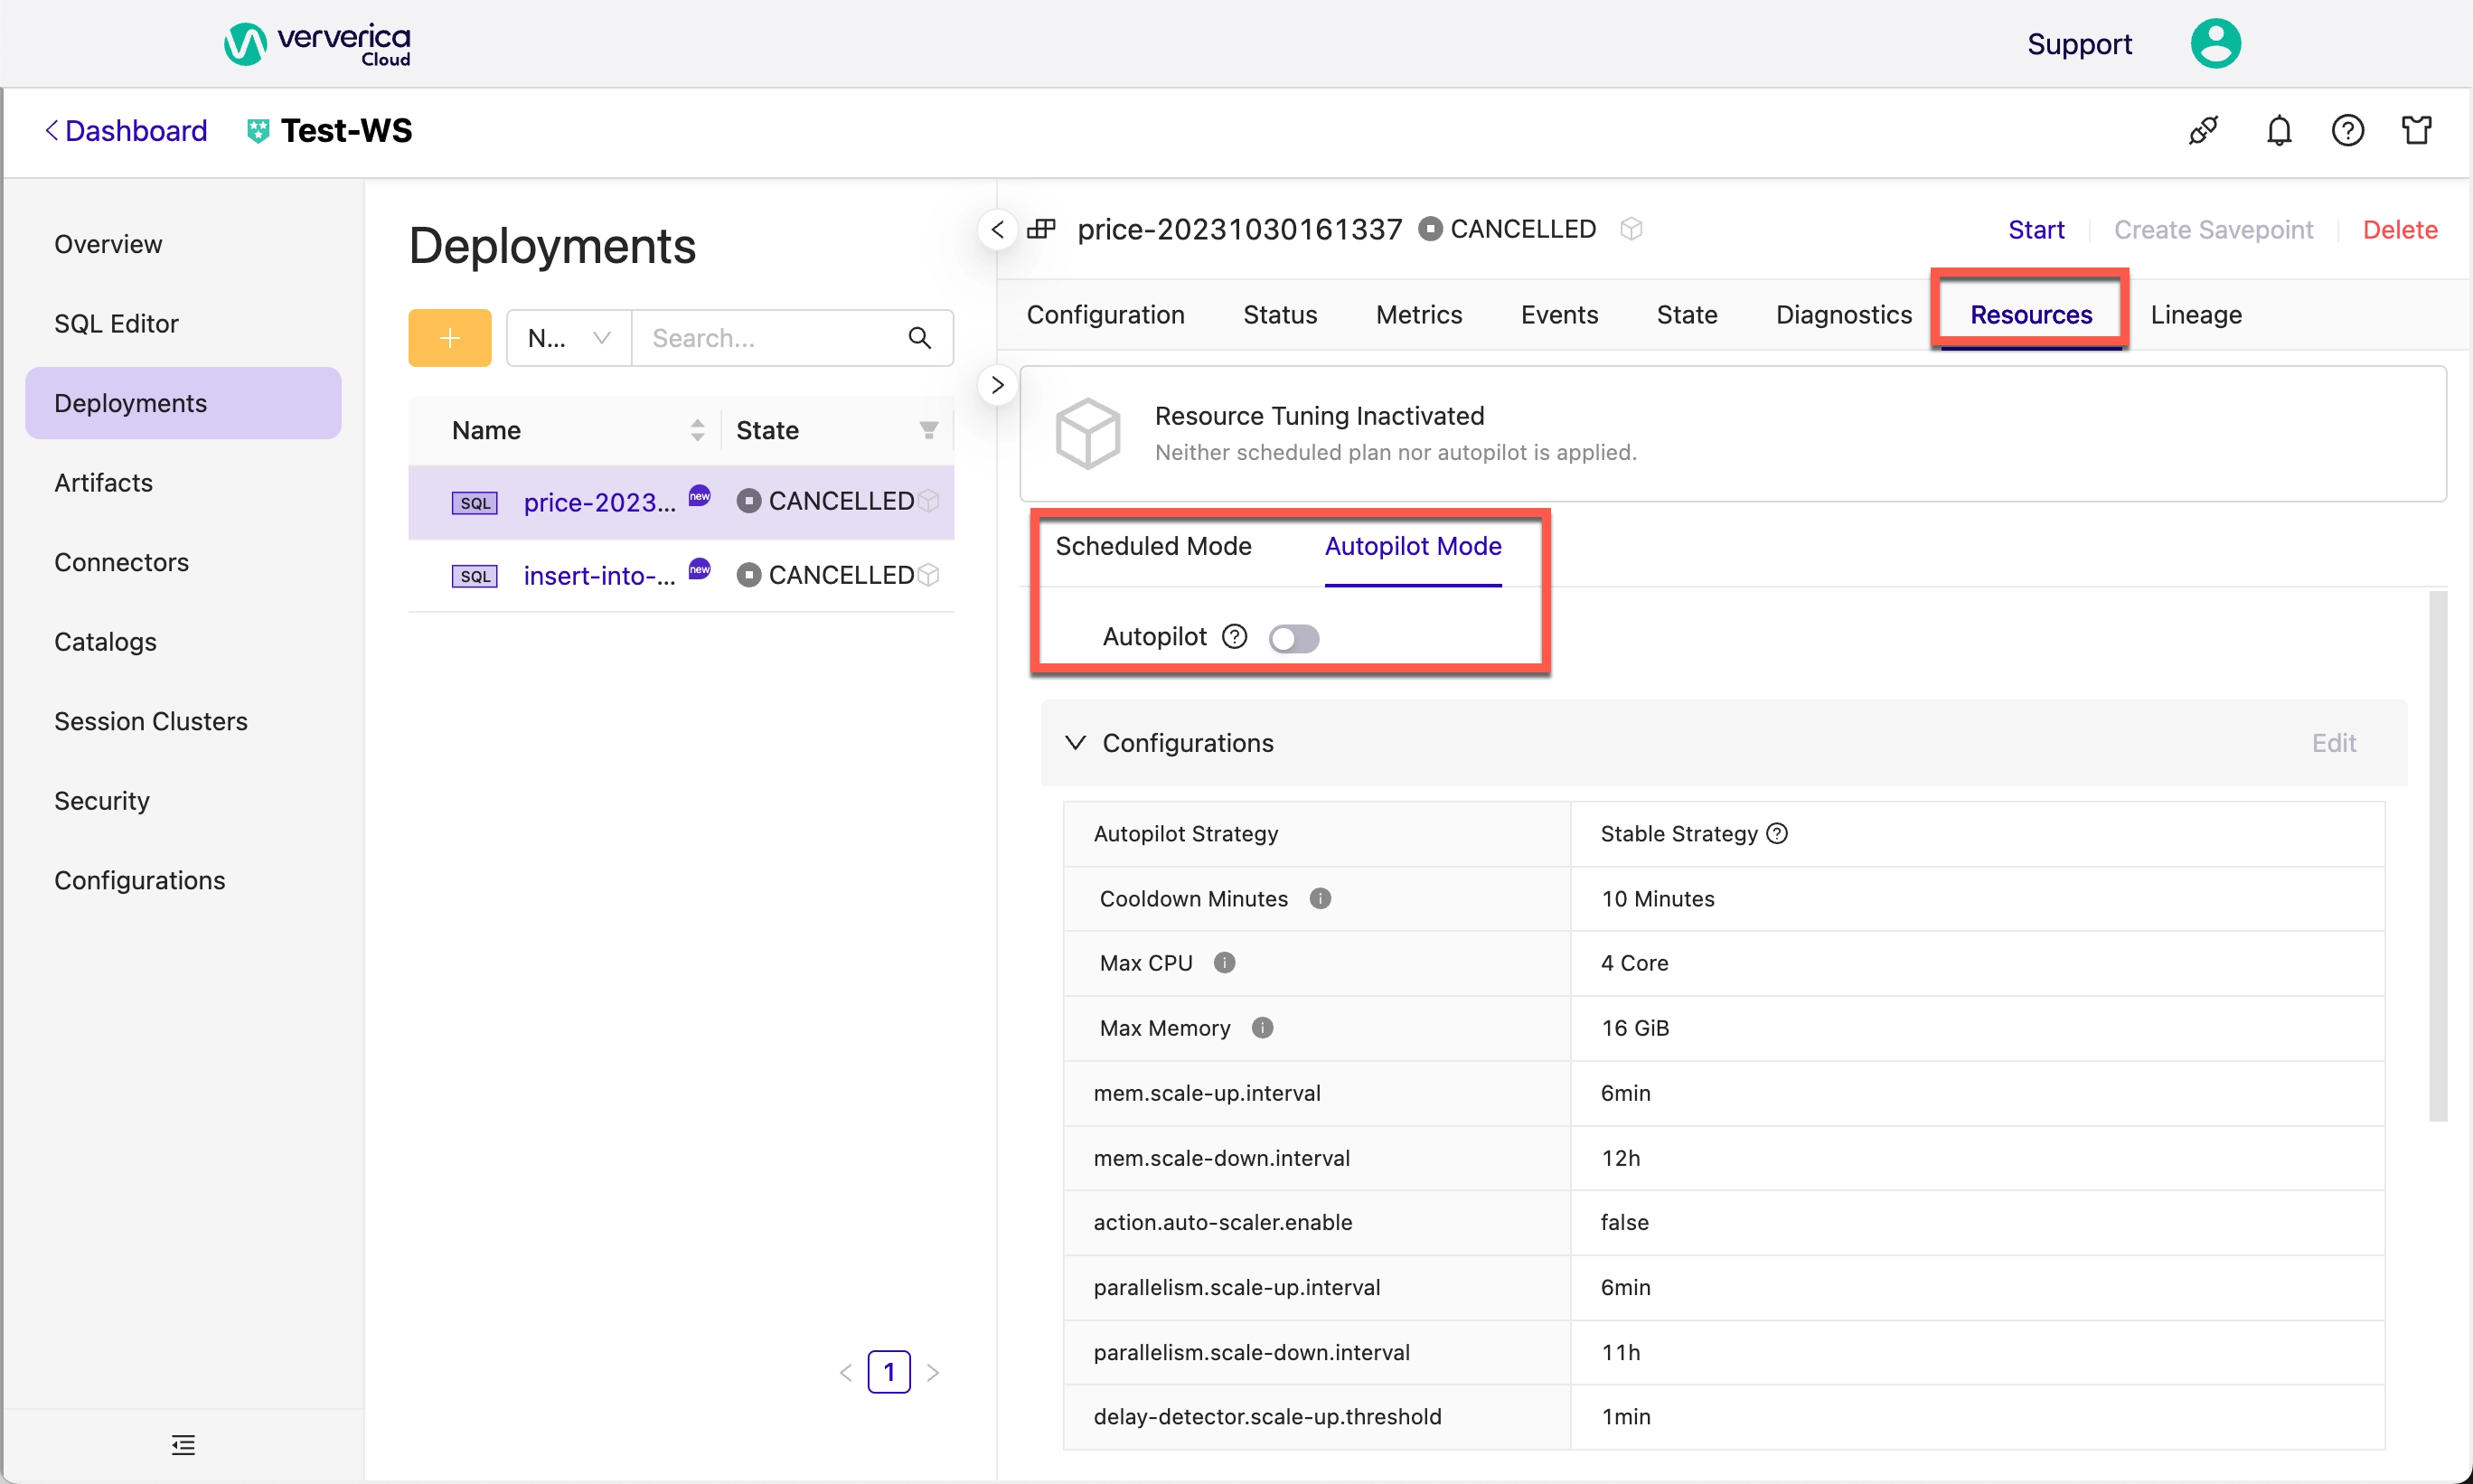
When modifying a job, configure the Autopilot and Scheduled tuning options via the Deployments > Resources tab:
Background information
In most cases, a large amount of time is required for deployment tuning. For example, when you publish a draft, you must configure resources, parallelism, and the number and size of TaskManagers for the draft. When a deployment is running, you must adjust the resources of the deployment to maximize resource utilization. If backpressure occurs on the deployment or the latency increases, you must adjust the configurations of the deployment. You can choose a tuning mode based on your business requirements. The following table describes the tuning modes.
| Tuning Mode | Scenario | Benefit | References |
|---|---|---|---|
| Disabled (default mode) | You did not configure Autopilot or scheduled tuning but you want to optimize deployment resources in a simple manner. | Allows you to manually adjust deployment resources based on the resource suggestions that are provided in scenarios where Autopilot or scheduled tuning is not enabled. Resource optimization suggestions on a deployment are based on the running status of the deployment. The optimization suggestions are not automatically applied to the deployment. You must manually adjust the resources of the deployment based on your business requirements. | None |
| Autopilot | A deployment uses 30 compute units (CUs). After the deployment runs for a period of time, the CPU utilization and memory usage of the deployment are sometimes excessively low when no latency and no backpressure occur in the source. If you do not want to manually adjust the resources of the deployment, you can enable Autopilot to allow the system to automatically adjust the resources. When the resource usage is low, the system automatically downgrades the resource configuration. When the resource usage reaches a specified threshold, the system automatically upgrades the resource configuration. | Helps you adjust the parallelism and resource configuration for a deployment in an efficient manner. Globally optimizes your deployment. This helps handle performance issues, such as low deployment throughput, upstream and downstream backpressure, and a waste of resources. | For more information about the default tuning actions of Autopilot, see Default tuning actions of Autopilot. For more information about how to enable the Autopilot feature, see Enable and configure Autopilot. |
| Scheduled | A deployment has the time interval characteristics based on business activities. For example, the peak hours of the deployment are from 09:00:00 to 19:00:00 every day, and the off-peak hours of the deployment are from 19:00:00 to 09:00:00 of the next day. In this case, you can enable scheduled tuning to use 30 CUs for your deployment during the peak hours and 10 CUs during the off-peak hours. Note: You must obtain the resource usage in each time period. | Helps you adjust the parallelism and resource configuration for a deployment in an efficient manner. Globally optimizes your deployment. This helps handle performance issues, such as low deployment throughput, upstream and downstream backpressure, and a waste of resources. | For more information about how to configure scheduled tuning, see Using Scheduled Mode. |
Limits
- You cannot modify the parallelism for a deployment if you enable the Unaligned Checkpoints feature.
- Autopilot is not supported for deployments that are deployed in session clusters.
- Autopilot cannot resolve all performance bottlenecks of streaming deployments.The performance bottlenecks of streaming deployments are determined based on all the upstream and downstream stores. If a streaming deployment of fully managed Flink encounters a performance bottleneck, you can use Autopilot to optimize the resource configuration. However, Autopilot may fail to work when some conditions are not met. For example, Autopilot may require that the traffic smoothly changes, no data skew exists, and the throughput of each operator expands linearly when the parallelism for the deployment increases. If the business logic of the deployment deviates significantly from the preceding conditions, some issues may occur. Examples:
- The parallelism for the deployment cannot be modified, or the deployment cannot reach a normal state and is repeatedly restarted.
- The performance of user-defined scalar functions (UDSFs), user-defined aggregate functions (UDAFs), or user-defined table-valued functions (UDTFs) deteriorates.
- Autopilot cannot identify issues that occur on external systems. If these issues occur, you need to troubleshoot them. When an external system fails or access to the external system requires a long period of time, the parallelism for the deployment increases. This increases the load on the external system. As a result, the external service breaks down.
Precautions
- After Autopilot is triggered for a deployment, the deployment is restarted. During the restart process, the deployment temporarily stops processing data.
- By default, the interval at which Autopilot is triggered is 10 minutes. You can configure the
cooldown.minutesparameter to change the interval. - If your deployment is a DataStream deployment or you write the deployment code by using a custom SQL connector, make sure that the Parallelism parameter is not specified in the deployment code. If the Parallelism parameter is specified, Autopilot does not take effect, and the resources of the deployment cannot be adjusted.
- The interval between the trigger time of the new policy and the existing policy must exceed 30 minutes. Otherwise, the new policy cannot be created.
Default tuning actions of Autopilot
If Autopilot is enabled, the system automatically performs the following operations to tune the resource configurations:
- Adjusts the parallelism for the deployment to meet the deployment throughput requirements. After Autopilot is enabled, the system monitors the delay changes of the source data that is consumed, the actual CPU utilization of TaskManagers, and the data processing capabilities of each operator to adjust the parallelism for the deployment. The system adjusts the parallelism for the deployment based on the following rules:
- If the deployment delay does not exceed the default value of the deployment delay, the system does not modify the parallelism for the deployment. The default value is 60s.
- If the deployment delay exceeds 60s, the system determines whether to increase the parallelism for the deployment based on the following conditions:
- If the deployment delay is decreasing, the system does not adjust the parallelism for the deployment.
- If the deployment delay continuously increases for 3 minutes (default value), the system adjusts the parallelism for the deployment to a value that is twice the processing capacity of the current actual transactions per second (TPS), but not greater than the maximum number of CUs. By default, the maximum number of CUs is 64.
- If the delay metric does not exist for the deployment, the system adjusts the parallelism for the deployment based on the following conditions:
- If the percentage of the data processing time of a vertex node exceeds 80% in six consecutive minutes, the system increases the parallelism for the deployment to reduce the value of slot-utilization to 50%. The number of CUs cannot exceed the specified maximum number of CUs. By default, the maximum number of CUs is 64.
- If the average CPU utilization of all TaskManagers exceeds 80% in six consecutive minutes, the system increases the parallelism for the deployment to reduce the average CPU utilization to 50%.
- If the maximum CPU utilization of all TaskManagers is less than 20% in 24 consecutive hours and the percentage of the data processing time of a vertex node is less than 20%, the system decreases the parallelism for the deployment to increase the CPU utilization and the percentage of the actual data processing time of the vertex node to 50%.
- Monitors the memory usage and failover of the deployment to adjust the memory configurations of the deployment. The system adjusts the memory size of the deployment based on the following rules:
- If the JobManager encounters frequent garbage collections (GCs) or an out of memory (OOM) error, the system increases the memory size of the JobManager. By default, the maximum memory size of the JobManager is 16 GiB.
- If frequent GCs, an OOM error, or a HeartBeatTimeout error occur on a TaskManager, the system increases the memory size of the TaskManager. By default, the maximum memory size of a TaskManager is 16 GiB.
- If the memory usage of a TaskManager exceeds 95%, the system increases the memory size of the TaskManager.
- If the actual memory usage of a TaskManager falls below 30% for 24 consecutive hours, the system decreases the memory size of the TaskManager. By default, the minimum memory size of a TaskManager is 1.6 GiB.
Enable and configure Autopilot
Method 1: Via Resources tab
Log in to Ververica Cloud.
On the Dashboard page, locate the workspace you want to manage, click the title of the workspace or this icon ⋮, and select Open Console.
In the left-side navigation pane, click Deployments.
On the Deployments page, click the name of the desired deployment.
Display the Resources tab.
Click Autopilot Mode.
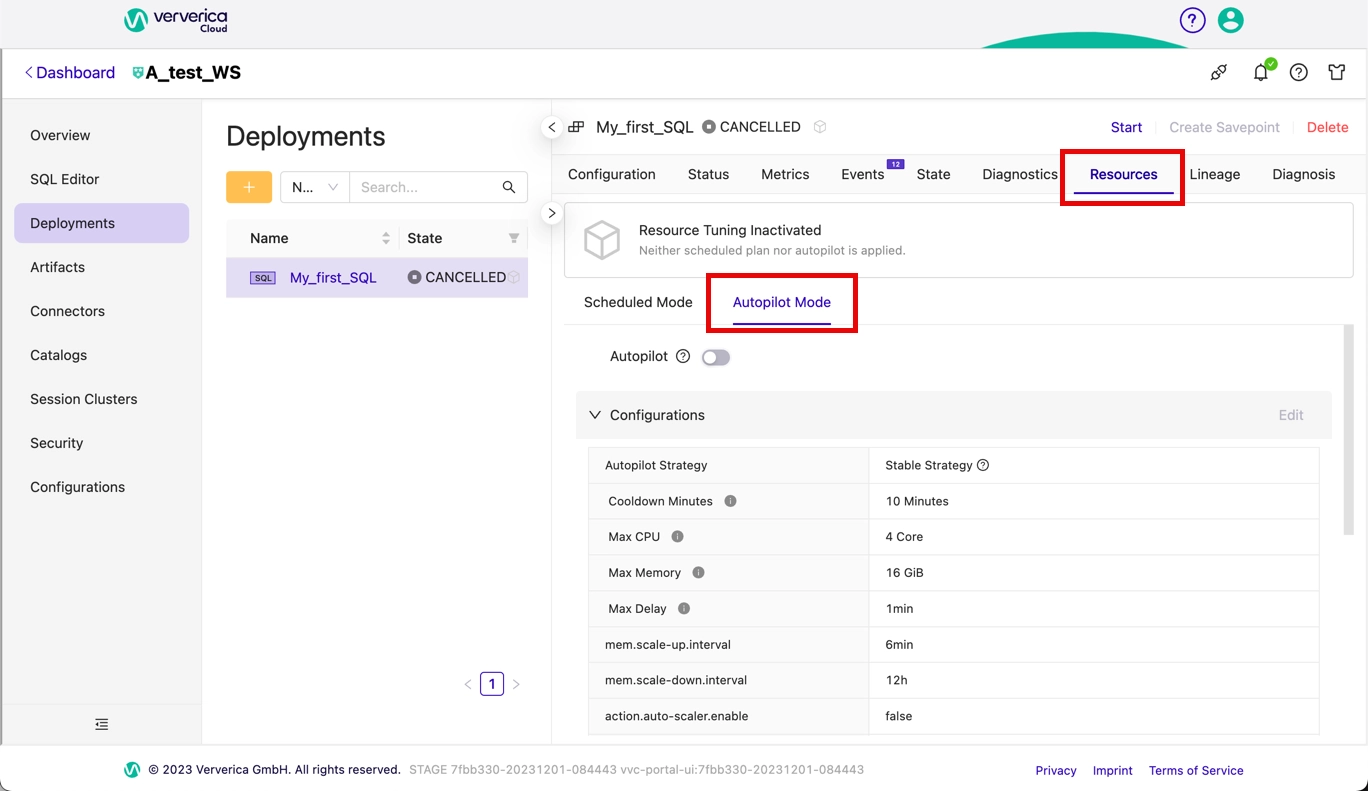
Click to toggle the Autopilot setting to ON.
Click Edit at the top of the Configurations section.
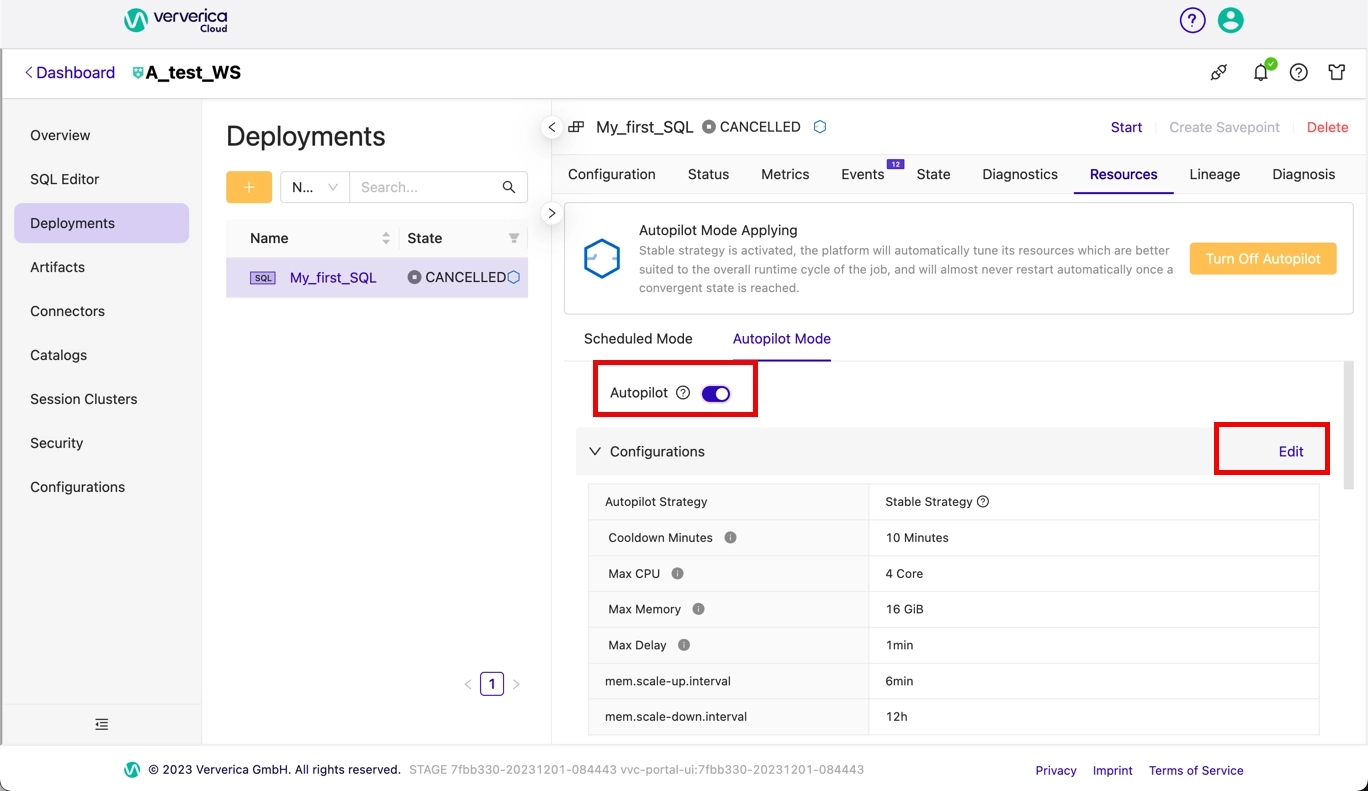
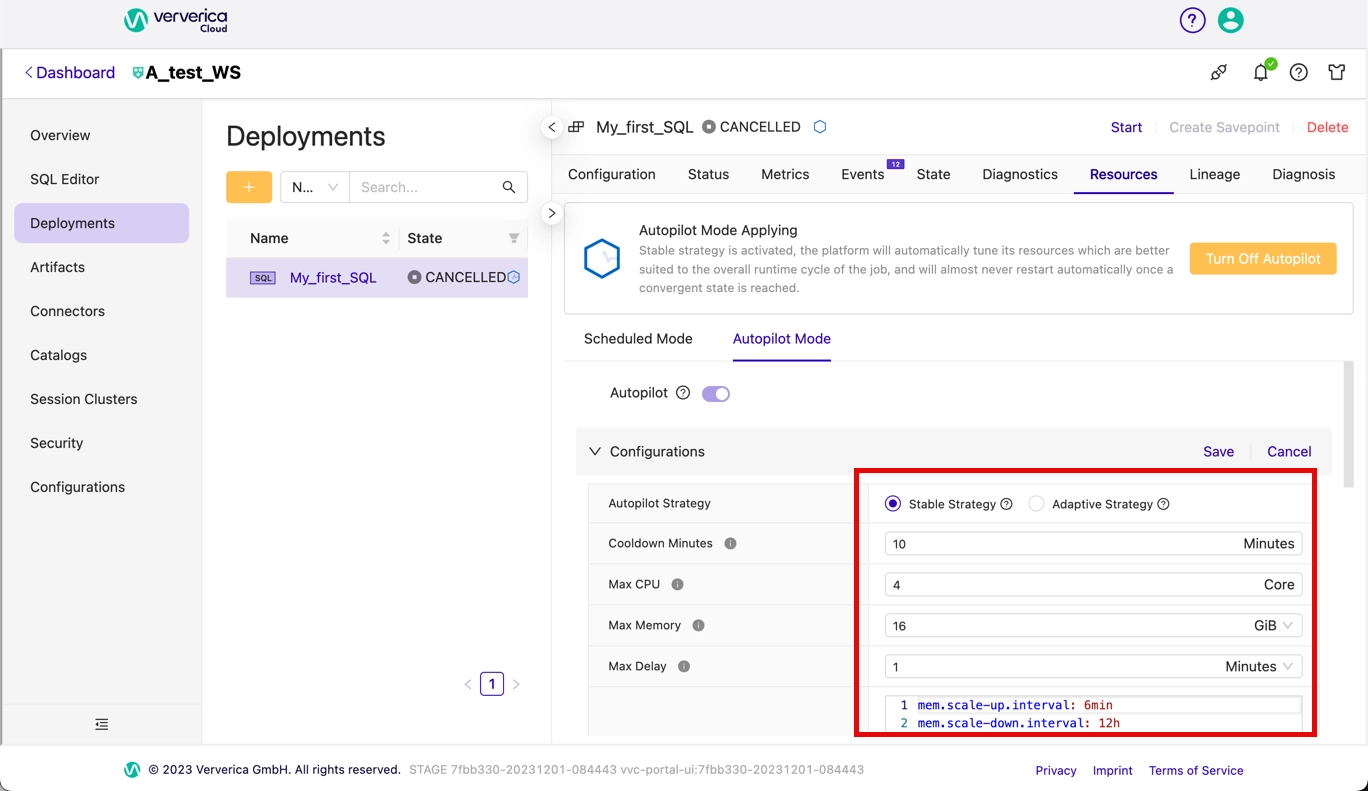
Select one of the following:
- Stable Strategy: The system will reduce the impact of start-stop behaviours on jobs, and will reduce job resources according to the operation of longer-cycle jobs to reach the convergence state as quickly as possible.
- Adaptive Strategy: The system will pay more attention to the latency of the current job, and the application of resources, and optimize the resources more quickly according to the changes of the relevant indicators.
Edit the parameters. See Autopilot-related parameters.
Click Save.
Method 2: When starting a job
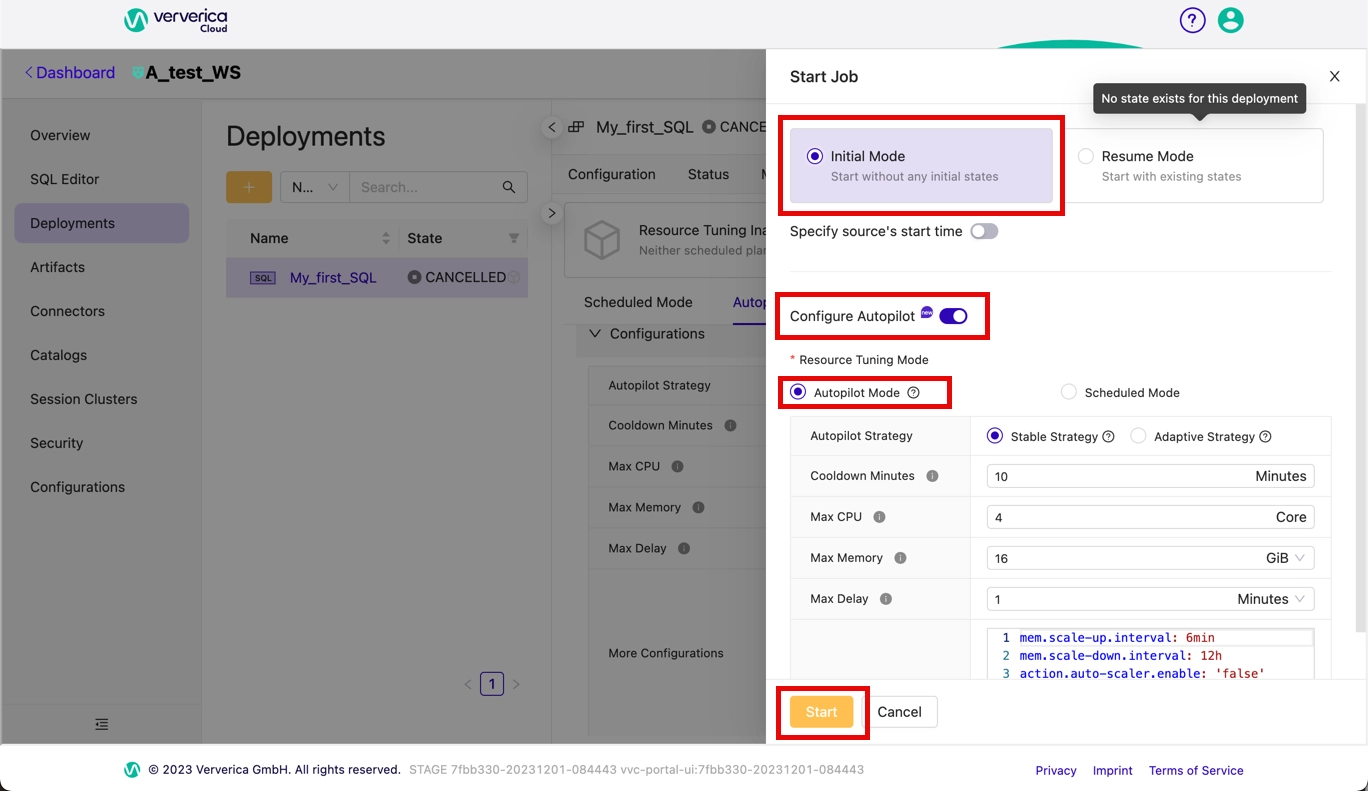
- Log in to Ververica Cloud.
- On the Dashboard page, locate the workspace you want to manage, click the title of the workspace or this icon ⋮, and select Open Console.
- In the left-side navigation pane, click Deployments.
- On the Deployments page, click the name of the desired deployment.
- Click Start at the top right of the Deployments window.
- Specify the job start mode (Initial Mode or Resume Mode). For details, see Procedure.
- Click to toggle Configure Autopilot to ON.
- Set the Resource Tuning Mode to Autopilot Mode.
- Select one of the following:
- Stable Strategy: The system will reduce the impact of start-stop behaviours on jobs, and will reduce job resources according to the operation of longer-cycle jobs to reach the convergence state as quoickly as possible.
- Adaptive Strategy: The system will pay more attention to the latency of the current job, and the application of resources, and optimize the resources more quickly according to the changes of the relevant indicators.
- Edit the parameters. See Autopilot-related parameters.
- Click Start.
Autopilot-related parameters
| Parameter | Description |
|---|---|
| Cooldown Minutes | The time interval at which Autopilot is triggered after a deployment is restarted due to Autopilot. |
| Max CU | The maximum number of CUs that can be allocated to a deployment. Unit: CUs. |
| mem.scale-down.interval | The minimum interval at which Autopilot is triggered when the memory size is decreased. Default value: 24. Unit: hours. The system checks the CPU utilization of the deployment at an interval of 24 hours. If the memory usage is less than the specified threshold, the system decreases the memory size or provides a recommendation for decreasing the memory size. |
| parallelism.scale.max | The maximum parallelism when the value of the Parallelism parameter is increased. Default value: -1. This value indicates that the maximum parallelism is not limited. |
| parallelism.scale.min | The minimum parallelism when the value of the Parallelism parameter is decreased. Default value: 1. This value indicates that the minimum parallelism is 1. |
| delay-detector.scale-up.threshold | The maximum delay that is allowed. The throughput of the deployment is measured based on the delay of source data consumption. Default value: 1. Unit: minutes. If the data processing capability is insufficient and the data processing delay is longer than 1 minute, the system performs the scale-up operation to increase the throughput of the deployment or the system provides a recommendation for performing the scale-up operation. The system can increase the parallelism or split chains to perform the scale-up operation. |
| slot-usage-detector.scale-up.threshold | If the percentage of the data processing time of a vertex node is greater than the value of this parameter, the parallelism for the deployment is increased. Default value: 0.8. The idle time of data processing nodes is monitored. The idle time of source nodes is not monitored. If the percentage of the data processing time is consecutively greater than 0.8, the parallelism for the deployment is decreased to reduce the resource utilization or the system provides a recommendation for performing the scale-up operation. |
| slot-usage-detector.scale-down.threshold | If the percentage of the data processing time of a vertex node is greater than the value of this parameter, the parallelism for the deployment is decreased. Default value: 0.2. The idle time of data processing nodes is monitored. The idle time of source nodes is not monitored. If the percentage of the data processing time is consecutively less than 0.2, the parallelism for the deployment is increased to improve the resource utilization or the system provides a recommendation for performing the scale-down operation. |
| slot-usage-detector.scale-up.sample-interval | The interval at which the slot idle metric is monitored. This parameter can be used to calculate the average value of the idle time. Default value: 3 minutes. This parameter takes effect together with the slot-usage-detector.scale-up.threshold and slot-usage-detector.scale-down.threshold parameters. If the average value of the idle time in a 3-minute period is greater than 0.8, the scale-up operation is performed. If the average value of the idle time in a 3-minute period is less than 0.2, the scale-down operation is performed. |
| resources.memory-scale-up.max | The maximum memory size of a TaskManager and the JobManager. Default value: 16. Unit: GiB. When the system automatically tunes the resource configuration or increases the parallelism for a TaskManager or the JobManager, the maximum memory size is 16 GiB. |
Run a deployment using Scheduled Mode
Instead of using Autopilot Mode, you can set up your own scheduled plans to run deployments at specific times, with specific tuning parameters.
In order to schedule a deployment, at least one scheduled plan must exist. You can create one or more scheduled plans before applying one to a job. These plans are then available to select when you start a deployment.
Create a plan
Once you have scheduled one or more scheduled plans, they apply to all the running jobs under that deployment.
- In the Ververica Cloud console, display the Deployments > Resources tab.
- Click Scheduled Mode.
- In the Resource Plans section, click New Plan.
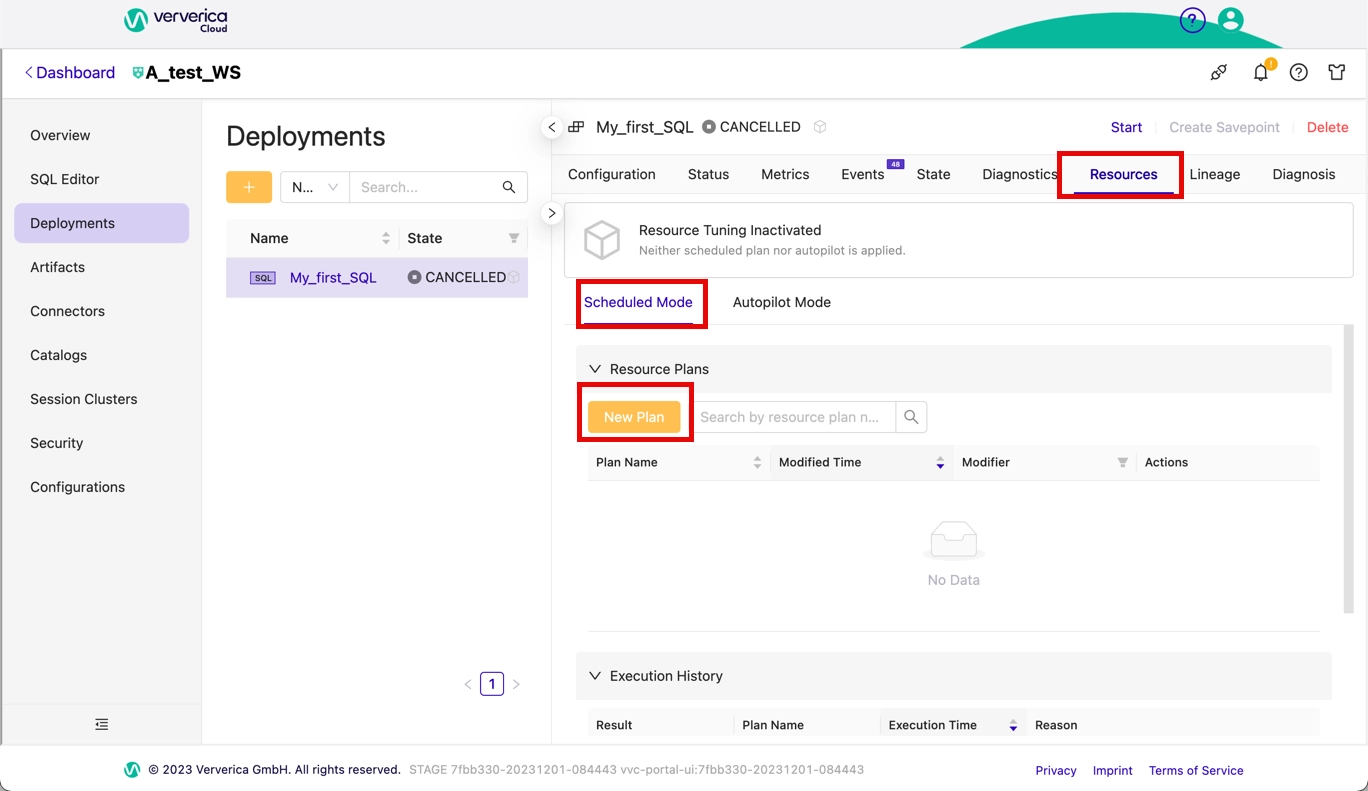
- Enter a Plan Name and configure the parameters:

- Trigger Period: Valid values: No Repeat, Every Day, Every Week, and Every Month. If you set this parameter to Every Week or Every Month, you must specify the related time range during which you want the policy to take effect.
- Trigger Time: The time when the plan takes effect.
- For other parameter descriptions, see Resources and Parameters.
- (Optional) Scroll down and click New Resource Setting Period below the Resource Setting panel and create another set of parameters to control the schedule (e.g. another time period).
- Click OK.
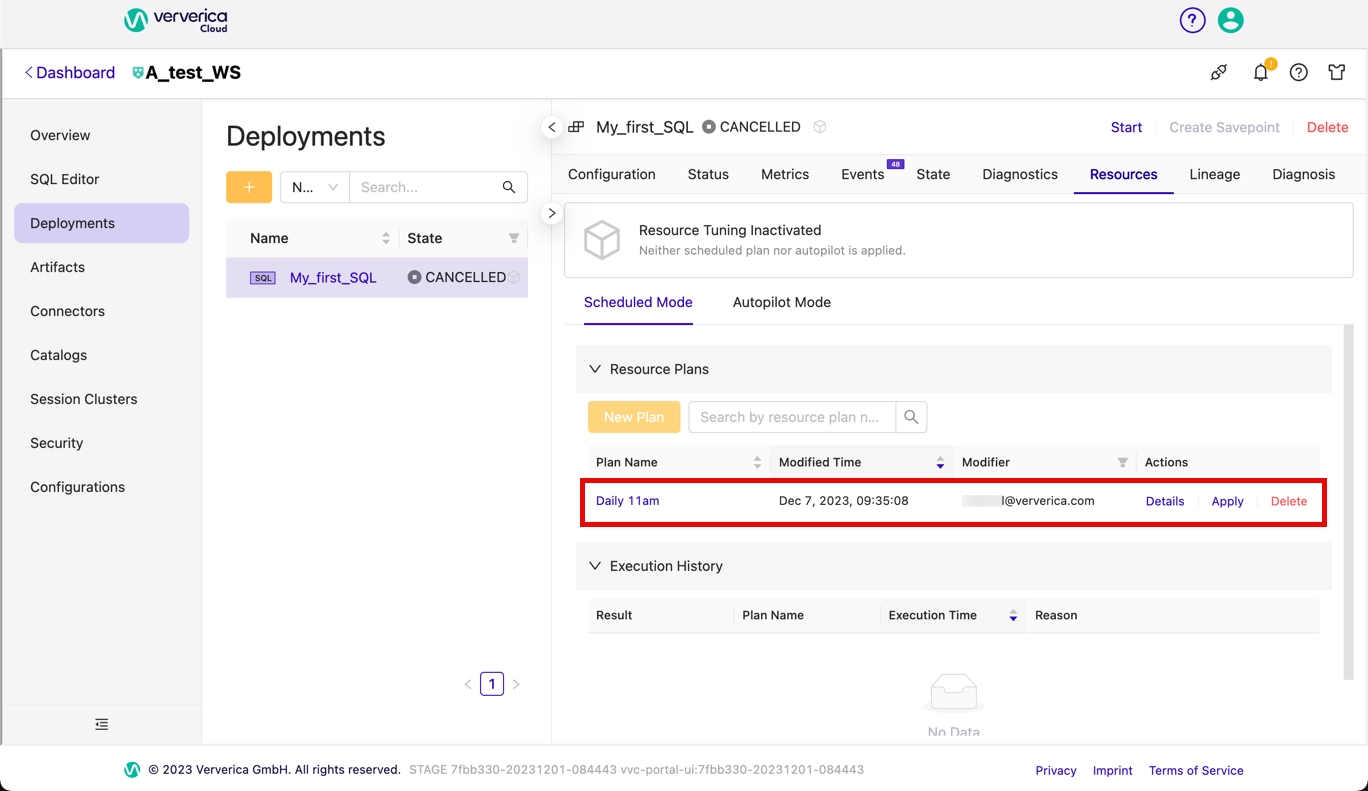
The plan will be saved and listed in the Resource Plans section.
Start a job using a scheduled plan
To start a job using a scheduled plan:
- Click on the deployment you want to start in the Deployments window.
- Click Start in the Deployments toolbar.note
There must be at least one saved plan available to apply at startup.
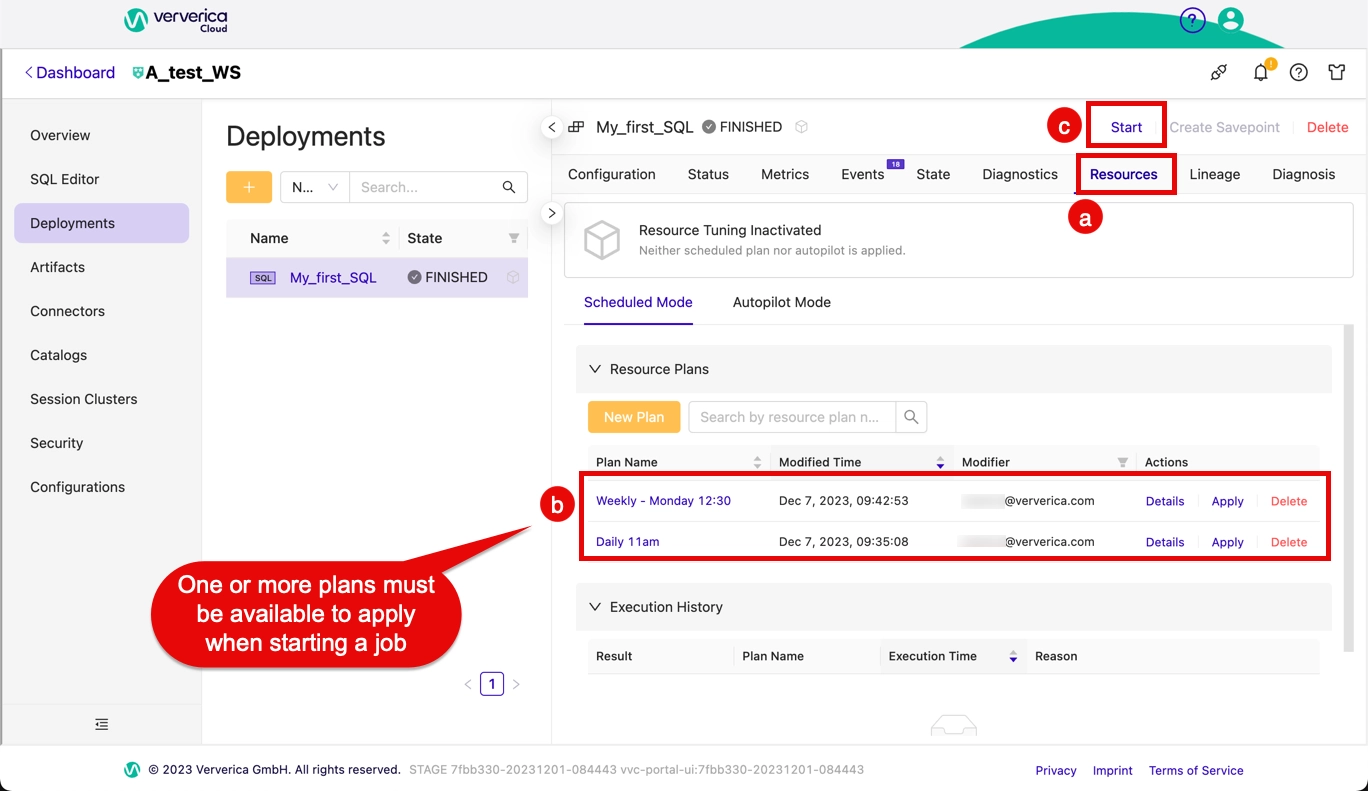
- In the Start Job dialog, set the mode (Initial or Resume).
- Specify a start time, if appropriate.
- Click to set Configure Autopilot to ON.
- Set the Resource Tuning Mode to Scheduled Mode.
- Select a scheduled plan from the drop-down menu.
 note
noteIf no scheduled plans are available, or if you want to create another one, you can choose Create new scheduled plan, but this will take you back to the main Resources window and you will need to follow the instructions in Create a scheduled plan.
- Click Start.
The job will start with the specified scheduled plan.
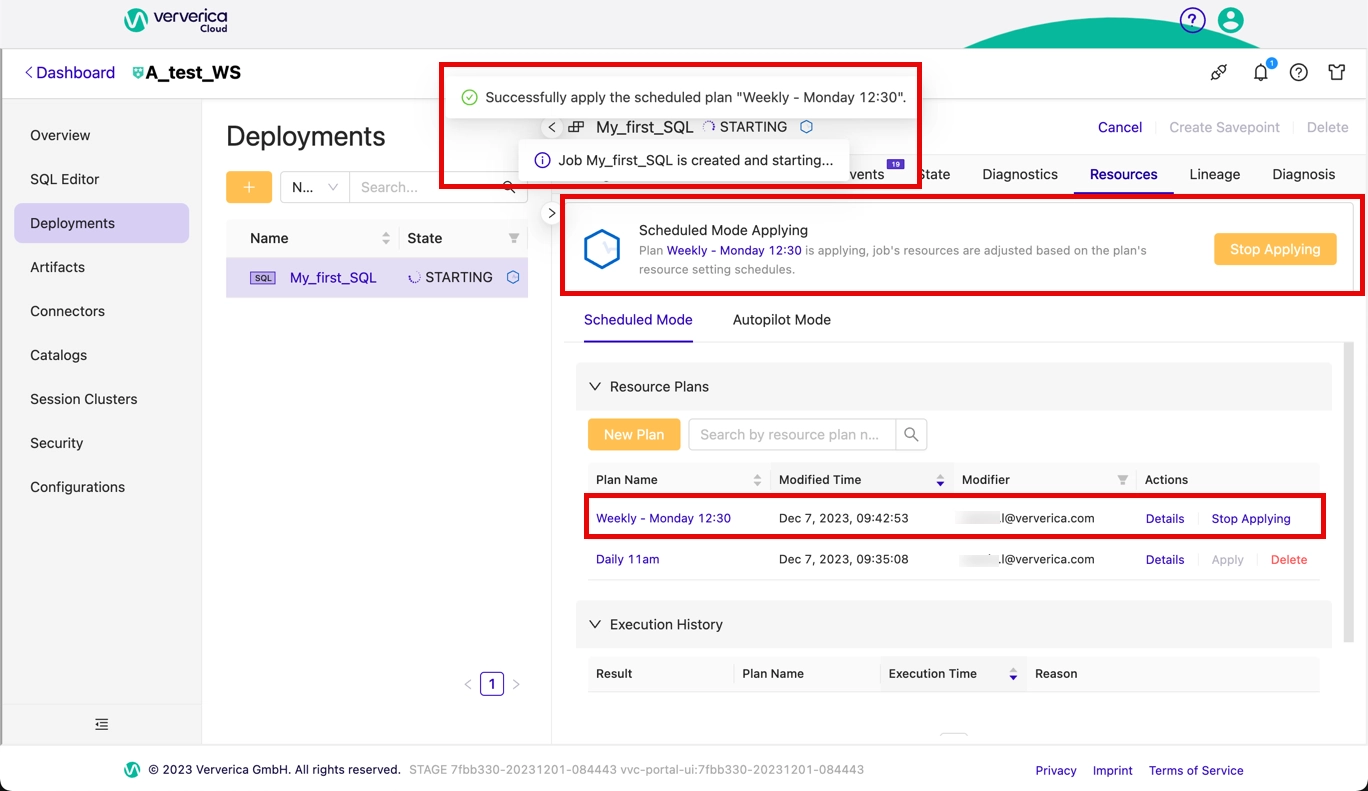
Change the applied plan
You can change the scheduled plan that applies to the currently running job.
This might cause the job to restart.
- In the Deployments > Resources tab, locate the entry for the scheduled plan that is applied to the running job.
- Click Stop Applying:
- You can click Stop Applying next to the scheduled plan entry in the Resource Plans list.
- You can click the main Stop Applying button near the top of the Resources tab.This is useful if you have many scheduled plans defined and can't easily see the one you want in the Resource Plans list.
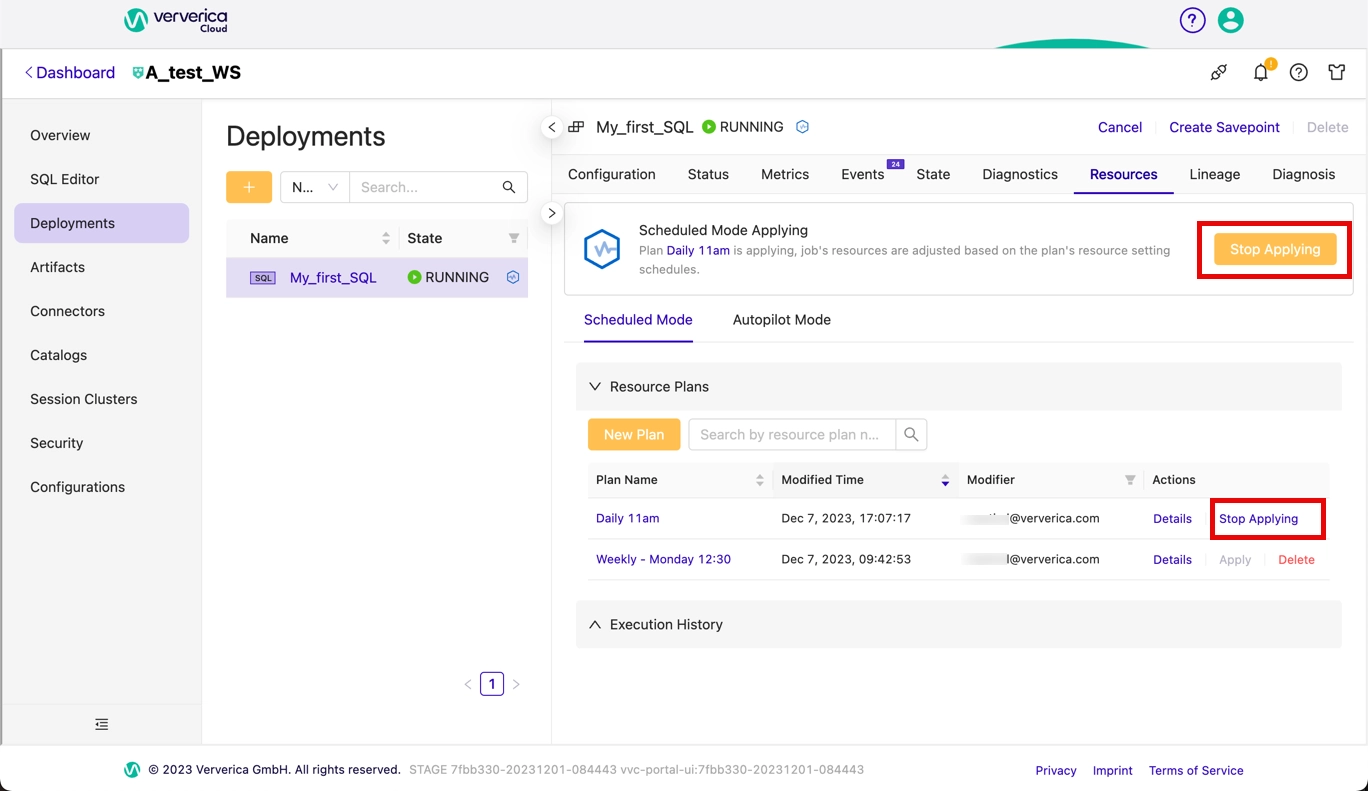
- Click Apply next to the new scheduled plan.
Edit an existing plan
- You cannot edit the name of an existing plan. You would need to delete the plan and recreate it with a new name, or just create a new plan.
- You cannot edit the details of a plan that is currently applied to a running job
To edit the details of an existing scheduled plan:
- Display the Deployments > Resources tab.
- Click on the name of the scheduled plan, or on Details, in the Resource Plans table.
- Click Edit at the top of the resulting plan screen.
- Change the parameters.
- Click Save.
Delete a plan
You cannot delete a plan that is currently applied to a running job.
To delete a saved plan:
- In the Deployments > Resources tab, locate the entry for the scheduled plan that you want to delete.
- Click Delete next to the plan's entry.
- Click OK to confirm.